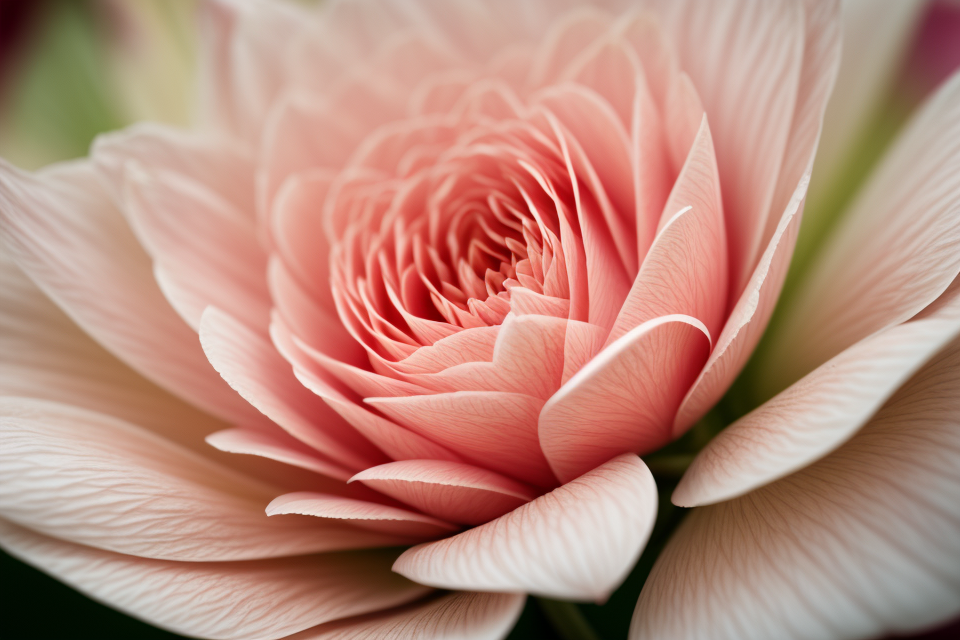
Macro photography is an exciting and rewarding genre that allows photographers to capture stunning details of small subjects. But to truly master this art form, it’s important to understand the basic rules that govern it. In this comprehensive guide, we’ll explore the essential rules and techniques for macro photography, from focus and lighting to composition and subject selection. Whether you’re a seasoned pro or just starting out, this guide will help you take your macro photography to the next level. So, let’s dive in and discover the secrets of this fascinating and captivating field!
Understanding Macro Photography
What is Macro Photography?
Macro photography is a specialized form of photography that involves capturing close-up images of small objects or subjects. Unlike traditional photography, which focuses on capturing images from a distance, macro photography involves getting up close and personal with the subject matter.
In macro photography, the photographer uses a specialized lens, typically a macro lens, to capture images that are life-size or larger than life-size. This means that the photographer can capture details that would otherwise be invisible to the naked eye.
Macro photography is used in a variety of contexts, including scientific research, product photography, and fine art. It requires careful attention to detail, a keen eye for composition, and a willingness to experiment with different techniques and equipment.
One of the key challenges of macro photography is managing depth of field. Because the subject is so close to the camera, even small movements can cause blurry images. Macro photographers must use a tripod to keep the camera steady and use a shallow depth of field to keep the subject in focus.
Another challenge of macro photography is managing lighting. Because the subject is so close to the camera, even small variations in lighting can cause significant changes in the final image. Macro photographers must use diffused light sources and carefully adjust the lighting to achieve the desired effect.
Despite these challenges, macro photography is a rewarding and fascinating art form. By capturing the smallest details of the world around us, macro photographers can reveal a hidden universe of beauty and complexity. Whether you are a professional photographer or a hobbyist, the world of macro photography is waiting to be explored.
The Importance of Lighting in Macro Photography
Proper lighting is a critical element in macro photography. It is responsible for illuminating the subject and creating the desired mood and atmosphere. In this section, we will discuss the importance of lighting in macro photography and the various techniques that can be used to achieve the desired results.
- The role of lighting in macro photography
- Lighting is essential in macro photography as it helps to highlight the intricate details and textures of the subject. It also helps to create a sense of depth and dimension, which is particularly important when photographing small objects.
- The type of lighting used will depend on the subject matter and the desired effect. For example, soft lighting can be used to create a gentle, natural look, while harsh lighting can be used to create dramatic contrasts and shadows.
- Types of lighting in macro photography
- Natural lighting: This is the most traditional form of lighting in macro photography. It is achieved by positioning the subject near a window or outside on a sunny day. Natural lighting is often used to create a soft, natural look and can be used to highlight the colors and textures of the subject.
- Artificial lighting: Artificial lighting is often used when natural lighting is not available or when a specific effect is desired. There are several types of artificial lighting that can be used in macro photography, including LED lights, flash, and strobes.
- Ring lights: Ring lights are a popular choice for macro photography as they provide even, circular lighting that is ideal for highlighting small objects. They are also easy to set up and can be adjusted to provide soft or harsh lighting depending on the desired effect.
- Tips for using lighting in macro photography
- Experiment with different lighting setups to find the one that works best for your subject and desired effect.
- Pay attention to the quality of light, such as its intensity, direction, and color, as this can have a significant impact on the final image.
- Consider the time of day and the weather conditions when shooting outdoors, as these factors can affect the quality of the light.
- Use a tripod to keep the camera steady and avoid camera shake, which can be particularly important when using long exposures or low light.
- Be mindful of the background and how it is lit, as this can affect the overall composition of the image.
The Art of Composition in Macro Photography
- Framing the Subject
- Using the Rule of Thirds
- Balancing Elements
- Negative Space
- Leading Lines
- Using Lines to Lead the Eye
- Symmetry and Asymmetry
- Depth of Field
- Choosing the Right Aperture
- Focusing on the Right Elements
- Playing with Light
- Shadows and Highlights
- Soft Light and Hard Light
- Color Theory
- Contrast and Harmony
- Using Complementary Colors
- Symmetry and Patterns
- Finding Balance
- Creating Visual Interest
- Experimenting with Angles
- Shooting from Different Perspectives
- Creating Dynamic Images
- Focusing on Textures
- Capturing the Fine Details
- Creating Abstract Images
- The Importance of Post-Processing
- Enhancing the Colors
- Adjusting the Contrast
- Removing Distractions
- Understanding the Limitations
- Dealing with Camera Shake
- Managing Depth of Field
- Overcoming Limited Light
- Inspiration and Practice
- Looking at Macro Photography Portfolios
- Taking Your Time to Practice
- Learning from Critiques and Feedback
Choosing the Right Equipment for Macro Photography
When it comes to macro photography, the right equipment is crucial to achieving the desired results. In this section, we will discuss the essential equipment needed for macro photography and provide tips on how to choose the right equipment for your needs.
Types of Equipment
- Camera: A DSLR or mirrorless camera with manual controls is ideal for macro photography. This allows you to adjust settings such as aperture, shutter speed, and ISO to achieve the desired effect.
- Lens: A macro lens is essential for macro photography. These lenses are designed to capture images at a 1:1 magnification ratio, which means that the subject is life-sized on the camera sensor. Some lenses are also designed to focus at a closer distance, which is crucial for capturing small subjects.
- Tripod: A tripod is recommended for macro photography, as it helps to stabilize the camera and keep the subject in focus. This is especially important when shooting at close distances and using a shallow depth of field.
- Flash: A flash unit can be used to add light to the subject and enhance contrast. It can also be used to freeze motion in subjects that are sensitive to light.
- Extension tubes: Extension tubes are a cost-effective way to achieve macro magnification without purchasing a dedicated macro lens. They fit between the camera body and lens and allow for closer focusing.
Choosing the Right Equipment
- Budget: Determine your budget for equipment and look for options that fit within your price range.
- Magnification ratio: Consider the magnification ratio of the equipment you are purchasing. The higher the magnification ratio, the closer you can get to the subject.
- Compatibility: Make sure that the equipment you choose is compatible with your camera system.
- Size and weight: Consider the size and weight of the equipment, especially if you plan to take it on trips or shoot in remote locations.
- Features: Look for features such as image stabilization, weather sealing, and autofocus points that can enhance your macro photography experience.
In conclusion, choosing the right equipment for macro photography is essential for achieving the desired results. Consider your budget, magnification ratio, compatibility, size and weight, and features when selecting equipment for your macro photography needs.
Macro Photography Techniques
Focusing in Macro Photography
Focus is crucial in macro photography as it determines the sharpness and clarity of the subject. The following are some essential rules and techniques for focusing in macro photography:
- Manual Focus: Macro photography requires manual focus as auto-focus systems often struggle to accurately focus on small subjects. Use a tripod or other stabilizing device to ensure the camera remains steady while manually focusing.
- Single Sharp Point: To achieve a sharp, professional look, focus on a single point of the subject. This can be achieved by selecting a single autofocus point or manually adjusting the focus until the desired point is sharp.
- Deep Focus: When photographing small subjects, it can be challenging to get the entire subject in focus. Use a deep focus technique by adjusting the focus to the nearest point of the subject and gradually moving the focus to the farthest point. This will create a more pleasing, in-focus background and foreground.
- Focus Stacking: Focus stacking is a technique where multiple images are taken at different focus points and combined in post-processing to create a final image with a deep depth of field. This technique is useful when photographing subjects with high contrast or when a shallow depth of field is not desired.
- Magnification: Magnification can help when focusing on small subjects. Use a magnifier or a loupe to help with precise focusing.
- Hyperfocal Distance: Hyperfocal distance is a technique that allows for a larger depth of field, keeping both the foreground and background in focus. This technique is useful when photographing small subjects in a broader environment.
- Pre-focusing: Pre-focusing is a technique where the camera is focused on a point before the subject arrives. This technique is useful when photographing small subjects that move quickly or unpredictably.
By following these rules and techniques, you can achieve sharp, clear, and professional macro photographs.
Aperture and Depth of Field in Macro Photography
Aperture and depth of field are essential concepts in macro photography. They determine the amount of the image that appears in focus and how much of the background is visible. Here are some rules to consider when working with aperture and depth of field in macro photography:
- Shooting with a shallow depth of field: Macro photography often involves shooting close-up shots of small subjects. Shooting with a shallow depth of field can help isolate the subject from the background and create a more dramatic effect. This can be achieved by using a large aperture, such as f/2.8 or wider. However, it’s important to note that using a shallow depth of field can also make it more difficult to keep the subject in focus, so careful focusing is necessary.
- Controlling depth of field: Aperture is not the only way to control depth of field in macro photography. Other techniques include using a longer focal length, moving closer to the subject, or using a smaller aperture. It’s important to experiment with different techniques to find the best approach for each shot.
- Considering the background: The background can be an important element in macro photography. A shallow depth of field can help blur the background and create a more dramatic effect, but it can also make it more difficult to keep the subject in focus. It’s important to consider the background and how it will affect the final image. If the background is distracting or uninteresting, it may be worth considering using a smaller aperture or moving further away from the subject to increase the depth of field and keep more of the background in focus.
- Experimenting with different apertures: Experimenting with different apertures is an important part of macro photography. A larger aperture can create a more dramatic effect, while a smaller aperture can keep more of the background in focus. It’s important to experiment with different apertures and see how they affect the final image.
Shutter Speed and Motion in Macro Photography
Macro photography is all about capturing intricate details and textures that are often overlooked by the naked eye. However, one of the challenges of macro photography is controlling motion, especially when photographing moving subjects. This is where shutter speed comes into play.
- Controlling Motion with Shutter Speed
Shutter speed is the length of time that the camera’s shutter is open, and it is one of the most important factors in controlling motion in macro photography. By using a slower shutter speed, you can capture moving subjects without freezing them, creating a sense of motion in the image. On the other hand, using a faster shutter speed will freeze the subject, capturing it in sharp detail. - Choosing the Right Shutter Speed
Choosing the right shutter speed depends on the subject and the effect you want to achieve. For example, if you are photographing a butterfly in flight, you will need to use a faster shutter speed to freeze the motion and capture the butterfly in sharp detail. On the other hand, if you are photographing a flowing stream, you can use a slower shutter speed to capture the movement and create a sense of motion in the image. - Experimenting with Shutter Speed
Experimenting with shutter speed is an essential part of macro photography. Try using different shutter speeds to see how it affects the final image. You can also try panning, a technique where you move the camera in the same direction as the subject, to create a sense of motion and blur the background. - Aperture and Motion
Aperture is another important factor in controlling motion in macro photography. A wider aperture will allow more light into the camera, which can be useful when photographing moving subjects in low light conditions. However, a wider aperture can also create a shallower depth of field, which can make it more difficult to capture sharp details of moving subjects. - Other Techniques for Controlling Motion
There are other techniques that can help you control motion in macro photography, such as using a tripod or monopod to stabilize the camera, and using a remote shutter release to minimize camera shake. By combining these techniques with the right shutter speed, you can create stunning images that capture the intricate details and textures of the macro world.
Using Reflectors and Light Modifiers in Macro Photography
Effective lighting is crucial for achieving stunning results in macro photography. While natural light can provide beautiful illumination, it’s not always available or consistent. In such cases, reflectors and light modifiers can be used to enhance and control the light in your images. Here’s how to make the most of these tools:
- Choose the right reflector: Reflectors come in various shapes and sizes, and each has its own benefits. For macro photography, a 5-in-1 reflector is a popular choice. It has five surfaces with different textures that can be used to create different effects. The white surface is ideal for filling in shadows, while the silver surface is great for adding contrast and drama. The gold surface is useful for adding warmth to the light, and the black surface can be used to block light.
- Position the reflector correctly: To use a reflector effectively, it’s essential to position it correctly. The angle and distance of the reflector from the subject will depend on the desired effect. Generally, a reflector should be positioned at a 45-degree angle from the light source to achieve the best results.
- Use light modifiers: Light modifiers are tools that alter the shape and quality of light. They can be used to soften harsh light or create a specific effect. Some popular light modifiers for macro photography include softboxes, diffusers, and snoots. Softboxes are great for creating a soft, even light, while diffusers can be used to spread the light more broadly. Snoots are useful for focusing light on a specific area of the subject.
- Experiment with lighting: Macro photography allows for a lot of creative freedom, and experimenting with lighting is an excellent way to achieve unique results. Try different combinations of reflectors and light modifiers to see what works best for your subject and the mood you want to create.
By using reflectors and light modifiers, you can achieve a higher level of control over the light in your macro photographs. With practice and experimentation, you’ll be able to create stunning images that showcase the intricate details of your subjects.
Post-Processing Tips for Macro Photography
Macro photography, with its emphasis on the intricate details of small subjects, requires careful consideration of post-processing techniques to bring out the best in your images. Here are some essential tips for post-processing your macro photographs:
- Adjust Exposure: Often, macro photographs require adjustments to exposure to bring out the best details in the image. Overexposure can help bring out more detail in the shadows, while underexposure can help prevent blown highlights. Use the histogram and blinkies in your photo editing software to help guide your exposure adjustments.
- Sharpen the Image: Macro photographs often require additional sharpening to bring out the fine details in the image. Use a sharpening tool or a plugin to enhance the sharpness of your image.
- Color Correction: Macro photographs often require color correction to bring out the true colors of the subject. Adjust the color temperature, saturation, and hue to bring out the best in your image.
- Noise Reduction: Macro photographs often require noise reduction to reduce the appearance of digital noise in the image. Use a noise reduction tool or plugin to reduce the noise in your image.
- Cropping: Macro photographs often require cropping to frame the subject correctly and remove distractions from the image. Use the crop tool in your photo editing software to fine-tune the composition of your image.
- Adding Contrast: Macro photographs often require added contrast to bring out the fine details in the image. Use a contrast tool or plugin to enhance the contrast of your image.
- Removing Blemishes: Macro photographs often require removal of blemishes and imperfections in the image. Use a healing brush or clone tool to remove blemishes and imperfections in your image.
- Adding Detail: Macro photographs often require adding detail to bring out the intricate details of the subject. Use a detail tool or plugin to add detail to your image.
- Adding Vibrance: Macro photographs often require adding vibrance to bring out the rich colors of the subject. Use a vibrance tool or plugin to add vibrance to your image.
- Final Adjustments: Finally, make any final adjustments to your image, such as adjusting the brightness and contrast, adding a filter, or adjusting the saturation. Make sure the image looks its best before saving it.
By following these post-processing tips, you can bring out the best in your macro photographs and create stunning images that showcase the intricate details of your subjects.
Common Macro Photography Mistakes
Overusing Flash in Macro Photography
Overusing flash in macro photography is a common mistake that can lead to harsh and unnatural-looking images. While flash can be a useful tool for macro photography, it should be used sparingly and with caution. Here are some rules to keep in mind when using flash in macro photography:
- Avoid using flash as the primary light source. Instead, try to use natural light or ambient light as the main light source and use flash as a fill light to add a little extra light to shadows.
- Be mindful of the distance between the flash and the subject. If the flash is too close to the subject, it can create harsh shadows and highlights. Try to position the flash at a distance from the subject that is at least the length of the lens being used.
- Use a diffuser or softbox to soften the light from the flash. This will help to create a more natural and flattering light on the subject.
- Be aware of the angle of the flash. If the flash is positioned at an angle, it can create uneven lighting and shadows on the subject. Try to position the flash so that it is pointing directly at the subject.
- Use a low power setting on the flash to avoid overpowering the ambient light. A good starting point is to use a power setting of 1/4 or 1/2.
By following these rules, you can avoid overusing flash in macro photography and create more natural and flattering images.
Ignoring the Background in Macro Photography
Ignoring the background in macro photography is a common mistake that many photographers make. The background can be distracting and take away from the subject of the photograph. Here are some tips to help you avoid this mistake:
- Look for a plain or simple background: A plain or simple background can help draw attention to the subject of the photograph. Look for a background that is not too busy or distracting.
- Use a shallow depth of field: A shallow depth of field can help blur the background and draw attention to the subject. Use a wide aperture to achieve a shallow depth of field.
- Move the subject: If the background is too distracting, try moving the subject to a different location. This can help isolate the subject from the background.
- Use a lens hood: A lens hood can help reduce the amount of light that enters the lens from the sides, which can help create a more pleasing background.
- Consider the perspective: The perspective of the photograph can also affect the background. Try shooting from a low angle or using a wide-angle lens to create a more interesting background.
By following these tips, you can avoid ignoring the background in macro photography and create photographs that are more visually appealing and engaging.
Focusing on the Wrong Parts of the Subject in Macro Photography
One of the most common mistakes made in macro photography is focusing on the wrong parts of the subject. It’s important to remember that in macro photography, every detail of the subject is important, and the viewer’s eye is drawn to the most sharply focused part of the image. Therefore, it’s essential to carefully consider where to focus when composing a macro shot.
- Avoid focusing on uninteresting or unimportant parts of the subject, such as a background or an insignificant texture. Instead, try to find the most visually interesting parts of the subject and focus on those.
- Pay attention to the depth of field and how it affects the sharpness of different parts of the image. A shallow depth of field can be used to create a pleasingly blurred background, while a deeper depth of field can be used to keep more of the subject in focus.
- Consider the lighting when deciding where to focus. Strong contrasts of light and shadow can add interest to an image, but they can also make it difficult to determine where to focus.
- Finally, don’t be afraid to experiment with different focusing techniques, such as focusing and recomposing or using a focus stacking technique, to achieve the desired results.
By paying attention to these rules, you can avoid the mistake of focusing on the wrong parts of the subject in macro photography and create images that are visually appealing and impactful.
Poor Lighting Setup in Macro Photography
One of the most common mistakes in macro photography is a poor lighting setup. In order to capture stunning and detailed images, it is crucial to understand the importance of lighting in macro photography. Here are some key points to consider when setting up your lighting for macro photography:
- Lighting Angle: The angle of the light source is critical in macro photography. Lighting should be placed at a low angle to create a dramatic and dark background, which helps to create a sense of depth and draw attention to the subject. A side lighting setup can also be used to create a sense of texture and form in the image.
- Shadows: Shadows can be used to add depth and interest to an image. However, it is important to avoid heavy shadows that can cause a loss of detail in the subject. This can be achieved by using a reflector or a second light source to fill in any shadows.
- Light Intensity: The intensity of the light source is also important in macro photography. The light source should be intense enough to create a sharp and detailed image, but not so intense that it causes overexposure or loss of detail in the subject.
- Color Temperature: The color temperature of the light source can also affect the mood and feel of the image. A cooler color temperature can create a more dramatic and moody image, while a warmer color temperature can create a more natural and inviting feel.
- Background: The background of the image can also be affected by the lighting setup. A dark and blurred background can help to draw attention to the subject, while a bright and distracting background can take away from the subject.
By paying close attention to these key points, you can create a lighting setup that enhances the beauty and intricacy of your macro subjects.
Lack of Attention to Composition in Macro Photography
While the intricate details of a subject are the primary focus of macro photography, it is essential to pay close attention to composition as well. Composition is the arrangement of visual elements in a photograph, and it plays a crucial role in creating an aesthetically pleasing image.
Lack of Framing
One common mistake that many macro photographers make is a lack of attention to framing. Framing refers to the way in which the subject is placed within the frame of the photograph. It is important to consider the rule of thirds, which suggests that the subject should be placed at one of the intersection points of the grid formed by the horizontal and vertical lines of the frame. This creates a more dynamic and visually pleasing composition.
Overemphasis on Detail
Another mistake that can be made in macro photography is an overemphasis on detail at the expense of composition. While the intricate details of a subject are certainly the focus of macro photography, it is important to remember that these details should be placed within a larger context. This context can include the surrounding environment, the overall shape and form of the subject, and the relationships between different elements within the frame.
Inconsistent Focus
Inconsistent focus can also be a problem in macro photography. When shooting macro, it is often necessary to use a shallow depth of field in order to achieve a pleasing bokeh effect. However, this can sometimes result in an inconsistent focus, with some elements of the image being sharp and others being blurry. To avoid this, it is important to carefully select the point of focus and use a tripod to ensure that the camera is stable and able to maintain a consistent focus throughout the shot.
By paying close attention to composition in macro photography, it is possible to create images that are not only technically proficient but also aesthetically pleasing and emotionally engaging. Whether you are photographing a small flower or a detailed object, the key to success in macro photography is to think about the larger context in which the subject is placed, and to use composition to create a visually pleasing and cohesive image.
Macro Photography Tips and Tricks
Tips for Capturing Sharp Images in Macro Photography
In macro photography, capturing sharp images is essential to produce high-quality photos. Here are some tips to help you achieve this:
- Use a tripod
- Use a cable release or remote shutter
- Use live view mode
- Focus stacking
- Proper exposure settings
-
Post-processing
-
Use a tripod:
One of the most important tips for capturing sharp images in macro photography is to use a tripod. A tripod helps to stabilize the camera and reduce camera shake, which can cause blurry images. Using a tripod allows you to take your time and make adjustments to your camera settings without worrying about holding the camera still. - Use a cable release or remote shutter:
Using a cable release or remote shutter is another way to minimize camera shake and ensure sharp images. A cable release allows you to trigger the camera’s shutter without touching it, reducing the risk of camera shake. A remote shutter is an alternative option that works wirelessly, and it’s particularly useful when you’re working with long exposures. - Use live view mode:
Live view mode allows you to see the image on the camera’s LCD screen and make adjustments to your composition and focus. It’s especially useful when working with a tripod, as it allows you to ensure that your camera is level and that your image is perfectly framed. - Focus stacking:
Focus stacking is a technique that involves taking multiple photos of the same subject at different focus points and then combining them in post-processing to create a single image with a range of focus. This technique is particularly useful when photographing subjects with a lot of detail, such as insects or flowers. - Proper exposure settings:
Proper exposure settings are also essential for capturing sharp images in macro photography. Make sure to use a narrow aperture to ensure that as much of the subject is in focus as possible. You may also want to use a higher ISO to increase the shutter speed and reduce camera shake. - Post-processing:
Finally, post-processing can help to improve the sharpness of your images. Use software such as Adobe Photoshop to sharpen your images and reduce noise. However, be careful not to overdo it, as too much sharpening can make the image look unnatural.
Using Foreground Elements to Create Interest in Macro Photography
When it comes to macro photography, the foreground elements can play a crucial role in creating a compelling image. Here are some tips to keep in mind when using foreground elements to create interest in your macro shots:
- Consider the perspective: The perspective you choose can greatly affect the composition of your macro shot. Think about the angle you’re shooting from and how it will affect the relationship between the foreground and background elements.
- Choose an interesting foreground element: The foreground element is what will draw the viewer’s eye into the shot, so choose something that is visually interesting and complementary to the main subject. This could be a flower, a leaf, a rock, or any other natural element that you can find.
- Experiment with depth of field: One of the great things about macro photography is that you can control the depth of field to create a sense of depth in your shots. Experiment with different apertures to see how it affects the background and foreground elements in your image.
- Think about color: Color can be a powerful tool in macro photography. Look for contrasting colors in the foreground and background to create a visually striking image.
- Experiment with different angles: Don’t be afraid to experiment with different angles and perspectives. Sometimes, the most interesting shots come from an unexpected angle.
By following these tips, you can use foreground elements to create interest in your macro photography shots and capture stunning images that showcase the beauty of the natural world.
Capturing the Essence of Movement in Macro Photography
Macro photography offers a unique opportunity to capture the intricate details of nature that are often overlooked by the naked eye. However, capturing movement in macro photography can be a challenging task. In this section, we will discuss some essential rules and techniques for capturing the essence of movement in macro photography.
Finding the Right Subject
The first step in capturing the essence of movement in macro photography is to find the right subject. Look for subjects that are in motion, such as insects, water droplets, or leaves blowing in the wind. Consider the time of day and the weather conditions when selecting your subject. For example, photographing a butterfly in flight may be more successful on a sunny day with little wind.
Choosing the Right Equipment
The right equipment is essential for capturing the essence of movement in macro photography. A camera with a high frame rate and fast autofocus system is ideal for capturing fast-moving subjects. A tripod is also necessary to keep the camera stable during long exposures. A remote shutter release or the camera’s self-timer can help minimize camera shake during the exposure.
Using a Slow Shutter Speed
Using a slow shutter speed is one of the most effective techniques for capturing the essence of movement in macro photography. A slower shutter speed allows the camera to capture more light, which can help to freeze the motion of the subject. However, it can also create motion blur, which can add an artistic touch to the image. Experiment with different shutter speeds to find the right balance between freezing the motion and creating motion blur.
Panning Technique
Panning is a technique used to create a sense of motion in macro photography. To use this technique, choose a moving subject and follow it with the camera while taking a picture. Keep the shutter speed slow and pan the camera in the same direction as the subject. This will create a blurred background and a sharp subject, which can add a sense of motion to the image.
Focus Technique
Focus is crucial when capturing the essence of movement in macro photography. Use a single autofocus point and set it on the subject’s eye or any other distinctive feature. This will ensure that the subject is sharp, while the background is blurred. Alternatively, you can use manual focus and adjust the focus ring to achieve the same result.
Post-Processing
Post-processing can help enhance the movement in your macro photography images. Adjust the contrast and saturation to add more vibrancy to the colors. Use a technique called “stacking” to merge multiple images of the same subject to create a more extensive depth of field. This technique can help capture more details of the subject while keeping the background blurred.
In conclusion, capturing the essence of movement in macro photography requires careful planning, the right equipment, and creative techniques. By following these rules and techniques, you can create stunning images that showcase the beauty and complexity of nature’s smallest wonders.
Tips for Creating Stunning Macro Photography in Different Environments
Creating stunning macro photography shots is not limited to a single environment. With a little creativity and the right techniques, you can capture amazing images in various settings. Here are some tips to help you create stunning macro photography in different environments:
- Choose the right location: Depending on the subject you want to photograph, you may need to choose a specific location. For example, if you want to photograph flowers, look for a location with a variety of flowers in bloom. If you want to photograph insects, look for a location with a high concentration of insects.
- Use natural light: Natural light is the best light source for macro photography. Look for a location that receives ample natural light, and try to photograph your subject during the golden hour or early morning/late afternoon when the light is soft and diffused.
- Look for interesting backgrounds: The background of your macro photography shot can make or break the image. Look for interesting and unique backgrounds that will add depth and interest to your image. This could be a patterned wall, a flowering plant, or even a puddle of water.
- Use a tripod: Using a tripod is essential for macro photography as it allows you to keep the camera steady and focused on the subject. A tripod will also help you achieve a shallow depth of field, which can add more interest to your image.
- Experiment with angles: Macro photography allows you to get up close and personal with your subject, so experiment with different angles to find the most interesting perspective. Try shooting from above, below, or at an angle to add more depth and interest to your image.
- Pay attention to details: Macro photography is all about capturing the details of your subject. Look for unique textures, patterns, and colors that will make your image stand out.
By following these tips, you can create stunning macro photography shots in any environment. So, get out there and start exploring the world through your lens!
Tips for Macro Photography of Small Creatures
Understanding Your Subject
- 1. Research the Behavior of Your Subject: Before photographing small creatures, it’s important to research their behavior to understand their movements, habits, and preferences. This knowledge will help you predict their actions and anticipate the best moments to capture them.
-
2. Choose the Right Time of Day: Certain times of the day are better for photographing small creatures. For example, some insects are more active in the early morning or late afternoon when the sun is less intense. Research the behavior of your subject to determine the best time to photograph them.
-
3. Use a Macro Lens: Macro photography requires a lens with a minimum focal length of 60mm, which can capture fine details of your subject. Choose a lens with a higher focal length for closer focusing distances and a larger magnification ratio.
- 4. Use a Tripod: To capture sharp images of small creatures, it’s essential to use a tripod. This will help you maintain a steady camera position and ensure that your subject stays in focus.
Finding the Right Composition
- 5. Look for Unique Perspectives: Instead of photographing your subject from a straight-on angle, look for unique perspectives that add visual interest to your image. This could include photographing from below, at an angle, or from a distance.
- 6. Utilize Natural Frames: Look for natural frames in the environment that can be used to frame your subject. This could include leaves, flowers, or other objects that can add depth and interest to your image.
Lighting Techniques
- 7. Use Natural Light: When photographing small creatures, use natural light to illuminate your subject. Look for areas of soft, diffused light that can create a gentle, natural look.
- 8. Use Off-Camera Flash: If you’re unable to find suitable natural light, consider using off-camera flash to light your subject. Use a small flash unit or a ring flash to provide even, diffused light that won’t scare away your subject.
Capturing the Image
- 9. Focus Accurately: Use manual focus to ensure that your subject is sharp. Zoom in on your subject and adjust the focus until they are in sharp focus.
- 10. Use a Remote Shutter Release: To avoid camera shake, use a remote shutter release or the camera’s self-timer to trigger the shutter. This will help you capture sharp images without any camera shake.
By following these tips, you can capture stunning macro photographs of small creatures. Whether you’re photographing insects, spiders, or other small creatures, these techniques will help you create unique and compelling images that showcase the beauty and intricacy of these tiny creatures.
Summarizing the Key Points of Macro Photography
- The use of a tripod is crucial in macro photography to prevent camera shake and ensure sharpness in the final image.
- Proper focus is essential, and the use of manual focus or single-shot autofocus can help achieve this.
- Lighting is a critical factor in macro photography, and proper use of flash, natural light, or reflectors can enhance the subject’s appearance.
- Experimenting with different angles and perspectives can lead to unique and creative shots.
- Patience and perseverance are key in macro photography, as capturing the perfect shot may require numerous attempts.
- Post-processing techniques such as cropping, adjusting colors and contrast, and adding special effects can enhance the final image.
- It is essential to consider the composition and background of the shot, as these elements can greatly impact the overall aesthetic of the image.
Continuing to Learn and Grow in Macro Photography
Macro photography is a fascinating and challenging field that requires constant learning and growth. To become a skilled macro photographer, it is important to continually expand your knowledge and refine your techniques. Here are some tips to help you continue to learn and grow in macro photography:
Attend Workshops and Classes
Attending workshops and classes is a great way to learn new techniques and gain inspiration from experienced macro photographers. Many photography schools and institutions offer courses in macro photography, and there are also many online resources available. Look for classes that cover topics such as composition, lighting, and post-processing, as well as classes that focus on specific subjects, such as insects or flowers.
Practice Regularly
Like any skill, macro photography requires practice to master. Set aside time each week to practice your macro photography skills, whether it’s shooting in your backyard or at a local park. Experiment with different angles, lighting, and subjects to expand your skillset and develop your unique style.
Study the Work of Other Macro Photographers
Studying the work of other macro photographers is a great way to learn new techniques and gain inspiration. Look for photographers whose work you admire and study their compositions, lighting, and post-processing techniques. You can also join online communities or forums dedicated to macro photography, where you can share your work and learn from others.
Experiment with Different Equipment and Techniques
Macro photography requires specialized equipment, such as a macro lens and ring flash, but there are many other tools and techniques that can help you achieve stunning results. Experiment with different equipment, such as extension tubes or bellows, and try different techniques, such as focus stacking or light painting, to create unique and creative images.
Shoot in Different Environments
Macro photography can be done in a variety of environments, from the backyard to the rainforest. Challenge yourself to shoot in different environments and experiment with different subjects, such as insects, plants, and textures. This will help you develop your skills and broaden your knowledge of macro photography.
By following these tips, you can continue to learn and grow in macro photography, expanding your skills and developing your unique style. Whether you’re a beginner or an experienced macro photographer, there is always more to learn and discover in this fascinating and challenging field.
Exploring New Techniques and Ideas in Macro Photography
- Experimenting with Angles: Macro photography allows for unique perspectives, and experimenting with different angles can lead to striking images. Consider shooting from below, above, or at an angle to create dynamic compositions.
- Incorporating Reflections: Reflections can add depth and interest to macro photographs. Look for reflective surfaces like water, leaves, or metal, and explore how they can enhance your images.
- Using Natural Frames: Frame your subject with natural elements like flowers, leaves, or branches. This technique adds visual interest and context to your images, highlighting the delicate relationship between your subject and its surroundings.
- Creating Bokeh: Bokeh, the aesthetic quality of the blur produced in an image by a lens, can be a pleasing effect in macro photography. Look for small, out-of-focus highlights in the background, like raindrops on a leaf or pollen on a flower, and experiment with different lens apertures to create your desired bokeh effect.
- Chasing Natural Light: Macro photography often requires precise lighting to showcase the subject’s intricate details. Utilize natural light by positioning your subject near a window or opening on a cloudy day. You can also experiment with shadows and backlighting to create interesting textures and moods.
- Exploring Symmetry and Patterns: Look for symmetrical or patterned subjects in nature, like flowers, leaves, or insects, and capture them in a way that highlights their repetitive or organized design.
- Composition and Framing: Proper composition and framing are essential in macro photography. Pay attention to the rule of thirds, leading lines, and the balance of positive and negative space in your images. Consider the background and try to minimize distractions, or use the background to add context or contrast to your subject.
- Capturing Movement: Macro photography can also capture the fleeting moments of movement in nature. Freeze the motion of an insect in flight, a droplet of water falling, or a leaf rustling in the wind to create dynamic and unique images.
- Experimenting with Camera Settings: Don’t be afraid to experiment with different camera settings, such as shutter speed, ISO, and aperture, to achieve your desired results. Each setting can greatly impact the final image, so play around and find what works best for your specific situation.
- Post-Processing Techniques: Finally, make use of post-processing techniques to enhance your images further. Adjust colors, contrast, and sharpness to bring out the best in your macro photographs. Don’t be afraid to experiment with different editing software and techniques to create your desired look.
FAQs
1. What is macro photography?
Macro photography is a type of photography that captures extremely close-up images of small objects or subjects, usually at a 1:1 magnification ratio or greater. This means that the subject is photographed at life-size or larger, revealing details that are often invisible to the naked eye.
2. What equipment is needed for macro photography?
A dedicated macro lens is the most essential piece of equipment for macro photography. These lenses are designed to capture images at a close focusing distance, typically within inches of the subject. A tripod is also highly recommended to ensure stability and sharpness during long exposures. Additionally, a camera with live view mode and focus stacking capabilities can be helpful for achieving precise focus and composition.
3. What are the basic rules for macro photography?
The basic rules for macro photography include: 1) use a tripod for stability and sharpness, 2) use a dedicated macro lens for optimal image quality, 3) use a small aperture for maximum depth of field, 4) use a low ISO to minimize noise, 5) use a remote shutter release or the camera’s self-timer to avoid camera shake, 6) use a focusing rail or stacked shots to achieve sharp focus, 7) experiment with different angles and lighting techniques to achieve unique and creative compositions.
4. How do I achieve a shallow depth of field in macro photography?
To achieve a shallow depth of field in macro photography, use a larger aperture (smaller f-number) and focus on the subject while blurring the background. This can be achieved by using a dedicated macro lens with a wide aperture, or by using a regular lens and moving the subject closer to the lens while focusing on the subject.
5. How do I focus on a subject in macro photography?
To focus on a subject in macro photography, use manual focus and adjust the focus ring on the lens until the subject is sharp. Use a tripod to ensure stability and sharpness, and consider using a focusing rail or stacked shots to achieve precise focus. Additionally, use live view mode and magnification to carefully examine the focus and make adjustments as needed.
6. How do I control the lighting in macro photography?
To control the lighting in macro photography, use external flash units or other lighting sources to provide fill light, backlight, or sidelight as needed. Consider using diffusers or reflectors to shape the light and reduce harsh shadows. Additionally, experiment with different angles and lighting techniques to achieve unique and creative compositions.
7. How do I avoid camera shake in macro photography?
To avoid camera shake in macro photography, use a tripod to provide stability and sharpness. Additionally, use a remote shutter release or the camera’s self-timer to minimize camera shake caused by pressing the shutter button. Consider using a gorilla pod or other flexible tripod for unique angles and positions.
8. How do I choose the right subject for macro photography?
To choose the right subject for macro photography, consider subjects with intricate details, patterns, or textures that will be visible at a close focusing distance. Consider subjects such as insects, flowers, leaves, and small objects that can be found in nature or around the home. Additionally, consider the lighting and composition of the subject to create unique and creative images.


