Are you ready to capture the beauty of the night in your photographs? Night photography is an exciting and challenging field that requires careful planning, preparation, and execution. In this guide, we will explore the techniques and tips needed to take stunning night photographs that will leave your audience mesmerized. From choosing the right equipment to finding the perfect location, we will cover everything you need to know to capture the magic of the night. So, grab your camera and let’s get started on this thrilling photographic journey!
Understanding Night Photography
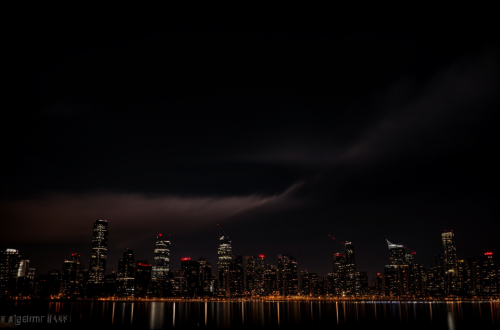
The Art of Capturing Low-Light Scenes
Capturing low-light scenes is a challenging aspect of night photography that requires a deep understanding of the right techniques and equipment. The key to capturing stunning low-light scenes lies in balancing the exposure and utilizing the available light sources effectively. Here are some essential tips for mastering the art of capturing low-light scenes in your night photography:
- Utilize Long Exposures: One of the most common techniques for capturing low-light scenes is using long exposures. By keeping the camera’s shutter open for an extended period, you allow more light to enter the sensor, resulting in a well-exposed image. However, it’s crucial to use a tripod to avoid camera shake during the longer exposure times.
- Adjust Your ISO: ISO is a crucial setting for low-light photography, as it directly affects the sensitivity of the camera’s sensor to light. Increasing the ISO will make the camera more sensitive to light, allowing you to capture images in dimmer conditions. However, it’s essential to keep in mind that increasing the ISO also increases the noise in the image, so finding the right balance is crucial.
- Use Available Light Sources: In low-light scenes, it’s often challenging to find sufficient light to illuminate the scene adequately. However, by using available light sources such as streetlights, car headlights, or moonlight, you can create beautiful and unique images. Experiment with different light sources and angles to find the most visually appealing composition.
- Incorporate Silhouettes: Silhouettes can be a powerful tool for creating a sense of depth and contrast in low-light scenes. By using the available light sources to create silhouettes of objects in the scene, you can create visually striking images that draw the viewer’s eye.
- Use Light Painting: Light painting is a technique where you add light to a scene using a long exposure. By moving a light source around the scene during the exposure, you can create intricate patterns and designs that add visual interest to the image. This technique can be used to capture buildings, landscapes, and even cityscapes in low-light conditions.
By mastering the art of capturing low-light scenes, you’ll be able to create stunning night photographs that showcase the beauty and mystery of the night. Experiment with different techniques and equipment to find the right balance and create unique and captivating images.
Choosing the Right Equipment for Night Photography
Capturing the perfect night shot requires the right equipment. In this section, we will discuss the essential equipment needed for night photography and how to choose the right gear for your needs.
1. Camera
The camera is the most critical piece of equipment for night photography. A full-frame camera with high ISO capabilities is recommended as it can capture more light and produce less noise in low-light conditions. A camera with manual controls is also essential, as it allows you to adjust settings like shutter speed, aperture, and ISO to achieve the desired results.
2. Lens
The lens you choose will depend on the type of night photography you want to capture. A wide-angle lens is ideal for landscapes and cityscapes, while a telephoto lens is perfect for capturing details of buildings or objects from a distance. A tripod is also recommended to keep the camera steady during long exposures.
3. Tripod
A tripod is essential for night photography, as it allows you to keep the camera steady during long exposures. It also helps to reduce camera shake and prevent blurry images. A sturdy tripod with adjustable legs is recommended, as it can be used in various environments and situations.
4. Remote Shutter Release
A remote shutter release is an optional but useful accessory for night photography. It allows you to trigger the camera’s shutter without touching it, reducing the risk of camera shake and blurry images. A remote shutter release can also be used to take long exposures without the need for a timer or self-timer.
5. External Flash
An external flash can be used to add light to your night shots, illuminating dark areas or highlighting specific subjects. However, it’s important to use it sparingly, as too much flash can wash out the scene and overpower the available light.
6. Polarizing Filter
A polarizing filter can help to reduce glare and reflections in night shots, especially when shooting near water or other reflective surfaces. It can also enhance the colors and contrast in the scene, making for more vibrant and dramatic images.
Choosing the right equipment for night photography requires careful consideration of your needs and the conditions you’ll be shooting in. By selecting the right camera, lens, tripod, and other accessories, you can capture stunning night shots that capture the magic of the night.
Understanding Exposure and ISO Settings for Night Photography
Capturing the perfect night photograph requires an understanding of the intricacies of exposure and ISO settings. Exposure and ISO work together to create the final image, and understanding how they interact is crucial to achieving the desired results.
Exposure is the amount of light that enters the camera’s sensor, and it is measured in lux-seconds. In low light conditions, such as at night, the camera’s aperture and shutter speed are crucial in controlling the amount of light that enters the camera. A wider aperture and a shorter shutter speed will allow more light into the camera, while a narrower aperture and a longer shutter speed will allow less light in.
ISO, on the other hand, is the sensitivity of the camera’s sensor to light. A higher ISO setting will make the sensor more sensitive to light, allowing for better exposure in low light conditions. However, a higher ISO setting also increases the noise in the image, which can negatively impact the final result.
To achieve the best results in night photography, it is important to balance the exposure and ISO settings. A higher ISO setting may be necessary to capture the desired exposure, but it should be used judiciously to avoid introducing too much noise into the image.
In addition to adjusting the exposure and ISO settings, photographers may also need to use a tripod to keep the camera steady and avoid camera shake. This is especially important when using a longer shutter speed or a higher ISO setting, as both can increase the risk of camera shake.
By understanding the intricacies of exposure and ISO settings, photographers can take control of their night photography and capture stunning images in even the darkest of conditions.
The Importance of Tripod and Remote Shutter Release
A tripod and remote shutter release are essential tools for night photography. These tools help in capturing sharp and well-exposed images in low light conditions.
Tripod
A tripod is an essential tool for night photography as it provides stability and allows for longer exposures. Longer exposures are necessary when shooting in low light conditions to capture enough light to produce a well-exposed image. A tripod helps in keeping the camera stable during longer exposures, which results in sharper images. Additionally, a tripod allows for the use of remote shutter release, which is another essential tool for night photography.
Remote Shutter Release
A remote shutter release is a tool that allows the photographer to trigger the camera’s shutter without touching it. This is important in night photography because any movement of the camera during the exposure can result in a blurred image. A remote shutter release eliminates the need to touch the camera during the exposure, resulting in sharper images. Additionally, a remote shutter release allows for the use of longer exposures without the risk of camera shake.
In conclusion, a tripod and remote shutter release are essential tools for night photography. They help in capturing sharp and well-exposed images in low light conditions. A tripod provides stability, while a remote shutter release eliminates the risk of camera shake during longer exposures. These tools are a must-have for any photographer looking to capture the magic of night.
Planning Your Night Photography Shoot
Finding the Right Location for Night Photography
When it comes to night photography, finding the right location is crucial to capturing stunning and unique images. Here are some tips to help you find the perfect spot for your night photography shoot:
- Scout During the Day: One of the best ways to find the right location for night photography is to scout the area during the day. This will give you a good idea of the lighting conditions, terrain, and any potential obstacles that may arise at night.
- Look for Unique Features: Try to find unique features that will make your night photography stand out. This could be anything from a distinctive building or monument to a natural landscape feature like a waterfall or bridge.
- Check the Lighting: Pay attention to the lighting conditions in the area. Look for streetlights, moonlight, and other sources of ambient light that can enhance your night photography. Keep in mind that some locations may have strict rules about using artificial lighting, so be sure to check local regulations before setting up your equipment.
- Consider the Time of Year: The time of year can also play a role in finding the right location for night photography. For example, a full moon during the summer months can create a beautiful and dramatic scene, while a winter wonderland can provide a magical backdrop for your nighttime images.
- Research Online: Finally, research online forums and social media groups dedicated to night photography to get ideas and suggestions from other photographers. You may also be able to find local groups or meetups that can provide you with additional resources and information about the best locations for night photography in your area.
By following these tips, you can find the perfect location for your night photography shoot and capture stunning and unique images that will showcase the magic of night.
Time of Day and Weather Conditions for Night Photography
Choosing the right time of day and weather conditions is crucial for capturing stunning night photographs. The ideal time for night photography is during the last hour before sunrise or the first hour after sunset, when the sky is illuminated by soft, warm light. This is known as the “golden hour” or “blue hour,” and it creates a dreamy, ethereal atmosphere that can enhance your night photographs.
Additionally, the weather conditions can greatly impact your night photography shoot. Clear, dry weather with minimal wind is ideal for capturing sharp images without any distortion. However, if you’re looking to capture images of the city skyline or stars, consider incorporating clouds or fog to add depth and interest to your photographs.
Moreover, it’s important to be aware of the moon’s phase during your night photography shoot. A full moon can provide ample light, while a new moon can create a darker, more mysterious atmosphere. The days leading up to and following a full moon are often referred to as the “moon days,” and they can offer unique opportunities for capturing striking night photographs.
Lastly, be mindful of the light pollution in the area where you plan to shoot. Light pollution can have a significant impact on the quality of your night photographs, so it’s essential to find a location with minimal light pollution for the best results.
Overall, carefully considering the time of day and weather conditions, as well as the moon’s phase, can help you plan a successful night photography shoot and capture stunning images under the night sky.
Pre-Visualizing Your Shot
When it comes to night photography, one of the most important steps in capturing a stunning image is pre-visualizing your shot. This means that before you even pick up your camera, you should have a clear idea of what you want to capture and how you want to capture it. Here are some tips for pre-visualizing your night photography shots:
- Consider the Light: One of the most important factors in night photography is the available light. Consider the type of light available at your shooting location, whether it’s streetlights, moonlight, or artificial light from buildings, and think about how you can use it to enhance your composition.
- Scout Your Location: Before you arrive at your shooting location, take some time to scout out the area and think about potential compositions. Look for interesting architecture, landscapes, or other elements that could make for a compelling photograph. Consider the composition you want to achieve and think about how you can use the available light to enhance it.
- Plan Your Exposure: Night photography often requires longer exposures, which can lead to blurred images if you don’t plan your shot carefully. Consider the shutter speed, aperture, and ISO settings you’ll need to achieve the exposure you want. Use a tripod to keep your camera steady and avoid camera shake.
- Compose Your Shot: Once you have a clear idea of what you want to capture and how you want to capture it, it’s time to compose your shot. Consider the rule of thirds, leading lines, and other compositional techniques to create a visually pleasing image. Experiment with different angles and perspectives until you find the one that works best for your composition.
By pre-visualizing your night photography shots, you’ll be better prepared to capture the image you have in mind. It will also help you to work more efficiently and effectively during your shoot, ensuring that you get the best possible results.
Using Light Painting Techniques for Night Photography
When it comes to night photography, light painting techniques can be a powerful tool to create unique and striking images. Here are some tips for using light painting techniques in your night photography:
- Experiment with different light sources: You can use a variety of light sources, such as flashlights, headlamps, and glow sticks, to create different effects in your images. Experiment with different colors and intensities to see what works best for your shot.
- Use long exposures: Light painting involves adding light to the scene during a long exposure, which allows the light to be captured in the image. You can use a tripod to keep your camera steady during the exposure, and use a remote shutter release to avoid camera shake.
- Paint the scene with light: Once you have set up your shot and chosen your light sources, start painting the scene with light. Move the light sources around the scene, creating different shapes and patterns. Experiment with different techniques, such as tracing the outline of objects or creating abstract designs.
- Consider the surroundings: When using light painting techniques, it’s important to consider the surroundings and the ambient light in the scene. If the surroundings are too dark, you may need to use additional light sources to illuminate the scene. If the surroundings are too bright, you may need to use a smaller light source or cover the lens to block out excess light.
- Be patient: Light painting can take time and patience to create a successful image. Experiment with different techniques and be willing to try new things. Don’t be afraid to try different light sources or exposure times to achieve the desired effect.
Shooting Techniques for Night Photography
Setting Up Your Camera for Night Photography
To capture stunning night photographs, it is crucial to set up your camera correctly. Here are some essential tips to keep in mind when setting up your camera for night photography:
- ISO: Adjusting the ISO is critical for shooting in low light conditions. Increase the ISO to let more light into the camera, but be cautious as increasing the ISO can also amplify noise in the image. A good starting point is to set the ISO to 800 or higher, depending on the lighting conditions.
- Shutter Speed: A slower shutter speed is typically used in night photography to capture the darkness and movement of the night. However, keep in mind that slower shutter speeds can introduce motion blur in the image, especially when shooting handheld. To avoid this, use a tripod or a flat surface to rest the camera on. A good starting point for shutter speed is around 15-30 seconds.
- Aperture: The aperture can also affect the exposure in low light conditions. A wider aperture (lower f-number) will allow more light into the camera, but it can also create a shallower depth of field. Consider using a smaller aperture (higher f-number) to ensure a deeper depth of field and better image sharpness.
- Focusing: Autofocus can be challenging in low light conditions, so it’s best to use manual focus. Use the live view mode to zoom in on the scene and focus manually. Alternatively, use the center focus point and adjust the focus distance to ensure the subject is in focus.
- White Balance: The white balance can also affect the color of the image. Use the auto white balance (AWB) or custom white balance (CWB) to ensure accurate color reproduction. If the scene is predominantly blue, consider using a tungsten white balance to warm up the image.
By following these tips, you can set up your camera for night photography and capture stunning images of the night.
Understanding Exposure Bracketing and HDR Photography
Exposure bracketing and HDR photography are two techniques that can help you capture stunning images in low light conditions. These techniques involve taking multiple shots of the same scene at different exposure settings and then combining them to create a single image with a wider dynamic range.
Exposure bracketing involves taking multiple shots of the same scene at different exposure settings. This can be done manually by adjusting the camera’s aperture, shutter speed, and ISO settings, or automatically using the camera’s bracketing feature. The idea is to capture multiple images with different exposures, and then review them later to select the best one.
HDR photography, on the other hand, involves taking multiple shots of the same scene at different exposure settings and then combining them using special software to create a single image with a wider dynamic range. This technique can be more time-consuming than exposure bracketing, but it can also produce more dramatic results.
To get the best results from exposure bracketing and HDR photography, it’s important to understand how to use your camera’s exposure settings effectively. This includes understanding how to use the histogram and the blinking highlights and shadow warning on your camera’s LCD screen to ensure that you’re capturing the full range of tones and details in your images.
In addition to these techniques, it’s also important to use a tripod to keep your camera steady during long exposures, and to use a remote shutter release or the camera’s self-timer to avoid camera shake when pressing the shutter button.
Overall, exposure bracketing and HDR photography are powerful techniques that can help you capture stunning images in low light conditions. By understanding how to use these techniques effectively, you can take your night photography to the next level and capture the magic of the night like never before.
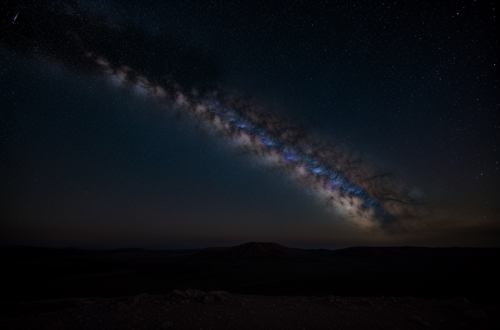
Tips for Capturing Stars and Astrophotography
Exploring the Wonders of Astrophotography
Astrophotography is a fascinating sub-genre of night photography that involves capturing images of celestial objects, such as stars, planets, and nebulae. It requires careful planning, patience, and specialized equipment to produce stunning results.
Selecting the Right Camera and Lens
To capture the beauty of the night sky, it is essential to use a camera with good low-light capabilities and a wide-angle lens. A full-frame camera with high ISO performance and low noise characteristics is ideal for astrophotography. Wide-angle lenses, such as fish-eye or ultra-wide zoom lenses, can capture a broad view of the night sky, allowing you to include more of the celestial objects in your frame.
Setting the Camera Settings
When shooting astrophotography, it is crucial to set your camera settings appropriately to capture the best results. Start by setting a low ISO to minimize noise, and use a wide aperture to capture as much light as possible. Since the night sky is a high-contrast scene, you may need to bracket your exposures to capture both the bright stars and the dark foreground elements. Use a remote shutter release or the camera’s self-timer to avoid camera shake during long exposures.
Finding the Perfect Location
The success of your astrophotography images depends heavily on the quality of your location. Look for a location with minimal light pollution, clear skies, and an interesting foreground element to create a compelling composition. Research astronomical events, such as meteor showers or lunar eclipses, to plan your astrophotography sessions around these events.
Capturing the Stars
The stars are the main attraction in astrophotography, and capturing them requires careful planning and execution. Shoot during the winter months when the Earth is closer to the stars, and the sky is darker. Use a polarizing filter to reduce reflections and glare from celestial light sources. Consider using a tracking mount or a remote shutter release to avoid camera shake during long exposures.
Capturing Nebulae and Galaxies
Nebulae and galaxies are more challenging to capture than stars, but they can produce stunning results when done correctly. To capture these celestial objects, you will need to use long exposures and narrow apertures to collect as much light as possible. Consider using a telescope or a specialized astrophotography camera to capture detailed images of these objects.
Post-Processing Astrophotography Images
Post-processing is an essential step in astrophotography to bring out the best in your images. Start by adjusting the white balance to remove the color casts caused by the light pollution. Adjust the exposure, contrast, and saturation to enhance the details in the image. Use noise reduction techniques to minimize the effects of high ISO noise. Add final touches to your image by using filters, textures, and special effects to create a unique and captivating image.
By following these tips and techniques, you can capture stunning astrophotography images that showcase the beauty and mystery of the night sky.
Long Exposure Photography Techniques for Night Scenes
Capturing the Magic of Night: A Comprehensive Guide to Night Photography
Shooting Techniques for Night Photography
Long Exposure Photography Techniques for Night Scenes
One of the most effective techniques for capturing the magic of night scenes is through long exposure photography. Long exposure photography involves leaving the camera’s shutter open for an extended period of time, allowing more light to enter and be captured by the camera’s sensor. This technique is particularly useful for capturing the movement of stars, the glow of streetlights, and the flow of water in the dark.
Choosing the Right Camera Settings
Before embarking on a night photography session, it is essential to set up the camera correctly. The first step is to select a low ISO setting, ideally between 100 and 400, to ensure minimal noise in the image. The aperture should also be set to a low number, such as f/4 or f/5.6, to increase the depth of field and keep the entire scene in focus.
Experimenting with Shutter Speed
The shutter speed is the most critical setting for long exposure night photography. A slower shutter speed will allow more light to enter the camera, resulting in a brighter image. However, a slower shutter speed also increases the risk of camera shake, which can lead to a blurry image. To avoid camera shake, it is essential to use a tripod or other stable surface to support the camera.
Experimenting with Different Scenes
Long exposure photography techniques can be used to capture a variety of night scenes, including stars, cityscapes, and waterways. For example, to capture the movement of stars, a shutter speed of 15 seconds to 30 seconds can be used, while a shutter speed of 1 second to 2 seconds is ideal for capturing the glow of streetlights. When photographing waterways, such as rivers or the ocean, a shutter speed of 10 seconds to 20 seconds can be used to capture the flow of water.
Tips for Editing Long Exposure Night Photography
After capturing the image, it is essential to edit the photo to enhance its quality. One of the most common editing techniques is to adjust the exposure, contrast, and brightness of the image to bring out the details in the scene. It is also essential to remove any noise or grain that may have been introduced during the long exposure.
Overall, long exposure photography techniques are a powerful tool for capturing the magic of night scenes. By experimenting with different camera settings and scenes, photographers can create stunning images that showcase the beauty of the night sky, cityscapes, and waterways.
Editing Your Night Photography Images
Understanding Image Editing Software for Night Photography
Effective image editing is crucial in bringing out the best in your night photography shots. With the right software, you can enhance the brightness, contrast, and color saturation of your images, while also reducing noise and other unwanted elements. In this section, we will explore the various image editing software options available for night photography and discuss their unique features and capabilities.
Choosing the Right Image Editing Software
There are many image editing software options available, each with its own set of features and capabilities. Some of the most popular options for night photography include Adobe Photoshop, Lightroom, and GIMP.
Adobe Photoshop
Adobe Photoshop is a powerful and versatile image editing software that offers a wide range of tools and features for enhancing your night photography images. With its advanced selection tools, you can easily isolate specific elements of your image and apply adjustments to them. Photoshop also offers a variety of filters and effects that can be used to enhance the mood and atmosphere of your images.
Adobe Lightroom
Adobe Lightroom is a photo management and editing software that is specifically designed for organizing and editing large volumes of images. It offers a streamlined workflow and a wide range of adjustment tools that can be used to enhance the brightness, contrast, and color saturation of your night photography images. Lightroom also offers a variety of presets that can be used to quickly and easily enhance your images.
GIMP
GIMP (GNU Image Manipulation Program) is a free and open-source image editing software that offers many of the same features and capabilities as Photoshop. It is a powerful and versatile software that can be used for a wide range of image editing tasks, including night photography. GIMP offers a variety of tools and filters that can be used to enhance the brightness, contrast, and color saturation of your images, as well as reduce noise and other unwanted elements.
Understanding the Basics of Image Editing
Before diving into the specific tools and techniques for editing night photography images, it is important to understand the basics of image editing. This includes understanding the different image modes (RGB, CMYK, etc.), color spaces, and color models.
Basic Image Adjustments
Some of the most basic image adjustments that can be made to night photography images include brightness, contrast, and color saturation. These adjustments can be made using the exposure, contrast, and saturation sliders in your image editing software.
Removing Noise
Noise is a common issue in night photography images, especially when shooting at high ISO settings. There are several techniques that can be used to reduce noise in your images, including using noise reduction tools in your image editing software and applying a noise reduction filter to your images.
Enhancing the Mood and Atmosphere
In addition to basic image adjustments, there are a variety of filters and effects that can be used to enhance the mood and atmosphere of your night photography images. This includes adjusting the white balance, adding grain, and applying color grading techniques.
Conclusion
Understanding image editing software is crucial in bringing out the best in your night photography shots. Whether you choose Adobe Photoshop, Lightroom, or GIMP, there are many tools and techniques available for enhancing the brightness, contrast, and color saturation of your images, while also reducing noise and other unwanted elements. By mastering the basics of image editing and experimenting with different techniques, you can create stunning night photography images that capture the magic of the night.
Adjusting Exposure, Contrast, and Colors in Post-Processing
When editing your night photography images, there are several key elements that you may want to adjust in post-processing. These include exposure, contrast, and colors. By making these adjustments, you can bring out the best in your images and create stunning nighttime scenes.
Adjusting Exposure
Exposure is one of the most important elements to adjust when editing night photography images. Nighttime scenes can be very dark, and without proper exposure, your images may be too dark or too bright. To adjust exposure, you can use tools such as the histogram, brightness/contrast slider, or exposure slider in your editing software. It’s important to find the right balance between highlights and shadows to ensure that your image looks natural and well-lit.
Adjusting Contrast
Contrast is another key element to adjust when editing night photography images. Nighttime scenes can have low contrast, which can make your images look flat and uninteresting. To add contrast, you can use tools such as the curves or levels adjustment layers in your editing software. This will help to bring out the details in the shadows and highlights, and create a more dynamic and visually appealing image.
Adjusting Colors
Finally, you may also want to adjust the colors in your night photography images. Nighttime scenes can have a cool or warm color cast, depending on the lighting conditions. To adjust colors, you can use tools such as the color balance or hue/saturation adjustment layers in your editing software. It’s important to be careful when adjusting colors, as too much saturation can make your image look unnatural and overprocessed.
Overall, adjusting exposure, contrast, and colors are crucial steps in post-processing your night photography images. By making these adjustments, you can create stunning nighttime scenes that are full of detail and depth.
Removing Noise and Enhancing Detail in Night Photography
When capturing night scenes, the low light conditions can result in images with a lot of noise. This noise can spoil the otherwise magical quality of your night photographs. To salvage your images, you can use software to remove noise and enhance the details.
Removing Noise in Night Photography
There are several ways to remove noise from your night photographs. One of the most common methods is to use image editing software like Adobe Photoshop or Lightroom. These software programs have a variety of noise reduction tools that can help you get rid of the unwanted noise in your images.
Enhancing Detail in Night Photography
In addition to removing noise, you can also use image editing software to enhance the details in your night photographs. This is especially important when you are trying to capture the intricate details of night scenes, such as the stars in the sky or the details of buildings.
To enhance the details in your night photographs, you can use image editing software to adjust the contrast and brightness of your images. This will help bring out the details in your images and give them a more dynamic look.
Removing noise and enhancing detail are important steps in editing your night photography images. By using image editing software like Adobe Photoshop or Lightroom, you can improve the quality of your night photographs and bring out the magic of the night.
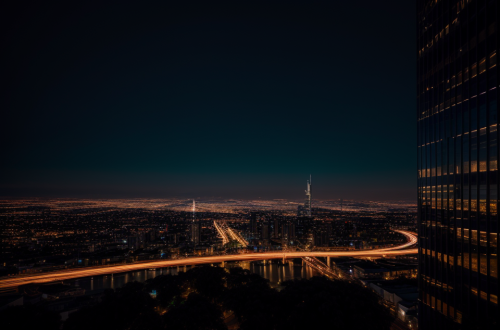
Creating Stunning Nighttime Landscapes and Cityscapes
When it comes to editing night photography images, one of the most challenging aspects can be creating stunning nighttime landscapes and cityscapes. While capturing the perfect shot during the day can be difficult enough, doing so at night requires a whole new set of skills and techniques. In this section, we will explore some tips and tricks for creating stunning nighttime landscapes and cityscapes that will help you to capture the magic of night in your photography.
One of the first things to consider when shooting nighttime landscapes and cityscapes is the use of long exposures. Long exposures can help to capture the movement of stars and other celestial bodies, as well as the lights of the city. To achieve this effect, you will need to use a tripod to keep your camera steady and set your camera’s shutter speed to a low setting, such as 15 seconds or longer. Additionally, you may want to consider using a remote shutter release or a timer to avoid any camera shake.
Another important consideration when shooting nighttime landscapes and cityscapes is the use of low ISO settings. This will help to minimize noise in your images and ensure that your photos have a crisp, clear quality. It is also important to consider the white balance of your images, as this can have a significant impact on the overall look and feel of your photos.
When it comes to editing your night photography images, there are a few key techniques that you can use to create stunning nighttime landscapes and cityscapes. One of the most important is the use of contrast. This can help to bring out the details in your images and give them a more dynamic, engaging quality. You may also want to experiment with adjusting the brightness and saturation of your images, as well as adding filters or effects to enhance the overall look and feel of your photos.
Another technique that can be particularly effective when editing night photography images is the use of black and white. This can help to create a more dramatic, moody effect that is often associated with nighttime photography. You may also want to experiment with adding grain or texture to your images, which can help to add depth and dimension to your photos.
Overall, creating stunning nighttime landscapes and cityscapes requires a combination of careful planning, technique, and editing. By following the tips and tricks outlined in this section, you will be well on your way to capturing the magic of night in your photography.
Tips and Tricks for Night Photography
Working with Moonlight and Other Natural Light Sources
Night photography offers unique challenges, but also opportunities to capture stunning images. One of the most captivating aspects of night photography is working with moonlight and other natural light sources. In this section, we will explore some tips and tricks for capturing the magic of night with moonlight and other natural light sources.
Moonlight
The moon is a powerful source of light, especially during the night. To capture the beauty of moonlight, it’s important to understand its phases and position in the sky. The full moon rises in the east at sunset and sets in the west at sunrise. The gibbous moon rises in the south after sunset and sets in the southwest at sunrise. The crescent moon rises in the west after sunset and sets in the west at sunrise.
To capture the best images of the moon, consider the following tips:
- Shoot during the full or gibbous moon when the moon is higher in the sky and provides more light.
- Use a tripod to stabilize your camera and avoid camera shake.
- Use a remote shutter release or the camera’s self-timer to avoid touching the camera and causing camera shake.
- Use a narrow aperture (f/11 or higher) to ensure a deep depth of field and sharp focus.
- Experiment with different shutter speeds to create different effects, such as capturing the movement of the moon across the sky.
Other Natural Light Sources
In addition to the moon, there are other natural light sources that can enhance your night photography. Some of these include streetlights, car headlights, and city lights. Here are some tips for working with these light sources:
- Look for interesting patterns or shapes created by the light sources.
- Use a polarizing filter to reduce glare and enhance color saturation.
- Experiment with different angles and perspectives to create unique compositions.
- Use a tripod to stabilize your camera and keep the camera still while shooting long exposures.
In conclusion, working with moonlight and other natural light sources can add a unique dimension to your night photography. By understanding the phases of the moon and other natural light sources, and by using the right techniques and equipment, you can capture stunning images that showcase the beauty of the night.
Using Streetlights and Neon Signs for Night Photography
Capturing the night scene with streetlights and neon signs can create a unique and captivating image. These artificial lights can add drama and energy to an otherwise dark and quiet scene. To make the most of this opportunity, consider the following tips:
- Look for interesting compositions: Use the streetlights and neon signs as a starting point for your composition. Look for interesting shapes, patterns, and textures that can be highlighted by the artificial light. Consider the surrounding environment, such as buildings, trees, and other elements, to create a balanced and visually appealing image.
- Experiment with different angles: Try different angles to capture the neon signs and streetlights. Shoot from a low angle to create a dramatic effect, or shoot from a high angle to capture the entire scene. You can also experiment with different perspectives, such as shooting from a distance or getting up close to the subject.
- Use a tripod: Using a tripod is essential for night photography, as it helps to keep the camera steady and avoid blur. A tripod will also allow you to use longer exposures, which can capture more light and create a brighter image.
- Use a wide aperture: A wide aperture can help to capture more light and create a brighter image. This is especially useful when shooting in low light conditions. A wide aperture can also create a shallow depth of field, which can add a sense of depth and dimension to the image.
- Adjust your ISO and shutter speed: Adjusting your ISO and shutter speed can help to capture the best possible image. A higher ISO can help to capture more light, but it can also introduce noise into the image. A lower ISO is best for capturing detail and maintaining image quality. A slower shutter speed can create motion blur, which can add a sense of movement to the image. A faster shutter speed can freeze motion, which can be useful when shooting fast-moving subjects.
- Use long exposures: Long exposures can capture more light and create a brighter image. This is especially useful when shooting in low light conditions. Long exposures can also create interesting effects, such as capturing the movement of traffic lights or stars in the night sky.
- Use a remote shutter release or self-timer: Using a remote shutter release or self-timer can help to avoid camera shake and create a sharper image. This is especially useful when shooting long exposures or using a tripod.
By following these tips, you can capture the magic of night with streetlights and neon signs. Remember to experiment and have fun, and don’t be afraid to try new techniques and approaches.
Shooting through Windows and Reflections at Night
One of the unique challenges of night photography is capturing the reflections of light on windows and other surfaces. These reflections can add an interesting layer of depth and complexity to your shots, but they can also be difficult to manage. Here are some tips for shooting through windows and reflections at night:
Finding the Right Angle
The angle at which you shoot can have a big impact on how reflections appear in your photos. To minimize reflections, try to position yourself at a 90-degree angle to the window or surface you’re shooting. This can help to reduce the amount of light that’s reflected back into the camera lens.
Choosing the Right Lens
The lens you choose can also affect how reflections appear in your photos. Wide-angle lenses can be particularly useful for shooting through windows and reflections, as they allow you to capture a wide area of the scene. However, they can also exaggerate the size of reflections, so it’s important to be mindful of this when composing your shots.
Experimenting with Shutter Speed
One of the key techniques for shooting through windows and reflections is experimenting with shutter speed. A slower shutter speed can help to capture the movement of the reflections, while a faster shutter speed can freeze them in place. Try experimenting with different shutter speeds to see what works best for your shot.
Using a Polarizing Filter
A polarizing filter can be a useful tool for reducing reflections and glare in your photos. By adjusting the angle of the filter, you can reduce the amount of light that’s reflected off surfaces and minimize glare. This can help to make your photos look more natural and less prone to reflections.
Considering the Light Source
Finally, it’s important to consider the light source when shooting through windows and reflections at night. If the light source is coming from behind you, it can create a glow effect in your photos. If the light source is coming from the side, it can create interesting reflections and highlights. Experiment with different light sources to see what works best for your shot.
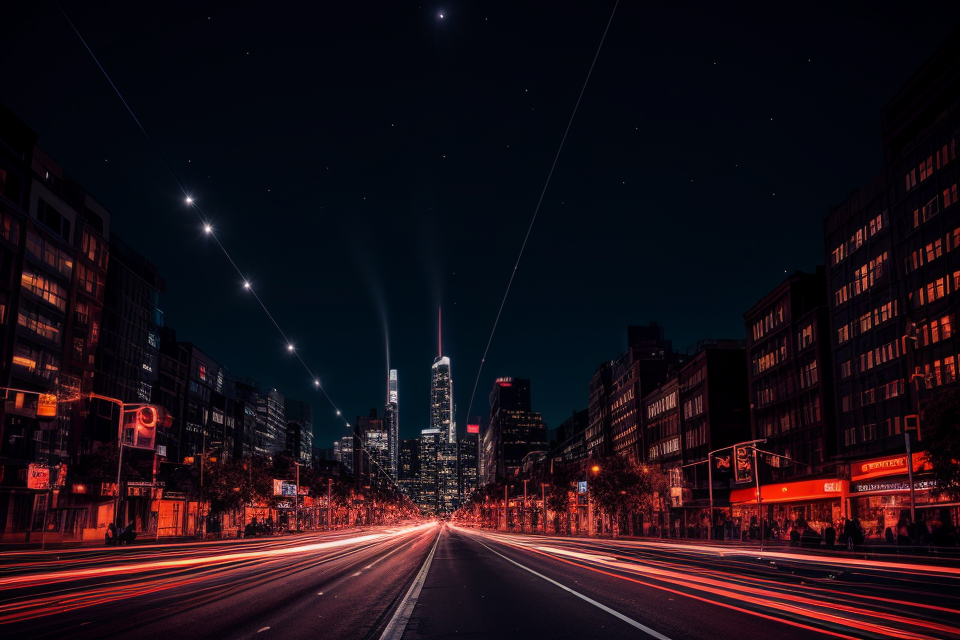
Experimenting with Multiple Exposures and Light Trails
When it comes to night photography, one of the most exciting techniques to try is multiple exposures and light trails. These techniques allow you to capture the movement and energy of the night in unique and creative ways. Here are some tips on how to experiment with multiple exposures and light trails:
- Use a tripod: Multiple exposures and light trails require a steady hand and a tripod is essential to keep your camera still during long exposures.
- Use a remote shutter release or self-timer: To avoid any camera shake when pressing the shutter button, use a remote shutter release or self-timer to trigger the camera.
- Choose a high ISO: When shooting at night, it’s important to use a high ISO to capture enough light. A higher ISO will also allow you to keep the shutter open for longer periods of time, which is necessary for creating light trails.
- Experiment with different shutter speeds: The length of the exposure will determine the shape and intensity of the light trails. Try different shutter speeds to see what works best for your scene.
- Bracket your exposures: To ensure that you capture the perfect shot, bracket your exposures by taking multiple shots at different exposure settings. This will give you more options to choose from when editing your photos.
- Use a wide-angle lens: A wide-angle lens will allow you to capture a wider scene, making it easier to include light trails in your composition.
- Look for traffic or lights: Look for busy streets or areas with lots of lights to create interesting light trails. Experiment with different angles and perspectives to find the best composition.
- Edit your photos: Finally, be sure to edit your photos to bring out the best in your multiple exposures and light trails. Adjust the exposure, contrast, and saturation to create a stunning final image.
By following these tips, you’ll be well on your way to capturing the magic of night through multiple exposures and light trails.
Tips for Capturing Lightning at Night
When it comes to night photography, capturing lightning is a unique challenge that requires careful planning and preparation. Here are some tips to help you capture stunning images of lightning at night:
- Use a tripod: A tripod is essential for night photography, as it helps to stabilize your camera and prevent blurry images. Make sure your tripod is sturdy and can support the weight of your camera and lens.
- Use a remote shutter release: Using a remote shutter release helps to prevent camera shake when taking photos at night. It also allows you to trigger the shutter without touching the camera, which can help to reduce the risk of blur.
- Set your camera settings: Set your camera to manual mode and adjust the settings to suit the light conditions. Use a low ISO, wide aperture, and long shutter speed to capture as much light as possible. Experiment with different shutter speeds to see what works best for your scene.
- Find a high vantage point: Look for a high vantage point, such as a hill or building, to give you a better view of the lightning. This will also help to reduce the risk of including unwanted objects in your frame.
- Use a wide-angle lens: A wide-angle lens will help you to capture a wider view of the scene, including more of the lightning. Experiment with different focal lengths to see what works best for your scene.
- Use a weather app: Check the weather forecast before you go out to shoot, and look for areas where thunderstorms are predicted. This will help you to plan your shoot and increase your chances of capturing lightning.
- Be patient: Lightning is unpredictable, so be patient and wait for the right moment to take your shot. It may take some time to capture the perfect image, so be prepared to wait for a while.
By following these tips, you can increase your chances of capturing stunning images of lightning at night. With careful planning and preparation, you can create images that are both awe-inspiring and memorable.
Final Thoughts on Night Photography
As you venture into the world of night photography, it’s important to remember that practice makes perfect. Experiment with different techniques, angles, and locations to develop your own unique style. Don’t be afraid to push the boundaries and try new things, as this is the only way to truly master this art form.
In addition, it’s crucial to stay patient and persistent. Night photography can be challenging, and it’s not always easy to capture the perfect shot. However, with time and effort, you’ll begin to see improvements in your work and will eventually be able to create stunning images that truly capture the magic of the night.
Lastly, always keep in mind the importance of respecting the environment and local regulations when shooting at night. Be mindful of your surroundings and the impact your actions may have on the world around you. With these final thoughts in mind, you’re ready to take your night photography skills to the next level and create breathtaking images that will leave a lasting impression.
Inspiring Others to Capture the Magic of Night
When it comes to night photography, inspiring others to capture the magic of night is an essential aspect that cannot be overlooked. Here are some tips to help you inspire others to capture the beauty of night:
- Share Your Knowledge
Sharing your knowledge and experience with others is a great way to inspire them to take up night photography. You can share your tips, tricks, and techniques with others, and even offer to mentor them. By sharing your knowledge, you can help others develop their skills and appreciate the beauty of night photography. - Showcase Your Work
Showcasing your work is another effective way to inspire others to capture the magic of night. By sharing your photographs on social media or in galleries, you can show others what is possible with night photography. Your images can serve as a source of inspiration and motivation for others to pursue this type of photography. - Lead Group Shoots
Leading group shoots is a great way to inspire others to capture the magic of night. By organizing group shoots, you can bring together like-minded individuals who are interested in night photography. During these shoots, you can share your knowledge, provide guidance, and help others develop their skills. - Organize Workshops and Events
Organizing workshops and events is another effective way to inspire others to capture the magic of night. By organizing workshops and events, you can provide a platform for others to learn and develop their skills. You can invite experts to speak, provide hands-on training, and offer opportunities for participants to practice their skills. - Encourage Collaboration
Encouraging collaboration is an excellent way to inspire others to capture the magic of night. By collaborating with others, you can share ideas, techniques, and knowledge. Collaboration can also lead to the creation of stunning images that showcase the beauty of night photography.
By following these tips, you can inspire others to capture the magic of night and help them develop their skills in night photography. Remember that by sharing your knowledge and experience, you can help others appreciate the beauty of night photography and inspire them to pursue this exciting and rewarding hobby.
FAQs
1. What equipment do I need for night photography?
Night photography requires specific equipment to capture the low light conditions. A DSLR or mirrorless camera with manual controls is essential, as it allows you to adjust the settings according to the lighting conditions. A tripod is also crucial to keep the camera stable during long exposures. Additionally, a remote shutter release or the camera’s self-timer can help minimize camera shake. Finally, a wide-angle lens is recommended to capture more of the night scene.
2. What settings should I use for night photography?
The settings for night photography depend on the available light and the desired effect. In general, a low ISO (100-400) is recommended to minimize noise, while a wider aperture (f/2.8-f/4) is used to allow more light into the camera. A slower shutter speed (15 seconds to several minutes) is needed to capture the low light, but a tripod is necessary to keep the camera stable. Adjusting the white balance to either “cloudy” or “tungsten” can help enhance the colors in the scene. Finally, manual focus or using the focus peaking feature can ensure sharpness in the image.
3. How do I take pictures of the stars?
Taking pictures of the stars requires specific techniques to capture the faint light of the stars against a dark sky. First, use a wide-angle lens (14mm or wider) to capture as much of the sky as possible. A high ISO (800-3200) is necessary to capture the faint light of the stars, while a low aperture (f/2.8 or wider) allows more light into the camera. A long exposure (30 seconds to several minutes) is required to capture the stars’ trails, and a remote shutter release or the camera’s self-timer can help minimize camera shake. Finally, use manual focus or the focus peaking feature to ensure sharpness in the stars.
4. How do I avoid camera shake during long exposures?
Camera shake can ruin a night photograph, so it’s essential to minimize it. Using a tripod is the most effective way to stabilize the camera during long exposures. A remote shutter release or the camera’s self-timer can also help minimize camera shake by delaying the shutter release. Additionally, using a sturdy tripod with a panning head can allow for smooth panning movements during long exposures. Finally, bracketing, or taking multiple shots at different exposures, can help ensure at least one image is sharp.
5. How do I edit my night photographs?
Editing night photographs can enhance the colors and brightness of the image. Adjusting the white balance to match the scene can help enhance the colors. Using a low saturation setting can help reduce noise in the image. Adjusting the contrast and brightness can help bring out the details in the scene. Finally, adding a gradient filter can help reduce lens distortion and enhance the sky’s colors.