Are you wondering if you can capture stunning macro shots with a 50mm lens? Absolutely! The idea that you need a specific macro lens to capture close-up shots is a myth. A 50mm lens, whether it’s a prime or a zoom lens, can produce incredible macro photography results with the right techniques and equipment. In this comprehensive guide, we’ll explore the ins and outs of macro photography with a 50mm lens, from setting up your shot to editing your photos. Get ready to expand your photography skills and discover the beauty of the world through a new lens!
What is Macro Photography?
Definition and Basics
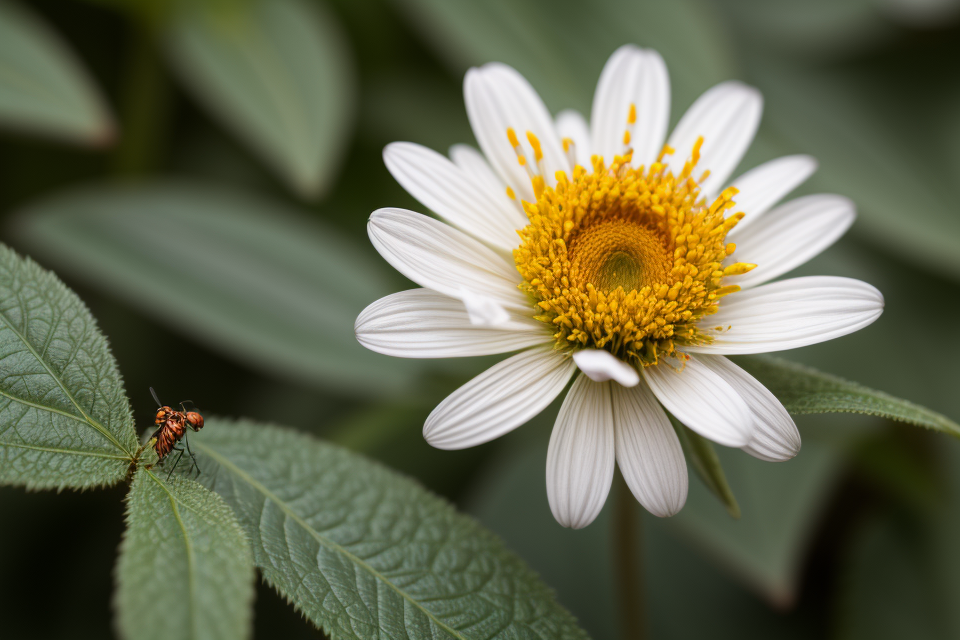
Macro photography is a type of photography that captures images of small objects at a larger-than-life scale. The term “macro” is derived from the Greek word “makros,” which means “large.” Macro photography allows photographers to explore the intricate details and beauty of everyday objects that are often overlooked by the naked eye.
One of the most important aspects of macro photography is understanding the relationship between the camera, the subject, and the photographer. This relationship is often referred to as the “macro world.” In this world, the photographer must be aware of the distance between the camera and the subject, as well as the size of the subject in relation to the camera’s field of view.
Another fundamental aspect of macro photography is lighting. Lighting is critical in capturing the intricate details of a subject. The use of natural light, artificial light, or a combination of both can be used to create the desired effect.
Macro photography also requires a good understanding of composition and focus. Composition is important in macro photography because it allows the photographer to create a visually pleasing image that showcases the subject’s intricate details. Focus is also critical in macro photography because it determines the sharpness of the image. A well-focused image can make all the difference in capturing the beauty of a subject.
Overall, macro photography is a fascinating and challenging type of photography that requires attention to detail, technical knowledge, and creativity. By understanding the basics of macro photography, photographers can capture stunning images of small objects that are often overlooked by the naked eye.
Importance of Macro Photography
Macro photography is a unique form of photography that captures the smallest details of an object, often magnifying it by several times its actual size. The term “macro” means “large” or “big,” but in the context of photography, it refers to capturing an image at a much larger scale than the subject. This technique allows photographers to capture details that are not visible to the naked eye, making it a valuable tool for scientists, artists, and anyone interested in exploring the world around them.
The importance of macro photography lies in its ability to reveal the hidden beauty of the world around us. It allows us to see the intricate details of a flower’s petals, the patterns on a butterfly’s wings, or the textures of a spider’s web. By capturing these details, macro photography helps us appreciate the beauty of the natural world and the intricate design of living organisms.
In addition to its aesthetic value, macro photography also has practical applications. It is used in scientific research to capture detailed images of specimens, allowing researchers to study them in greater detail. It is also used in product photography to showcase the intricate details of products, from electronic components to jewelry.
Furthermore, macro photography can be a source of inspiration and creativity for photographers. It encourages them to look beyond the obvious and explore new perspectives and angles. It can also lead to new discoveries and insights, as photographers often stumble upon unexpected details and patterns that they may not have noticed before.
Overall, the importance of macro photography lies in its ability to reveal the hidden beauty of the world around us, its practical applications in scientific research and product photography, and its potential to inspire creativity and new discoveries.
Can You Do Macro Photography with a 50mm Lens?
Understanding the 50mm Lens
The 50mm lens is a versatile piece of equipment that is often used for a variety of photography styles, including portraiture and landscape photography. However, it is also a popular choice for macro photography due to its ability to capture sharp images and its relatively low cost compared to other macro lenses.
When it comes to macro photography, the 50mm lens offers a number of advantages. Firstly, it has a relatively short minimum focusing distance, which allows you to get up close and personal with your subject. Additionally, the 50mm lens has a fixed focal length, which means that there is no zooming in or out, making it easier to achieve a consistent perspective throughout your images.
However, it is important to note that the 50mm lens is not specifically designed for macro photography, and as such, it may not offer the same level of magnification as a dedicated macro lens. Nevertheless, with some creativity and careful composition, it is possible to capture stunning macro images using a 50mm lens.
Pros and Cons of Using a 50mm Lens for Macro Photography
While it is possible to capture macro photography images with a 50mm lens, it may not be the best option for all photographers. There are pros and cons to using a 50mm lens for macro photography that should be considered before making a decision.
Pros:
- Affordability: A 50mm lens is often more affordable than a dedicated macro lens, making it a great option for those on a budget.
- Versatility: A 50mm lens can be used for a variety of photography styles, not just macro. This versatility can be useful for photographers who don’t want to invest in multiple lenses.
- Low-light capabilities: The wide aperture of a 50mm lens allows for more light to enter the camera, making it easier to capture images in low-light situations.
Cons:
- Minimum focusing distance: The minimum focusing distance of a 50mm lens is typically further away than a dedicated macro lens, which means that it may not be able to capture the level of detail that a dedicated macro lens can.
- Limited magnification: While a 50mm lens can capture close-up images, it may not be able to achieve the same level of magnification as a dedicated macro lens.
- Limited control: A 50mm lens may not offer the same level of control over focus and aperture as a dedicated macro lens, which can limit the photographer’s ability to create the desired image.
Overall, the decision to use a 50mm lens for macro photography will depend on the photographer’s specific needs and preferences. While it may not be the best option for all photographers, it can be a great choice for those looking for an affordable and versatile option.
Techniques for Macro Photography with a 50mm Lens
Focusing Techniques
Macro photography is all about capturing intricate details that are often overlooked by the naked eye. When it comes to using a 50mm lens for macro photography, the focusing technique is critical to ensuring that the subject is sharp and in focus. Here are some techniques for focusing when using a 50mm lens for macro photography:
Use the manual focus ring
One of the most effective ways to focus when using a 50mm lens for macro photography is to use the manual focus ring. This allows you to precisely adjust the focus to ensure that the subject is sharp and in focus. To use the manual focus ring, turn it slowly until the subject is in focus. You can also use the magnification feature on the camera to help you see the subject more clearly.
Use live view mode
Another technique for focusing when using a 50mm lens for macro photography is to use the live view mode on your camera. This allows you to see the image on the camera’s screen and adjust the focus accordingly. To use live view mode, switch to live view mode on your camera and use the focus peaking feature to help you see the area of focus. You can also zoom in on the subject to make it easier to focus.
Use a tripod
When using a 50mm lens for macro photography, it’s important to use a tripod to keep the camera steady and prevent blurry images. A tripod will also help you to use slower shutter speeds, which can be useful for capturing detail shots. Make sure to adjust the focus carefully when using a tripod, as any small movement can affect the final image.
Use focus stacking
Finally, focus stacking is a technique that involves taking multiple shots of the same subject at different focus points, and then combining them in post-processing to create a sharp image from head to toe. This technique can be particularly useful when shooting subjects with a lot of detail, such as flowers or insects. To use focus stacking, set up your camera on a tripod and take multiple shots of the subject at different focus points. Then, use photo editing software to combine the images into a single, sharp image.
Lighting Techniques
Proper lighting is essential for achieving stunning macro photographs with a 50mm lens. Here are some techniques to consider:
- Soft Lighting: Soft lighting is ideal for macro photography as it helps in minimizing shadows and highlighting the details of the subject. This can be achieved by using diffusers, reflectors, or by placing the light source at a distance from the subject.
- Ring Light: A ring light is a popular choice for macro photography as it provides even, circular lighting that highlights the subject and reduces shadows. The ring light can be adjusted to the desired intensity and distance to achieve the desired effect.
- Backlighting: Backlighting is a technique where the subject is lit from behind. This technique creates a halo effect around the subject and helps in separating it from the background. This technique works well for shooting transparent or translucent objects.
- Natural Light: Natural light is a great option for macro photography as it is free and easy to set up. The best time for natural light is during the golden hour, just after sunrise or before sunset, when the light is soft and diffused.
- Flat Panel Lights: Flat panel lights are versatile and can be used to create a variety of lighting effects. They can be positioned at different angles and distances to create the desired effect.
- Strobist Technique: The strobist technique involves using external flash units placed at different angles and distances to create a desired lighting effect. This technique requires some experimentation and knowledge of flash photography.
It is important to experiment with different lighting techniques to find the best one for your subject and desired effect. Proper lighting can make a significant difference in the quality and appearance of your macro photographs.
Composition and Frame Filling Techniques
Composition and frame filling techniques are essential skills to master when shooting macro photography with a 50mm lens. The 50mm focal length offers a unique perspective that can create striking images with creative compositions. Here are some techniques to help you capture outstanding macro shots:
- Rule of Thirds:
- The rule of thirds is a fundamental principle in photography that suggests dividing the frame into thirds vertically and horizontally, creating four equal parts.
- When composing a macro shot, consider placing the subject at one of the intersection points or along the gridlines to create a more dynamic and visually appealing image.
- Leading Lines:
- Leading lines are elements in the scene that lead the viewer’s eye from the foreground to the background or vice versa.
- In macro photography, you can use environmental elements such as branches, leaves, or stems as leading lines to guide the viewer’s attention to the main subject.
- Depth of Field:
- Depth of field (DOF) refers to the area in the image that appears in focus, from the nearest point to the farthest point.
- To maximize the depth of field in macro photography, use a small aperture (high f-number) and focus on the nearest point in the scene, ensuring that the subject is sharp while the background is blurred.
- Symmetry and Patterns:
- Look for symmetry and patterns in the scene, such as the arrangement of petals, leaves, or other elements.
- Frames and frames these symmetrical or patterned elements to create visually pleasing compositions that showcase the beauty of the subject.
- Fill the Frame:
- Filling the frame is a technique that involves placing the subject in the center of the image or filling most of the frame with the subject.
- This technique can be particularly effective in macro photography as it emphasizes the details and intricacies of the subject, creating a powerful and intimate connection with the viewer.
- Balance and Contrast:
- Strive for balance in your compositions by placing elements in the scene that complement each other in terms of color, texture, or shape.
- Contrast can also be used to create visual interest, by pairing elements that are different in some way, such as light and shadow, or soft and hard textures.
By incorporating these composition and frame filling techniques into your macro photography with a 50mm lens, you can create stunning and engaging images that showcase the beauty and intricacy of your subjects.
Macro Photography with a 50mm Lens: Best Practices
Camera Settings
To capture stunning macro photographs with a 50mm lens, it is essential to pay close attention to your camera settings. The right settings can help you achieve the desired depth of field, focus, and exposure. Here are some tips to consider when setting up your camera for macro photography:
- Aperture: Choose an aperture that will provide the depth of field you desire. A lower aperture (higher f-stop) will result in a deeper depth of field, while a higher aperture (lower f-stop) will produce a shallower depth of field. For macro photography, a narrower aperture is generally recommended to ensure that both the subject and the background are in focus.
- Shutter Speed: Macro photography often requires a slower shutter speed to capture fine details. A shutter speed of 1/200th of a second or slower is recommended to minimize camera shake and motion blur. If you’re shooting in low light conditions, consider using a tripod to stabilize the camera.
- ISO: Keep the ISO as low as possible to minimize digital noise. A lower ISO (e.g., ISO 100 or 200) will produce cleaner images, but it may require a longer shutter speed or wider aperture. Adjust the ISO only if necessary to achieve the desired exposure.
- Focus Mode: Use a single autofocus point or manual focus to ensure accurate focus on the subject. Single autofocus point is recommended if you want to control the exact point of focus, while manual focus allows for more precise adjustments. If your camera lacks manual focus capabilities, consider using a lens with manual focus override.
- Focus Stacking: If you’re unable to achieve the desired depth of field with a single aperture, consider using focus stacking. This technique involves taking multiple photos at different focus points and combining them in post-processing to create an image with a deeper depth of field.
- White Balance: Adjust the white balance to match the lighting conditions. This will help ensure accurate colors and reduce the need for post-processing adjustments. If you’re shooting in artificial light, consider using a custom white balance to achieve more accurate color reproduction.
- Image Stabilization: If your camera or lens has image stabilization, turn it on to help reduce the risk of camera shake and produce sharper images. If you’re shooting handheld, consider using a shutter speed of at least the focal length of the lens (e.g., 1/50th of a second for a 50mm lens) to minimize camera shake.
By paying attention to these camera settings, you can capture stunning macro photographs with your 50mm lens. Experiment with different settings to find the optimal configuration for your specific shooting conditions.
Lens Settings
When it comes to macro photography with a 50mm lens, the lens settings play a crucial role in achieving the desired results. Here are some tips to keep in mind:
- Aperture: A larger aperture (smaller f-number) will allow more light into the camera, which can be useful when shooting in low light conditions or when shooting at a wider aperture to create a shallow depth of field.
- Focus: The 50mm lens’s focusing distance will vary depending on the subject distance and the magnification ratio. To ensure accurate focusing, it’s essential to pre-focus and then fine-tune the focus based on the magnification ratio.
- Shutter Speed: A faster shutter speed is recommended when shooting macro to avoid camera shake and motion blur.
- ISO: Keep the ISO as low as possible to minimize noise and maintain image quality.
- Image Stabilization: If the lens does not have built-in image stabilization, consider using a tripod or other stabilizing device to minimize camera shake.
By following these lens settings tips, you can achieve sharp, well-lit, and detailed macro images with your 50mm lens.
Post-Processing Tips
- Adjust White Balance: Adjusting the white balance in post-processing can help enhance the colors in your macro photographs. This is particularly useful when shooting in artificial light or in different environments.
- Exposure Correction: Exposure correction can help bring out the details in your images. Overexpose or underexpose images as necessary to ensure that the highlights and shadows are optimized.
- Sharpening: Applying a sharpening filter can help bring out the fine details in your macro photographs. Use a low-pass filter or a high-frequency sharpening filter to enhance the clarity of your images.
- Noise Reduction: If your images appear noisy, use a noise reduction filter to remove the unwanted noise. However, be cautious as excessive noise reduction can also remove important details in your images.
- Color Grading: Adjusting the colors in your images can help create a specific mood or style. Use color grading to enhance the colors in your macro photographs, making them more vibrant or subdued as desired.
- Lens Correction: Lens distortion can affect the quality of your macro photographs. Use lens correction tools to correct for distortion, especially if you are using a wide-angle lens.
- Retouching: Finally, you may also consider retouching your macro photographs to remove blemishes, enhance skin tones, or adjust other small details. Use retouching tools to make subtle adjustments to your images without overdoing it.
Remember, while post-processing can enhance your macro photographs, it’s important to keep the processing to a minimum to maintain the integrity of your original image.
Future Scope of Macro Photography with a 50mm Lens
As macro photography continues to gain popularity, the scope for exploration with a 50mm lens is vast. This lens offers unique advantages, including its versatility and ability to capture intricate details, making it a valuable tool for photographers of all skill levels. Here are some of the exciting future directions for macro photography with a 50mm lens:
- Innovative Lighting Techniques: With the growing interest in macro photography, new lighting techniques are being developed to enhance the visual appeal of the images. From using multiple flashes to LED light panels, the possibilities are endless.
- Focus Stacking: This technique involves taking multiple images of a subject at different focus points and then combining them to create a single image with a greater depth of field. This approach allows for more creative freedom when composing shots and opens up new avenues for photographers.
- High-Speed Macro: The advancements in camera technology have enabled high-speed macro photography, which captures the subject’s movements in sharp detail. This type of photography requires careful planning, specialized equipment, and precise execution, making it a challenging and rewarding area of focus.
- Microscopy and Biological Macro: The study of tiny organisms and their intricate structures is a fascinating area of macro photography. As technology advances, so does the ability to capture images at an even smaller scale, opening up new opportunities for scientific exploration and artistic expression.
- Exploring New Subjects: Macro photography with a 50mm lens can be applied to a wide range of subjects, from nature and wildlife to industrial and architectural scenes. As photographers continue to push the boundaries of what is possible, the scope for macro photography with a 50mm lens will only continue to expand.
By embracing these emerging trends and continuing to push the boundaries of macro photography, photographers can create stunning images that capture the imagination and inspire new ways of seeing the world.
FAQs
1. What is macro photography?
Macro photography is a type of photography that captures small details of objects and subjects at a 1:1 ratio or larger, making them appear life-size or larger on the camera’s sensor. This allows photographers to capture intricate details that are often overlooked with normal lenses.
2. What is a 50mm lens?
A 50mm lens is a type of prime lens that is commonly used in photography. It has a fixed focal length of 50mm, which makes it ideal for a variety of shooting scenarios, including portraiture, street photography, and landscapes. The 50mm lens is also known for its natural field of view, which is similar to the human eye.
3. Can you do macro photography with a 50mm lens?
Yes, you can do macro photography with a 50mm lens, but it requires some creativity and experimentation. While a 50mm lens is not specifically designed for macro photography, it can still capture small details at a 1:1 ratio or larger with the right technique. This includes using a macro extension tube or a reversal lens setup, as well as adjusting your shooting distance and focus techniques.
4. What are macro extension tubes?
Macro extension tubes are devices that fit between the camera body and the lens, allowing you to get closer to your subject while maintaining a working distance. This is essential for macro photography, as it allows you to capture small details at a larger scale. Macro extension tubes come in different lengths, and each length adds a certain amount of additional space between the lens and the subject.
5. What is a reversal lens setup?
A reversal lens setup is a technique used in macro photography where you attach a lens to your camera backwards. This allows you to use the lens as a magnifying glass, which can capture small details at a larger scale. To do this, you will need to remove the front element of the lens and attach it to your camera using a lens mount adapter. This setup requires careful focus and adjustment to get the best results.
6. How do you adjust your shooting distance for macro photography with a 50mm lens?
To adjust your shooting distance for macro photography with a 50mm lens, you will need to move your camera closer to your subject. This can be done by using a macro extension tube or a reversal lens setup, as mentioned earlier. Additionally, you can also adjust your shooting distance by changing your shooting position and angle. Experimenting with different distances and angles can help you achieve the desired level of magnification and detail in your macro shots.
7. How do you focus for macro photography with a 50mm lens?
To focus for macro photography with a 50mm lens, you will need to use manual focus. This is because the camera’s autofocus system may not be able to accurately focus on small details at a larger scale. Manual focus allows you to precisely adjust the focus ring on your lens to achieve the desired level of sharpness and detail in your macro shots. It may take some practice and experimentation to get the hang of manual focus, but with time and patience, you can achieve stunning macro results with a 50mm lens.


