Are you ready to take your photography skills to the next level? Mastering the art of composition is essential for creating stunning and impactful images. In this article, we will explore the nine essential rules of composition that every photographer should know. From the rule of thirds to leading lines, these principles will help you to create more visually appealing and balanced photographs. So, get ready to elevate your photography game with these composition techniques that will take your images from ordinary to extraordinary.
Rule 1: The Rule of Thirds
Applying the Rule of Thirds
When it comes to photography, the rule of thirds is a fundamental principle that every photographer should know. It is a guideline that helps photographers to create more visually appealing images by placing the main subject or key elements of the image at the intersection points of a grid, divided into thirds, both horizontally and vertically.
By applying the rule of thirds, photographers can create a sense of balance and harmony in their images. This composition technique is especially useful when photographing landscapes, cityscapes, and still-life subjects. It helps to create a dynamic and interesting arrangement of elements within the frame, which can lead to more engaging and impactful images.
One way to apply the rule of thirds is to use the grid lines on the camera’s viewfinder or the image’s histogram. By aligning the main subject or key elements of the image with the intersection points of the grid, photographers can create a more dynamic and visually pleasing composition.
Another way to apply the rule of thirds is to use the “golden ratio,” which is a mathematical ratio that is often used in art and design. This ratio is based on the Fibonacci sequence, which is a series of numbers in which each number is the sum of the two preceding numbers. The golden ratio is approximately 1.618, and it can be used to create a more balanced and harmonious composition by placing the main subject or key elements of the image at specific points along the grid.
It’s important to note that while the rule of thirds is a useful guideline, it’s not a hard and fast rule. Photographers should feel free to break the rule of thirds if it helps to create a more interesting or dynamic composition. For example, placing the main subject off-center or using negative space can also create a strong and impactful image.
In summary, applying the rule of thirds is a fundamental principle that every photographer should know. It helps to create a sense of balance and harmony in images by placing the main subject or key elements of the image at the intersection points of a grid divided into thirds. While it’s a useful guideline, photographers should feel free to break the rule of thirds if it helps to create a more interesting or dynamic composition.
Finding the Focal Point
Finding the focal point is an essential aspect of photography composition. It refers to the point of interest in an image, around which the other elements in the frame are arranged. This technique is often used to draw the viewer’s attention to the main subject or to create a sense of balance and harmony in the image.
One of the most common methods for finding the focal point is to use the rule of thirds. This principle suggests that the main subject should be placed at one of the four intersection points of a grid that divides the image into nine equal parts. By placing the subject at these points, the image becomes more visually appealing and dynamic.
However, it is important to note that the rule of thirds is not a hard and fast rule. Photographers should use their creative judgment to determine the best placement for the focal point. It is also important to consider the context of the image and the message that the photographer wants to convey.
In addition to the rule of thirds, other techniques can be used to find the focal point, such as leading lines, framing, and negative space. These techniques can be used alone or in combination to create a more dynamic and engaging image.
In conclusion, finding the focal point is a crucial aspect of photography composition. By using techniques such as the rule of thirds, leading lines, framing, and negative space, photographers can create images that are visually appealing and convey a sense of balance and harmony.
Rule 2: Leading Lines
Using Leading Lines
Leading lines are a powerful tool in photography that can lead the viewer’s eye through the image and create a sense of depth and movement. By carefully placing lines in the foreground, photographers can guide the viewer’s eye towards the main subject of the image. Here are some tips for using leading lines in your photography:
- Look for natural lines: Leading lines don’t have to be obvious or man-made. In fact, some of the most effective leading lines are natural features of the scene, such as tree branches, winding roads, or the edge of a building.
- Consider the perspective: When composing your shot, think about the perspective of the leading line. Will it draw the viewer’s eye directly to the main subject, or will it create a sense of movement or tension?
- Be creative with framing: Leading lines don’t have to be straight. By framing the subject with curves or angles, you can create a more dynamic composition.
- Experiment with different angles: Leading lines can be effective from a variety of angles, so don’t be afraid to experiment. Try shooting from high or low angles to create a more dynamic composition.
- Look for patterns: Leading lines can also be created by patterns in the scene, such as the stripes on a building or the cracks in a sidewalk. These patterns can add a sense of movement and energy to the image.
- Be mindful of the context: When using leading lines, it’s important to consider the context of the scene. Are the lines natural or man-made? What is the mood or tone of the image? All of these factors can influence the effectiveness of the leading lines.
By incorporating leading lines into your photography, you can create more dynamic and engaging compositions that draw the viewer’s eye to the main subject.
Examples of Leading Lines
Leading lines are a powerful compositional tool that can help guide the viewer’s eye through an image. They are lines in the scene that lead the viewer’s eye to the main subject or to a particular point of interest. Here are some examples of leading lines:
- A road or path leading to a distant point of interest
- A diagonal line of buildings or trees
- A fence or wall leading to a main subject
- A set of stairs or a hallway leading to a doorway
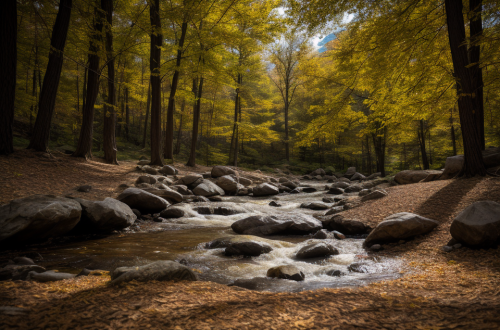
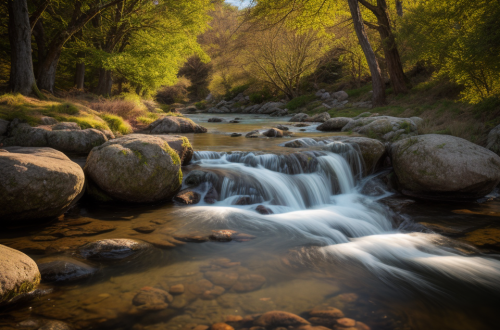
- A river or stream flowing through the scene
- A row of trees or a line of mountains
- A horizon line with a vanishing point
- A railroad track leading to a train
- A set of power lines or electrical wires
These are just a few examples of leading lines, but there are many other types of lines that can be used to create leading lines in an image. By using leading lines, photographers can draw the viewer’s eye to the main subject or to a particular point of interest in the scene. This can help create a sense of depth and movement in the image, and can make the composition more dynamic and engaging.
Rule 3: Depth of Field
Understanding Depth of Field
Depth of field (DOF) refers to the distance range in a photo that appears in focus, from the nearest point to the farthest point. Understanding DOF is crucial for photographers, as it enables them to control which parts of an image are sharp and which are blurred.
How DOF is affected
- Aperture: The aperture setting determines the size of the camera’s aperture, which directly affects the amount of light that enters the camera. A larger aperture (a smaller f-number) results in a shallower DOF, while a smaller aperture (a larger f-number) results in a deeper DOF.
- Focal length: The focal length of the lens affects the DOF. A longer focal length (such as a telephoto lens) produces a shallower DOF, while a shorter focal length (such as a wide-angle lens) produces a deeper DOF.
- Distance: The distance between the camera, the subject, and the background affects the DOF. The closer the subject is to the camera, the shallower the DOF will be. The farther away the subject is, the deeper the DOF will be.
Controlling DOF
Controlling DOF is an essential skill for photographers, as it allows them to create specific effects and focus the viewer’s attention on the subject. Here are some techniques to control DOF:
- Choose the right aperture: A larger aperture (smaller f-number) will result in a shallower DOF, while a smaller aperture (larger f-number) will result in a deeper DOF.
- Use a longer or shorter focal length: A longer focal length (telephoto lens) will produce a shallower DOF, while a shorter focal length (wide-angle lens) will produce a deeper DOF.
- Move closer or farther away from the subject: The closer the subject is to the camera, the shallower the DOF will be. The farther away the subject is, the deeper the DOF will be.
By understanding and controlling DOF, photographers can create images with a specific look and draw the viewer’s attention to the subject.
Tips for Achieving Shallow Depth of Field
When it comes to depth of field, photographers have two main options: shallow depth of field and deep depth of field. Shallow depth of field is often preferred because it creates a more dynamic and visually appealing image. Here are some tips for achieving shallow depth of field:
- Use a wide aperture: One of the most effective ways to achieve shallow depth of field is to use a wide aperture. This can be done by using a lens with a low f-stop number, such as f/1.8 or f/2.8.
- Shoot at a wide angle: Shooting at a wide angle also helps to create a shallow depth of field. This is because the lens has to be opened up more to achieve the same depth of field as a longer focal length.
- Move closer to your subject: Another way to achieve shallow depth of field is to move closer to your subject. This helps to isolate your subject from the background and create a more dramatic effect.
- Use a long lens: A long lens, such as a telephoto lens, can also help to create a shallow depth of field. This is because the lens has to be opened up more to achieve the same depth of field as a shorter focal length.
- Consider the distance between subjects: The distance between your subject and the background can also affect the depth of field. Shooting with a shallow depth of field means that the background will be blurred, so consider the distance between your subject and the background when composing your shot.
By following these tips, photographers can achieve a shallow depth of field and create more dynamic and visually appealing images.
Rule 4: Framing
Finding the Perfect Frame
When it comes to composition, finding the perfect frame is essential for creating a visually appealing image. A well-chosen frame can help to draw the viewer’s attention to the subject and guide them through the image. Here are some tips for finding the perfect frame:
- Experiment with different angles: Sometimes, the most interesting frames are found by shooting from an unusual angle. Experiment with different angles to find the one that works best for your image.
- Use leading lines: Leading lines are a great way to draw the viewer’s eye through the image. Look for leading lines in the scene, such as roads, paths, or lines of buildings, and use them to frame the subject.
- Look for patterns: Patterns can be a great way to add interest to an image and create a strong frame. Look for patterns in the scene, such as textures or shapes, and use them to frame the subject.
- Use negative space: Negative space can be a powerful tool for creating a strong frame. By leaving space around the subject, you can draw the viewer’s attention to it and create a sense of depth in the image.
- Be mindful of the background: The background can have a big impact on the overall composition of the image. Look for interesting or unique backgrounds that can help to frame the subject and add depth to the image.
By following these tips, you can find the perfect frame for your images and create compositions that are both visually appealing and impactful.
Using Environmental Framing
Environmental framing is a technique used in photography where the photographer uses the environment or surroundings to frame the subject. This technique can add depth and context to the photograph and make it more visually appealing.
One way to use environmental framing is to find an object in the environment that can act as a frame for the subject. This could be a doorway, a window, a tree, or any other object that can create a natural frame around the subject. By using an object in the environment as a frame, the photographer can add depth and dimension to the photograph and create a more dynamic composition.
Another way to use environmental framing is to use the environment itself as a frame. This could be done by framing the subject with the edges of the frame, or by using negative space to create a frame around the subject. This technique can be especially effective when shooting landscapes or cityscapes, as it can create a sense of depth and perspective in the photograph.
To effectively use environmental framing, it is important to consider the surroundings and find elements that can enhance the composition. This could include finding interesting textures, patterns, or colors in the environment that can add visual interest to the photograph. Additionally, paying attention to the light and shadows in the environment can also help create a more dynamic composition.
Overall, environmental framing is a powerful technique that can add depth and context to a photograph. By using the environment to frame the subject, photographers can create more dynamic and visually appealing compositions.
Rule 5: Symmetry and Patterns
Finding Symmetry and Patterns
As photographers, we often strive to create images that are visually appealing and pleasing to the eye. One way to achieve this is by utilizing symmetry and patterns in our compositions. Symmetry and patterns can add a sense of balance and harmony to an image, making it more aesthetically pleasing and interesting to the viewer.
There are many different types of symmetry and patterns that we can incorporate into our compositions, from geometric shapes to natural patterns found in the world around us. Here are some tips for finding symmetry and patterns in your photography:
- Look for repeating shapes and patterns in your surroundings, such as the branches of a tree or the tiles on a building’s facade.
- Pay attention to the angles and lines in your environment, and look for ways to frame them in a way that creates symmetry or a repeating pattern.
- Use reflections in water, mirrors, or other surfaces to create symmetry in your images.
- Look for repeating shapes and patterns in nature, such as the ripples in a body of water or the cracks in a rock.
- Experiment with framing and composition to create interesting patterns and symmetries in your images.
By incorporating symmetry and patterns into your compositions, you can create images that are not only visually appealing but also tell a story or convey a message. Whether you’re shooting landscapes, still lifes, or street scenes, keep an eye out for opportunities to incorporate symmetry and patterns into your work.
Examples of Symmetry and Patterns
One of the most captivating elements in photography is symmetry and patterns. These compositional tools can create stunning visuals and evoke a sense of balance and harmony in the image. By understanding how to use symmetry and patterns effectively, photographers can create compelling photographs that capture the viewer’s attention.
Symmetry in photography refers to the balance and uniformity of elements in the image. This can be achieved by placing the subject in the center of the frame or by dividing the image into equal halves. Symmetry can be found in various forms, such as vertical, horizontal, and diagonal lines. When using symmetry, it is essential to consider the placement of the subject and the surrounding elements to create a visually appealing composition.
Patterns, on the other hand, are repetitive elements that can be found in nature, architecture, or even man-made structures. Photographers can use patterns to create a sense of depth and texture in the image. By capturing patterns, photographers can create dynamic compositions that draw the viewer’s eye through the image.
Here are some examples of symmetry and patterns in photography:
- Reflections: Reflections can create symmetrical patterns in water, glass, or metal surfaces. By capturing these reflections, photographers can create visually appealing compositions that showcase the beauty of symmetry.
- Architectural structures: Buildings, bridges, and other architectural structures can provide excellent opportunities for photographers to capture symmetrical patterns. By framing the subject within the structure, photographers can create a sense of balance and harmony in the image.
- Nature: Nature is full of patterns, from the spiral of a snail shell to the intricate branches of a tree. By capturing these patterns, photographers can create dynamic compositions that showcase the beauty of nature.
- Lines: Lines can create patterns in the image, whether it’s the linear lines of a building or the diagonal lines of a mountain range. By using lines effectively, photographers can create compositions that lead the viewer’s eye through the image.
Overall, symmetry and patterns are powerful compositional tools that can create stunning visuals in photography. By understanding how to use these elements effectively, photographers can create compelling photographs that capture the viewer’s attention and evoke a sense of balance and harmony in the image.
Rule 6: Contrast
Understanding Contrast
Contrast is a fundamental aspect of photography that can greatly impact the visual appeal of an image. It refers to the difference in brightness and color between elements within a scene. By understanding and effectively utilizing contrast, photographers can create dynamic and engaging compositions that draw the viewer’s attention and convey a sense of depth and dimensionality.
In photography, contrast can be categorized into several types, including:
- Tonal Contrast: This refers to the difference in brightness or tonal values between elements within an image. It can be achieved by using a high-contrast filter or by adjusting the exposure settings during post-processing.
- Color Contrast: This type of contrast is created by using colors that are opposite each other on the color wheel, such as complementary colors. Color contrast can be used to create vibrant and visually striking images.
- Texture Contrast: This type of contrast is created by juxtaposing different textures within an image. It can be used to add visual interest and depth to a composition.
In addition to these types of contrast, photographers can also manipulate contrast by adjusting the exposure, saturation, and hue of different elements within an image. This can be done using post-processing software such as Adobe Lightroom or Photoshop.
By understanding and effectively utilizing contrast, photographers can create images that are visually appealing and impactful. It is an essential skill that every photographer should master in order to take their photography to the next level.
Using Contrast to Improve Your Photos
Contrast is a crucial element in photography that can greatly impact the visual appeal of an image. It refers to the difference in brightness and color between different parts of the scene. By mastering the use of contrast, photographers can create images that are more dynamic, engaging, and visually striking.
There are several ways to use contrast to improve your photos. One of the most effective methods is to use the “rule of thirds.” This principle suggests that an image should be divided into thirds vertically and horizontally, creating nine equal parts. By placing the subject of the photo at one of the intersection points or along the lines, photographers can create a more visually pleasing composition that follows the natural flow of the eye.
Another way to use contrast is to play with the brightness and darkness of different parts of the scene. This can be achieved by using shadows and highlights to create depth and dimension in the image. For example, photographers can use the sun to create contrasting shadows on a subject’s face, which can add character and depth to the photo.
Color contrast is also an important aspect of composition. By using colors that are opposite each other on the color wheel, photographers can create a sense of balance and harmony in the image. This technique is known as “complementary contrast” and can be used to great effect in landscape, still life, and portrait photography.
In addition to these techniques, photographers can also use contrast to create a sense of movement and energy in their photos. By using leading lines, diagonal lines, and other compositional techniques, photographers can create images that are more dynamic and engaging.
Overall, contrast is a powerful tool that can be used to improve the visual appeal of any photo. By mastering the use of contrast, photographers can create images that are more dynamic, engaging, and visually striking.
Rule 7: Light and Shadows
Using Light and Shadows to Your Advantage
Understanding how to utilize light and shadows can greatly enhance your photography. By manipulating these elements, you can create a variety of moods and effects in your images. Here are some tips for using light and shadows to your advantage:
- Experiment with different light sources: Try shooting with natural light, artificial light, or a combination of both. Experiment with the direction and intensity of the light to see how it affects the mood and tone of your images.
- Use shadows to create depth and dimension: Shadows can add depth and dimension to your images, creating a sense of mystery and intrigue. Experiment with shooting in low light conditions or using shadows to create contrast and interest in your images.
- Create silhouettes: Silhouettes can be a powerful way to add interest and drama to your images. Experiment with shooting subjects against bright backgrounds or using the sun as a backlight to create dramatic silhouettes.
- Play with contrast: Contrast can add interest and depth to your images. Experiment with shooting in bright light conditions and then switching to shadows or vice versa to see how it affects the contrast in your images.
- Experiment with light and shadow in post-processing: You can also experiment with light and shadow in post-processing. Use software tools to adjust the brightness, contrast, and saturation of your images to create the desired effect.
By understanding how to use light and shadows, you can create more dynamic and interesting images that tell a story and evoke emotion in the viewer.
Examples of Light and Shadows
In photography, light and shadows play a crucial role in creating depth, dimension, and mood in an image. By understanding how to manipulate light and shadows, photographers can add interest and drama to their compositions. Here are some examples of how light and shadows can be used to enhance an image:
Low Key Lighting
Low key lighting is a technique that involves using a single light source to create a dramatic, moody image. This can be achieved by using a small light source, such as a desk lamp or a spotlight, to cast a shadow on one side of the subject’s face. This creates a dramatic, moody image that can be used to convey a sense of mystery or intrigue.
High Key Lighting
High key lighting is a technique that involves using multiple light sources to create a bright, airy image. This can be achieved by using a softbox or a diffuser to spread the light evenly across the subject’s face. This creates a bright, airy image that can be used to convey a sense of joy or optimism.
Silhouette
A silhouette is a technique that involves using a light source behind the subject to create a dark outline. This can be achieved by using a bright light source, such as the sun, to create a strong contrast between the subject and the background. This creates a dramatic, striking image that can be used to convey a sense of danger or intrigue.
Chiaroscuro
Chiaroscuro is a technique that involves using strong contrasts of light and shadow to create a dramatic, dynamic image. This can be achieved by using a single light source to create strong shadows on one side of the subject’s face, while leaving the other side in bright light. This creates a dramatic, dynamic image that can be used to convey a sense of power or intensity.
Shadows and Texture
Shadows and texture can be used to add interest and depth to an image. By using shadows to create contrast and texture, photographers can add interest and dimension to their compositions. This can be achieved by using a variety of lighting techniques, such as side lighting or backlighting, to create interesting shadows and textures.
By understanding how to use light and shadows effectively, photographers can add interest and drama to their compositions, creating images that are both visually appealing and emotionally powerful.
Rule 8: Negative Space
Understanding Negative Space
Negative space is a crucial aspect of composition that every photographer should understand. It refers to the empty or unoccupied areas in an image that surround the main subject. Including negative space in your photos can create a sense of balance, emphasize the subject, and draw the viewer’s attention to the key elements of the image.
One of the benefits of incorporating negative space in your photography is that it can create a sense of scale and proportion. By having empty space around the subject, the viewer can better understand the size and distance of the subject in relation to its surroundings. This can be particularly useful when photographing landscapes, architecture, or any other scene where the subject’s size and scale are important.
Another advantage of negative space is that it can create a sense of balance and harmony in an image. By having empty space around the subject, the viewer’s eye is not overwhelmed with too much information, and the image becomes more visually appealing. This can be especially important when photographing people, as negative space can create a sense of calm and tranquility, allowing the viewer to focus on the subject’s emotions and expressions.
To effectively use negative space in your photography, it’s important to understand how to balance it with the subject. This can be achieved by placing the subject off-center or using a frame within the frame to create a sense of depth and dimension. Additionally, paying attention to the colors and textures of the negative space can also add depth and interest to the image.
Overall, understanding negative space is an essential aspect of composition that can greatly enhance the impact of your photographs. By incorporating negative space into your images, you can create a sense of balance, emphasize the subject, and draw the viewer’s attention to the key elements of the image.
Using Negative Space in Your Photos
Effective use of negative space can create a sense of depth and draw the viewer’s attention to the main subject in a photograph. By intentionally leaving empty space in the frame, you can create a more dynamic and visually appealing image.
One way to use negative space is to place the main subject off-center, creating a sense of movement and tension in the photograph. This technique can be particularly effective when photographing people or animals, as it can create a sense of intimacy and connection between the subject and the viewer.
Another way to use negative space is to create a sense of scale and perspective by including elements of the environment in the photograph. For example, by including a wide shot of a city skyline with a single person standing in the foreground, you can create a sense of scale and context that helps the viewer understand the size and scope of the environment.
Finally, negative space can be used to create a sense of calm and serenity in a photograph. By intentionally leaving empty space around the main subject, you can create a sense of stillness and tranquility that can be particularly effective in landscape and nature photography.
Overall, using negative space effectively can add depth and visual interest to your photographs, and can help you create more dynamic and engaging images.
Rule 9: Color
Understanding Color Theory
In order to master the art of photography, it is crucial to have a deep understanding of color theory. Color theory is the study of how colors interact with one another, and how they can be used to create different moods and emotions in a photograph. By understanding the basics of color theory, photographers can use color to their advantage, enhancing the visual impact of their images and creating more dynamic and compelling compositions.
There are three primary colors: red, blue, and yellow. All other colors are derived from these three primary colors. Understanding how these colors interact with one another is key to mastering color theory. For example, when red and blue are combined, they create the color purple. Similarly, when blue and yellow are combined, they create the color green. By understanding how these colors interact, photographers can use them to create different moods and emotions in their images.
Another important aspect of color theory is the concept of complementary colors. Complementary colors are colors that are opposite each other on the color wheel, such as red and green, or blue and orange. When complementary colors are used together, they can create a visually striking composition. For example, a photograph of a green leaf with a red flower in the background would be an example of complementary colors.
Additionally, the use of warm and cool colors can also enhance the mood and emotions of an image. Warm colors, such as red, orange, and yellow, tend to create a sense of warmth and energy, while cool colors, such as blue and green, tend to create a sense of calmness and tranquility. By carefully selecting and using warm and cool colors, photographers can enhance the overall impact of their images.
In conclusion, understanding color theory is essential for any photographer looking to master the art of photography. By understanding how colors interact with one another, as well as the use of complementary colors and warm and cool colors, photographers can create more dynamic and compelling compositions, and enhance the overall impact of their images.
Using Color to Enhance Your Photos
Color is a powerful tool that can be used to draw the viewer’s attention to specific elements in a photograph and to evoke emotions. By understanding how to use color effectively, you can create more dynamic and impactful images. Here are some tips for using color to enhance your photos:
Use Color to Draw Attention
One of the most common ways to use color in photography is to draw the viewer’s attention to a specific element in the image. This can be done by using a contrasting color to make the element stand out. For example, if you are photographing a person, you can use a bright color like red to draw attention to their clothing or accessories.
Use Color to Create Mood
Color can also be used to create a certain mood or atmosphere in a photograph. For example, warm colors like red and orange can create a sense of energy and excitement, while cool colors like blue and green can create a sense of calm and tranquility. When choosing colors for your photographs, consider the mood you want to convey and how different colors can contribute to that mood.
Use Color to Tell a Story
Another way to use color in photography is to tell a story or convey a message. For example, if you are photographing a political rally, you can use the colors of the protest signs or banners to convey the message being conveyed by the protesters. Similarly, if you are photographing a natural disaster, you can use the colors of the scene to convey the devastation and destruction caused by the event.
Use Color to Create Balance
Finally, color can be used to create balance in a photograph. This can be done by using complementary colors, which are colors that are opposite each other on the color wheel, to create a sense of harmony. For example, if you are photographing a landscape, you can use the warm colors of the sunset to balance the cool colors of the sky.
Overall, color is a powerful tool that can be used to enhance your photographs in many different ways. By understanding how to use color effectively, you can create more dynamic and impactful images that tell a story and evoke emotions in the viewer.
Further Reading
- “The Power of Color in Photography” by David DuChemin
- A comprehensive guide on how to use color effectively in photography, covering topics such as color theory, composition, and the emotional impact of color.
- David DuChemin is a well-known photographer and educator, and his insights on color are valuable for photographers of all skill levels.
- “Light and Color: An Introduction to the Theory of Color” by John Gage
- A classic text on color theory, covering topics such as the physics of light, color perception, and the use of color in art.
- This book is a must-read for photographers who want to understand the technical aspects of color and how it can be used to create powerful images.
- “Color in Photography” by Steve McSweeny
- A practical guide to using color in photography, covering topics such as choosing colors, using color to create mood, and working with color in post-processing.
- Steve McSweeny is a photographer and educator with a wealth of experience in the field, and his insights on color are both practical and effective.
- “The Photographer’s Eye: Composition and Design for Better Digital Photos” by Michael Melford
- A comprehensive guide to composition and design in photography, covering topics such as color, texture, and form.
- Michael Melford is a renowned landscape photographer, and his insights on color are valuable for photographers who want to create powerful and evocative images.
- “Color in Photography” by Bryan Peterson
- A comprehensive guide to using color in photography, covering topics such as color harmony, color temperature, and the use of color to create depth and dimension.
- Bryan Peterson is a well-known photographer and educator, and his insights on color are both practical and effective.
- “The Language of Light: Exploring the Art of Digital Photography” by Bruce Barnbaum
- A comprehensive guide to the art and science of photography, covering topics such as color, exposure, and composition.
- Bruce Barnbaum is a renowned photographer and educator, and his insights on color are valuable for photographers who want to create powerful and evocative images.
- “Understanding Color Management” by Drew Neisser
- A comprehensive guide to color management in photography, covering topics such as color calibration, color profiles, and color spaces.
- Drew Neisser is a photographer and educator with a wealth of experience in the field, and his insights on color management are valuable for photographers who want to ensure accurate and consistent color in their images.
- “Color in Photography” by Bill Schwab
- A comprehensive guide to using color in photography, covering topics such as color harmony, color temperature, and the use of color to create mood and atmosphere.
- Bill Schwab is a renowned photographer and educator, and his insights on color are both practical and effective.
- “Color in Photography” by Richard D. Zakia
- Richard D. Zakia is a renowned photographer and educator, and his insights on color are both practical and effective.
- “Color in Photography” by Frank C. Hutslar
- Frank C. Hutslar is a renowned photographer and educator, and his insights on color are both practical and effective.
FAQs
1. What are the 9 rules of composition in photography?
The 9 rules of composition in photography are a set of guidelines that help photographers create visually appealing images. These rules include the rule of thirds, leading lines, symmetry, depth of field, frame the subject, negative space, golden ratio, balance, and patterns. By following these rules, photographers can create more dynamic and visually appealing images.
2. What is the rule of thirds?
The rule of thirds is a fundamental principle of composition in photography. It involves dividing the image into thirds vertically and horizontally, creating a grid of nine equal parts. The idea is to place the subject of the image at one of the intersection points or along the grid lines, creating a more visually pleasing image. This technique is often used in landscape, still life, and portrait photography.
3. What are leading lines?
Leading lines are a compositional technique that involves using lines in the image to lead the viewer’s eye towards the subject. These lines can be anything from roads, paths, walls, or even natural features like rivers or streams. By using leading lines, photographers can create a sense of depth and movement in the image, leading the viewer’s eye towards the main subject.
4. What is symmetry in photography?
Symmetry is a compositional technique that involves creating balance and harmony in the image by placing the subject in the center. This technique is often used in still life and architectural photography. Symmetry can be used to create a sense of calm and stability in the image, making it more visually appealing to the viewer.
5. What is depth of field in photography?
Depth of field is a technique that involves controlling the amount of the image that is in focus. A shallow depth of field means that only a small portion of the image is in focus, while the rest is blurred. A deep depth of field means that most or all of the image is in focus. By controlling the depth of field, photographers can create a sense of depth and dimensionality in the image.
6. What is framing in photography?
Framing is a technique that involves using elements in the image to surround and highlight the main subject. This technique is often used in landscape and still life photography. By using elements like trees, rocks, or other natural features, photographers can create a sense of depth and balance in the image, making the main subject stand out.
7. What is negative space in photography?
Negative space is a compositional technique that involves using empty space in the image to create balance and emphasize the main subject. This technique is often used in portrait and still life photography. By using negative space, photographers can create a sense of simplicity and elegance in the image, making the main subject stand out.
8. What is the golden ratio in photography?
The golden ratio is a mathematical ratio that is often used in art and design. It involves dividing the image into two parts, with the main subject placed along the horizontal line and the other elements placed along the vertical line. This technique is often used in landscape and still life photography. By using the golden ratio, photographers can create a sense of balance and harmony in the image.
9. What is balance in photography?
Balance in photography refers to the distribution of visual weight in the image. This can be achieved by placing the main subject off-center, using complementary colors or shapes, or using negative space. By creating balance in the image, photographers can create a sense of harmony and stability, making the image more visually appealing to the viewer.