Are you tired of struggling with low light situations during your night photography adventures? Look no further! Mastering night photography requires a keen understanding of ISO and how it affects your images. With this guide, you’ll learn the ins and outs of choosing the right ISO for different scenarios, ensuring that your nighttime shots are nothing short of stunning. From understanding the basics of ISO to tips for choosing the right settings, this guide has everything you need to take your night photography game to the next level. So, grab your camera and let’s get started!
Understanding ISO and Night Photography
The Role of ISO in Night Photography
When it comes to night photography, ISO plays a crucial role in capturing the desired image. ISO, or International Organization of Standardization, is a measure of the sensitivity of the camera‘s sensor to light. In simpler terms, it determines how well the camera can capture an image in low light conditions.
The lower the ISO, the less sensitive the camera’s sensor is to light, and thus, the camera will require more light to capture an image. Conversely, a higher ISO makes the camera’s sensor more sensitive to light, allowing for better performance in low light conditions. However, it is important to note that increasing the ISO also increases the noise level in the image.
In night photography, it is important to choose the right ISO to ensure that the image is captured with the desired level of detail and minimal noise. The ideal ISO will depend on the specific shooting conditions, such as the available light, the desired aperture, and the shutter speed.
Understanding the role of ISO in night photography is essential for achieving the desired results and creating stunning images in low light conditions. By choosing the right ISO, photographers can effectively control the amount of light entering the camera and capture the perfect shot.
Factors Affecting ISO Choice in Night Photography
Choosing the right ISO is crucial in night photography as it determines the exposure and overall quality of the image. The ISO setting affects the sensitivity of the camera‘s sensor to light, and in low light conditions, it can be challenging to capture a well-exposed image without adjusting the ISO. In this section, we will discuss the factors that affect ISO choice in night photography.
Ambient Light Conditions
The ambient light conditions play a significant role in determining the appropriate ISO for night photography. In conditions with little to no ambient light, a higher ISO setting is required to capture a well-exposed image. On the other hand, if there is sufficient ambient light, a lower ISO setting can be used to achieve a similar result. Therefore, it is essential to assess the ambient light conditions before selecting the ISO setting.
Camera Sensor Size and Sensitivity
The size and sensitivity of the camera sensor also affect the ISO choice in night photography. Full-frame cameras generally have better low-light performance compared to APS-C or micro four-thirds cameras. This is because the larger sensor size of full-frame cameras allows for more light to be captured, resulting in less noise at higher ISO settings. Therefore, when shooting with a full-frame camera, a lower ISO setting can be used to achieve a similar result compared to a smaller sensor camera.
Subject Matter and Composition
The subject matter and composition also play a role in determining the appropriate ISO for night photography. For example, when shooting a landscape at night, a lower ISO setting can be used to capture a wider field of view with minimal noise. On the other hand, when shooting a fast-moving subject such as a car or a person, a higher ISO setting may be required to freeze the motion and avoid motion blur. Therefore, it is essential to consider the subject matter and composition when selecting the ISO setting.
In summary, selecting the right ISO for night photography is a critical decision that can significantly impact the exposure and overall quality of the image. The ambient light conditions, camera sensor size and sensitivity, and subject matter and composition are some of the factors that affect ISO choice in night photography. Understanding these factors can help photographers make informed decisions when selecting the ISO setting, resulting in better-quality images.
Experimenting with ISO Settings
Experimenting with ISO settings is crucial when it comes to mastering night photography. It allows you to explore the different ways of capturing light in low-light situations. In this section, we will discuss the importance of ISO in night photography and how to experiment with it to achieve the desired results.
- Importance of ISO in Night Photography
- ISO is the sensitivity of the camera‘s sensor to light. It is measured in units of ASA or ISO. The lower the ISO, the less sensitive the sensor is to light, while the higher the ISO, the more sensitive it becomes.
- In night photography, you need to use a higher ISO to capture enough light to produce a well-exposed image. However, increasing the ISO also increases the noise in the image. Therefore, it is essential to find the right balance between ISO and shutter speed to capture enough light while minimizing noise.
- Experimenting with ISO Settings
- Start with a low ISO (100 or 200) and see how much light you need to capture the scene. If the image is underexposed, increase the ISO until the image is correctly exposed.
- Experiment with higher ISOs (400, 800, 1600) to see how much noise is introduced into the image. At higher ISOs, you may need to adjust the shutter speed or aperture to maintain a correct exposure.
- It is also essential to experiment with the noise reduction settings in your camera or post-processing software to find the best balance between noise and image quality.
- Remember that there is no one-size-fits-all approach to ISO settings in night photography. It depends on the scene, the available light, and the desired outcome. Therefore, it is essential to experiment and find the right balance for each situation.
Tips for Effective ISO Management
Managing the ISO is crucial in night photography as it can significantly impact the image quality. Here are some tips to help you achieve the best results:
- Understand the ISO range of your camera: Before starting your night photography session, it’s essential to understand the ISO range of your camera. This will help you know the maximum ISO that your camera can handle without causing too much noise.
- Use a tripod: Using a tripod can help you keep your camera steady, allowing you to use a lower ISO and capture sharp images. It can also help you avoid the risk of blurry images due to camera shake.
- Use a remote shutter release or self-timer: Using a remote shutter release or self-timer can help you avoid the risk of camera shake when pressing the shutter button. This can help you achieve sharper images at lower ISO settings.
- Experiment with different ISO settings: While a lower ISO is generally preferred for better image quality, it may not always be possible to achieve the desired exposure at lower settings. Therefore, it’s essential to experiment with different ISO settings to find the optimal balance between image quality and exposure.
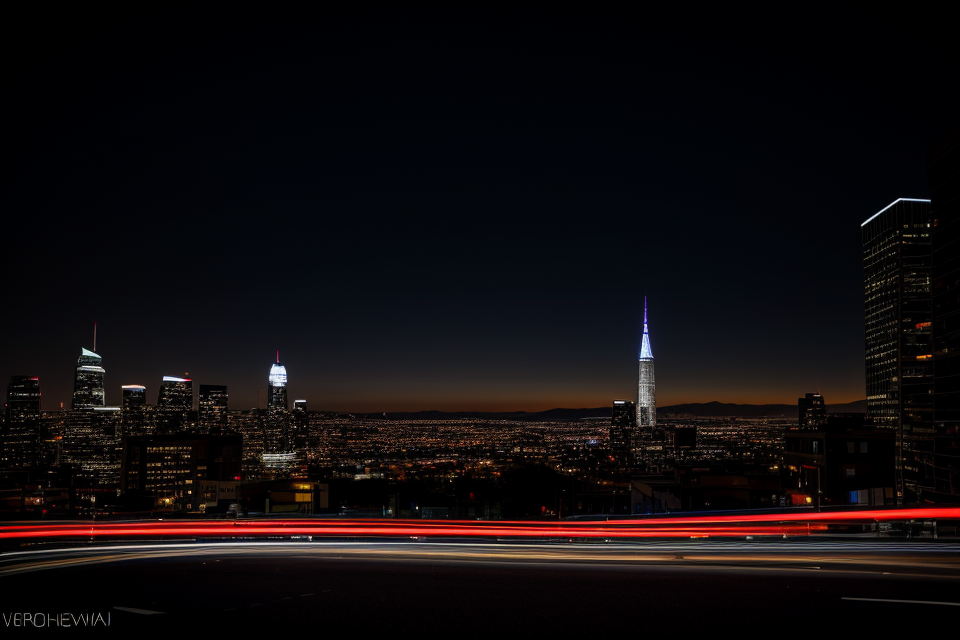
- Consider the scene and subject: The scene and subject you’re photographing can also influence your ISO settings. For example, if you’re photographing a cityscape at night, you may need to use a higher ISO to capture the movement of cars and people. However, if you’re photographing a landscape, you may want to use a lower ISO to capture the details of the scene.
- Review and adjust: Once you’ve taken your photos, review them on your camera or computer to assess the ISO settings. If you find that the images are too noisy, you may need to adjust your ISO settings for future shots.
Choosing the Right ISO for Your Needs
In night photography, ISO plays a crucial role in capturing the desired image. It determines the sensitivity of the camera‘s sensor to light, and it is essential to choose the right ISO to ensure that the image is captured with the desired level of detail and minimal noise. The ideal ISO will depend on the specific shooting conditions, such as the available light, the desired aperture, and the shutter speed. Experimenting with ISO settings is crucial to achieve the desired results. Balancing ISO, aperture, and shutter speed is essential for creating stunning images in low light conditions. Factors affecting ISO choice in night photography include ambient light conditions, camera sensor size and sensitivity, and subject matter and composition. To master night photography, it is essential to experiment with ISO settings and make adjustments based on the specific shooting conditions.
Factors to Consider When Choosing ISO
When it comes to choosing the right ISO for night photography, there are several factors to consider. These include:
- Your Camera’s Sensor Size
- The Amount of Light Available
- The Type of Scene You Want to Capture
- Your Personal Preferences
1. Your Camera’s Sensor Size
The sensor size of your camera can play a significant role in determining the right ISO for night photography. Full-frame cameras tend to perform better in low-light situations than cropped sensors, as they have larger pixels that can gather more light. This means that you may need to use a higher ISO on a cropped sensor camera to achieve the same results as a full-frame camera at a lower ISO.
2. The Amount of Light Available
The amount of light available at the scene is another crucial factor to consider when choosing the right ISO for night photography. If there is ample light available, you can use a lower ISO to avoid introducing noise into your images. However, if you are shooting in a dark environment, you may need to increase your ISO to capture enough light to create a well-exposed image.
3. The Type of Scene You Want to Capture
The type of scene you want to capture can also influence your decision on the right ISO for night photography. For example, if you are shooting a landscape at night, you may want to use a lower ISO to capture the details of the scene. On the other hand, if you are shooting a cityscape with fast-moving traffic, you may need to use a higher ISO to capture the movement and energy of the scene.
Balancing ISO, Aperture, and Shutter Speed
In night photography, it is crucial to strike the right balance between ISO, aperture, and shutter speed. Each of these settings has a significant impact on the final image. Understanding how they work together can help you create stunning night photographs.
The Relationship Between ISO, Aperture, and Shutter Speed
ISO, aperture, and shutter speed are interconnected and affect each other. Changing one setting can affect the others. It is essential to understand the relationship between them to make informed decisions when choosing settings for your night photographs.
- ISO: The ISO setting determines the sensitivity of the camera‘s sensor to light. A higher ISO setting allows the camera to capture more light in low-light situations, but it also increases noise in the image.
- Aperture: The aperture setting controls the amount of light that enters the camera. A wider aperture (a smaller f-number) allows more light in, but it also creates a shallower depth of field.
- Shutter Speed: The shutter speed setting determines how long the camera’s shutter is open. A slower shutter speed allows more light in, but it also increases the risk of camera shake and motion blur.
Balancing ISO, Aperture, and Shutter Speed for Night Photography
When shooting at night, it is crucial to balance these three settings to achieve the desired results. Here are some tips for balancing ISO, aperture, and shutter speed in night photography:
- Keep the ISO as low as possible to minimize noise in the image. A lower ISO setting requires more light, so you may need to use a tripod or a long exposure to keep the camera still.
- Use a wider aperture (a smaller f-number) to allow more light into the camera. This setting is particularly useful when shooting in low-light situations where you need to keep the shutter speed fast to avoid camera shake.
- Adjust the shutter speed based on the available light and the stability of the camera. If you have a tripod, you can use a slower shutter speed to capture more light and create a longer exposure. If you don’t have a tripod, you may need to use a faster shutter speed to avoid camera shake.
In summary, balancing ISO, aperture, and shutter speed is crucial in night photography. Understanding the relationship between these settings can help you make informed decisions and achieve the desired results in your night photographs.
Making Adjustments Based on Lighting Conditions
When it comes to night photography, one of the most important factors to consider is the ISO setting. The ISO is responsible for controlling the sensitivity of the camera‘s sensor to light, and it is essential to choose the right ISO for the lighting conditions you are working with. Here are some tips for making adjustments based on lighting conditions:
- Low Light Conditions: When shooting in low light conditions, such as a moonlit night or a starry sky, it is essential to use a high ISO to capture enough light to create a well-exposed image. A higher ISO setting will allow more light to enter the camera, resulting in a brighter image. However, it is important to note that increasing the ISO will also increase the noise in the image, so it is essential to find a balance between a high ISO and a low noise setting.
- High Light Conditions: On the other hand, when shooting in high light conditions, such as a cityscape at night, it is possible to use a lower ISO to reduce noise in the image. A lower ISO setting will allow less light to enter the camera, resulting in a darker image. However, it is possible to brighten the image during post-processing without introducing too much noise.
- Adjusting the ISO Based on the Scene: It is also important to consider the scene you are photographing when adjusting the ISO. For example, if you are photographing a cityscape at night, you may want to use a lower ISO to capture the details of the buildings and reduce noise. However, if you are photographing a nighttime landscape, you may want to use a higher ISO to capture the details of the stars and the moon.
Overall, adjusting the ISO based on the lighting conditions is an essential aspect of mastering night photography. By finding the right balance between a high ISO and a low noise setting, you can create well-exposed and stunning nighttime images.
ISO Settings for Different Scenes
Low-Light Environments
When shooting in low-light environments, such as a dimly lit street or a moonlit landscape, it’s essential to choose the right ISO setting to capture a well-exposed image. In these situations, you’ll typically want to use a higher ISO to gather more light and prevent blur caused by camera shake or long exposure times. However, it’s important to note that raising the ISO also increases noise in the image, so you’ll need to strike a balance between noise and image quality.
A good starting point for low-light photography is to set your ISO to 800 or 1600, depending on the amount of available light. If you’re still experiencing camera shake or blur, consider using a tripod or a shutter release cable to minimize movement during the exposure. Additionally, using a faster lens or opening up the aperture can also help gather more light and reduce noise.
When adjusting your ISO settings, it’s crucial to review your images on the back of the camera or on a computer screen to ensure that the images are properly exposed and free of excessive noise. Remember, the higher the ISO, the more noise will be present in the image, so it’s essential to find the right balance between noise and image quality.
Moonlit Scenes
When it comes to moonlit scenes, the ideal ISO setting depends on the amount of moonlight available and the desired level of detail in the image. Generally, a lower ISO setting of 100-400 is recommended for capturing the beauty of the night sky and preserving the details of the landscape. However, in cases where the moon is not full or there is minimal moonlight, a higher ISO setting of 800-1600 may be necessary to capture enough light and maintain a fast shutter speed.
In moonlit scenes, it is important to keep in mind that increasing the ISO can result in increased noise in the image. Therefore, it is essential to balance the ISO with the aperture and shutter speed to achieve the desired exposure while minimizing noise.
Additionally, it is important to consider the movement of the moon and its effect on the image. The moon moves across the sky relatively quickly, so it is important to use a remote shutter release or a camera with a self-timer to avoid camera shake and ensure sharp images.
In summary, when photographing moonlit scenes, it is important to consider the amount of moonlight available, the desired level of detail in the image, and the potential for noise. By balancing the ISO with the aperture and shutter speed, and taking into account the movement of the moon, photographers can capture stunning images of the night sky and the surrounding landscape.
Starry Skies
When it comes to capturing the beauty of starry skies, ISO plays a crucial role in determining the quality of your night photographs. The ISO setting affects the sensitivity of your camera’s sensor to light, and choosing the right ISO can make all the difference in how your images turn out.
Here are some tips for choosing the right ISO for starry sky photography:
- Low ISO: A low ISO setting (such as ISO 100 or 200) is best for capturing the detail and color in the stars, as well as in the surrounding landscape. This setting will result in less noise in your images, but it may also require a longer exposure time to capture enough light.
- High ISO: A high ISO setting (such as ISO 800 or 1600) can be useful for capturing the contrast and depth of the night sky, especially when shooting in low light conditions. However, a high ISO setting will also increase the noise in your images, so it’s important to balance this with careful exposure and post-processing techniques.
- Adjusting the ISO: In many cases, you may need to adjust the ISO setting depending on the specific scene you’re shooting. For example, if you’re shooting a wide-angle landscape with a bright moon, you may be able to use a lower ISO setting to capture the detail in the landscape and the moon’s soft light. However, if you’re shooting a tight shot of a specific constellation, you may need to use a higher ISO setting to capture enough light in a shorter amount of time.
Ultimately, the best ISO setting for starry sky photography will depend on the specific conditions of your shoot, including the amount of available light, the size of the moon, and the complexity of the scene. By understanding the relationship between ISO, exposure, and noise, you can make informed decisions about how to set your camera for the best possible results.
Common ISO Mistakes to Avoid
Over-Relying on High ISO Settings
One of the most common mistakes in night photography is over-relying on high ISO settings. While high ISO can be useful in certain situations, it can also lead to noise and a loss of detail in the image.
Here are some tips to avoid over-relying on high ISO settings:
- Use a tripod to keep the camera still and avoid blur from camera shake.
- Use a low ISO setting to reduce noise and preserve detail.
- Use a faster lens or open up the aperture to let more light into the camera.
- Use a longer exposure time to capture more light and reduce the need for a high ISO setting.
- Experiment with different ISO settings and see what works best for the scene.
It’s important to find the right balance between ISO, aperture, and shutter speed to achieve the best possible image quality. Don’t be afraid to adjust these settings to get the shot you want.
Under-Using ISO in Favor of Aperture and Shutter Speed
One common mistake that many photographers make when shooting at night is under-using ISO in favor of aperture and shutter speed. While it is true that aperture and shutter speed play important roles in night photography, it is equally important to consider the ISO setting.
Under-using ISO means using a lower ISO setting than necessary, which can result in underexposed photos with poor image quality. This can happen when photographers prioritize aperture and shutter speed over ISO, resulting in photos that are too dark or lack detail.
Here are some reasons why under-using ISO in favor of aperture and shutter speed can be a mistake:
- Low light conditions: In low light conditions, using a lower ISO setting can result in underexposed photos that lack detail and clarity. In such situations, increasing the ISO setting can help capture more light and produce better image quality.
- Image noise: Using a lower ISO setting can result in higher image noise, especially in longer exposures. This can lead to grainy or blurry photos that lack detail and clarity.
- Aperture and shutter speed limitations: While aperture and shutter speed are important factors in night photography, they have their limitations. For example, using a very wide aperture or a very long shutter speed can result in overexposed or underexposed photos, respectively. In such cases, increasing the ISO setting can help balance out the exposure and produce better image quality.
In conclusion, it is important to consider the ISO setting when shooting at night, and not to under-use it in favor of aperture and shutter speed. By adjusting the ISO setting to match the lighting conditions, photographers can capture better quality images with more detail and clarity.
Failing to Consider Other Exposure Factors
When it comes to night photography, it’s important to understand that ISO is just one of several exposure factors that you need to consider. Other factors include shutter speed and aperture, and failing to consider these factors can lead to underexposed or overexposed images.
One common mistake that photographers make is relying too heavily on ISO and not adjusting their shutter speed or aperture accordingly. This can result in an image that is either too dark or too bright, depending on the scene you’re trying to capture.
Another mistake is failing to adjust your camera’s settings based on the specific conditions of the scene you’re photographing. For example, if you’re shooting a night scene with a lot of light sources, such as streetlights or neon signs, you may be able to use a lower ISO and a faster shutter speed to avoid overexposure. On the other hand, if you’re shooting a scene with very little light, such as a moonlit landscape, you may need to use a higher ISO and a slower shutter speed to avoid underexposure.
In addition to considering the amount of light in the scene, you should also consider the type of scene you’re photographing. For example, if you’re shooting a landscape at night, you may want to use a tripod to ensure that your camera is stable and that you can capture sharp details in the scene. However, if you’re shooting a cityscape at night, you may want to use a wider aperture and a faster shutter speed to capture the movement of cars and people.
Ultimately, the key to mastering night photography is to understand the relationship between ISO, shutter speed, and aperture, and to use these factors in combination to capture the best possible image. By considering all of the exposure factors and adjusting your camera’s settings accordingly, you can create stunning nighttime photographs that capture the beauty and mood of the night.
Recap of Key Points
- Improper ISO selection can lead to overexposed or underexposed images, resulting in loss of detail and poor image quality.
- The most common mistake is selecting too high of an ISO, leading to image noise and loss of detail.
- Conversely, selecting too low of an ISO can result in underexposed images, with low light scenes appearing too dark.
- Proper ISO selection depends on the specific shooting conditions, including lighting and desired exposure.
- Adjusting the ISO is often necessary when shooting in low light conditions, but it should be done in conjunction with adjusting the aperture and shutter speed to achieve the desired exposure.
- The optimal ISO should be chosen based on the desired image quality and the available lighting conditions.
The Importance of ISO in Night Photography
In night photography, the ISO setting plays a crucial role in capturing the desired image quality. The ISO setting determines the sensitivity of the camera‘s sensor to light, which directly affects the exposure and brightness of the final image. Here are some key points to consider when understanding the importance of ISO in night photography:
- Low-light conditions: In low-light environments, such as at night or in dimly lit indoor spaces, a lower ISO setting is typically used to minimize image noise and maintain details in the shadows and highlights. A lower ISO setting reduces the sensor’s sensitivity to light, which helps to capture a more natural and true-to-life image.
- Exposure: The ISO setting also affects the exposure of the image. A higher ISO setting will increase the exposure, making the image brighter, while a lower ISO setting will decrease the exposure, resulting in a darker image. In night photography, it is essential to find the right balance between capturing enough light to produce a well-exposed image without introducing excessive noise.
- Noise: A higher ISO setting will increase the noise in the image, making it appear grainy or pixelated. This noise can be particularly problematic in night photography, where capturing a well-detailed image is critical. Therefore, it is essential to choose an appropriate ISO setting that balances noise and exposure, depending on the specific shooting conditions.
- Composition: The ISO setting also affects the composition of the image. A higher ISO setting can result in a wider aperture, which can create a shallower depth of field and blur the background. This effect can be useful for certain types of night photography, such as cityscapes or astrophotography, where a shallow depth of field can enhance the overall composition. However, it is important to consider the specific shooting conditions and the desired composition when choosing an ISO setting.
In summary, the ISO setting plays a crucial role in night photography, as it affects the exposure, noise, and composition of the final image. By understanding the importance of ISO and how it interacts with other settings, such as aperture and shutter speed, photographers can achieve better results in low-light conditions and create stunning night photographs.
Continuing to Experiment and Refine Your Technique
While selecting the appropriate ISO is crucial for capturing high-quality night photographs, it is equally important to continue experimenting and refining your technique. Here are some key considerations to keep in mind as you progress in your night photography journey:
- Monitor Your Camera’s Performance: As you modify your ISO settings, it is essential to monitor your camera’s performance. Check the histogram and image preview to ensure that you are not overexposing or underexposing your shots. Adjusting the ISO can have a significant impact on the overall exposure of your images, so it is vital to maintain a balanced approach.
- Consider Other Camera Settings: It is important to remember that ISO is just one aspect of photography. As you experiment with different ISO settings, pay attention to how it affects other aspects of your composition, such as aperture and shutter speed. By making small adjustments to these settings in conjunction with your ISO, you can achieve more nuanced and creative results.
- Experiment with Noise Reduction: Many cameras offer built-in noise reduction features, which can help reduce the appearance of noise in your images. However, using these features may also impact the overall sharpness and clarity of your photographs. As you continue to experiment with ISO settings, consider the trade-offs between noise reduction and image quality.
- Learn from Feedback: Finally, seek feedback from others on your night photography images. By sharing your work with fellow photographers or online communities, you can gain valuable insights into your composition and technique. Be open to constructive criticism and use it as an opportunity to learn and grow as a photographer.
By continuing to experiment and refine your technique, you can master the art of choosing the right ISO for your night photography. With practice and persistence, you will develop a keen eye for making informed decisions that lead to stunning and unique images.
FAQs
1. What is ISO and how does it affect night photography?
ISO is a setting on your camera that determines the sensitivity of the camera‘s sensor to light. A higher ISO setting will make the sensor more sensitive to light, allowing you to take pictures in low light conditions. However, a higher ISO setting will also increase the amount of noise in your images. In night photography, you want to use a high ISO setting to capture enough light, but not so high that it creates too much noise.
2. What is the ideal ISO setting for night photography?
The ideal ISO setting for night photography will depend on the specific conditions of the scene you are trying to capture. In general, you want to use the lowest possible ISO setting to capture enough light while minimizing noise. A good starting point is to set your ISO to 100 or 200 and adjust from there based on the available light.
3. Can I use a lower ISO setting to reduce noise in night photography?
Yes, you can use a lower ISO setting to reduce noise in night photography, but it may require longer exposure times or the use of a tripod to avoid camera shake. A lower ISO setting will capture less light, so you may need to compensate by using a wider aperture or a slower shutter speed. It’s important to find a balance between capturing enough light to get a well-exposed image and keeping the noise level to a minimum.
4. What are the consequences of using a high ISO setting in night photography?
Using a high ISO setting in night photography can result in excessive noise in your images. This can make it difficult to recover detail in post-processing and can lead to a grainy, unappealing look to your photos. Additionally, using a high ISO setting can cause your images to appear overexposed or underexposed, depending on the specific settings you are using. It’s important to find the right balance between capturing enough light and keeping noise to a minimum.
5. How can I minimize noise in night photography?
There are several ways to minimize noise in night photography. First, use a tripod to keep your camera still and avoid camera shake. Second, use a low ISO setting and adjust your exposure time and aperture as needed to get a well-exposed image. Third, use image editing software to adjust the exposure, contrast, and noise reduction settings of your photos. Finally, consider using a noise reduction filter or software to help reduce noise in your images.


