Are you tired of taking mediocre photos at night? Want to master the art of night photography? Look no further! This guide will take you through the ultimate exposure techniques to capture stunning night shots like a pro. From understanding ISO, shutter speed, and aperture to finding the right exposure values, we’ll cover it all. Say goodbye to grainy and underexposed photos and hello to vibrant and well-lit images that will leave your audience in awe. Get ready to take your night photography game to the next level with this comprehensive guide.
Understanding Exposure in Night Photography
A Deep Dive into Aperture, Shutter Speed, and ISO
Aperture
Aperture is the size of the camera’s aperture, which determines the amount of light that enters the camera. Aperture is measured in f-stops, and a larger aperture (a smaller f-stop number) allows more light into the camera, while a smaller aperture (a larger f-stop number) allows less light in. In night photography, a larger aperture is typically used to allow more light into the camera and create a properly exposed image.
Shutter Speed
Shutter speed is the length of time that the camera’s shutter is open, and it determines how much light enters the camera. A slower shutter speed allows more light into the camera, while a faster shutter speed allows less light in. In night photography, a slower shutter speed is typically used to allow more light into the camera and create a properly exposed image. However, using a slower shutter speed can also result in motion blur if the camera is not held steady, so it is important to use a tripod or other stabilizing device to keep the camera steady.
ISO
ISO is a measure of the camera’s sensitivity to light, and it determines how much light is needed to create a properly exposed image. A higher ISO setting makes the camera more sensitive to light, which allows for shooting in low light conditions, but it can also result in noise in the image. In night photography, a higher ISO setting is typically used to allow for shooting in low light conditions, but it is important to keep the ISO as low as possible to minimize noise in the image.
The Exposure Triangle: Balancing Aperture, Shutter Speed, and ISO
The exposure triangle is a fundamental concept in photography that consists of three elements: aperture, shutter speed, and ISO. These three elements work together to determine the exposure of an image.
- Aperture: Aperture refers to the size of the camera’s aperture, which is the opening in the lens through which light passes. Aperture is measured in f-stops, and a larger aperture (a smaller f-stop number) allows more light to enter the camera, while a smaller aperture (a larger f-stop number) allows less light in.
- Shutter Speed: Shutter speed refers to the length of time that the camera’s shutter is open, and it is measured in seconds or fractions of a second. A slower shutter speed allows more light to enter the camera, while a faster shutter speed allows less light in.
- ISO: ISO is a measure of the camera’s sensitivity to light, and it is typically measured on a scale from 100 to 6400. A higher ISO setting makes the camera more sensitive to light, allowing for faster shutter speeds or smaller apertures in low light conditions. However, a higher ISO setting also increases the amount of noise in the image.
To achieve the desired exposure in night photography, photographers must balance these three elements to get the right amount of light into the camera. In low light conditions, photographers may need to use a larger aperture and a slower shutter speed to allow more light into the camera, or they may need to increase the ISO setting to make the camera more sensitive to light.
Understanding the exposure triangle is crucial for achieving the desired exposure in night photography, as it allows photographers to adjust the settings of their camera to get the best results in any given situation. By mastering the exposure triangle, photographers can capture stunning night photographs that showcase the beauty of the night sky and the world around us.
Choosing the Right Exposure Settings for Night Photography
The Golden Hour
The Golden Hour is a specific time period shortly after sunset or before sunrise when the light is warm and soft, creating a magical atmosphere. It is an ideal time for night photography because the light is less harsh and provides a more natural color balance. During the Golden Hour, the sun is low on the horizon, casting long shadows and creating dramatic lighting conditions.
To capture the best images during the Golden Hour, it is essential to adjust your exposure settings accordingly. The exposure settings will depend on the available light, the camera’s ISO, shutter speed, and aperture. It is recommended to use a slower shutter speed to capture the soft light and movement in the scene. Additionally, using a tripod can help to keep the camera steady and avoid camera shake.
In conclusion, the Golden Hour is a crucial time for night photography, and it is essential to adjust your exposure settings to capture the best images. By using a slower shutter speed and a tripod, you can capture the soft and warm light of the Golden Hour and create stunning images.
Moonlight and Starlight
Capturing the beauty of the night sky is a popular subject in night photography. The moon and stars provide a source of light that can enhance the scene and create interesting compositions. However, it can be challenging to capture them correctly, as they are dim compared to the brightness of the surrounding environment. In this section, we will discuss some techniques for capturing moonlight and starlight in your night photographs.
The Influence of the Moon on Night Photography
The moon is a significant source of light during the night, and its phase can greatly affect the amount of light it provides. A full moon will be brighter than a crescent moon, and the position of the moon in the sky can also impact the amount of light it reflects onto the scene. When the moon is high in the sky, it can provide a diffused and softer light, while a low-lying moon can create a more dramatic and focused light.
Exposure Techniques for Capturing the Moon
To capture the moon in your night photographs, you will need to adjust your exposure settings to ensure that you get a well-exposed image. The moon is a high-contrast subject, so you will need to be careful not to overexpose the surrounding environment while still capturing the details of the moon. One technique is to use a long exposure, which will allow more light into the camera and capture the details of the moon without overexposing the surrounding environment.
Another technique is to use a lower ISO and a wider aperture, which will help to reduce the amount of noise in the image and provide a sharper focus on the moon. It is also important to use a tripod to stabilize the camera and prevent camera shake during the longer exposure times.
Capturing Starlight
Starlight is even dimmer than moonlight, so capturing it in your night photographs can be a challenging task. However, with the right exposure techniques, it is possible to capture the beauty of the stars in your images.
One technique is to use a long exposure, which will allow more light into the camera and capture the details of the stars without overexposing the surrounding environment. You can also use a lower ISO and a wider aperture to reduce noise and provide a sharper focus on the stars.
Another technique is to use a flash or a torch to add some light to the scene and help to bring out the details of the stars. This technique is useful when the stars are too dim to capture with a long exposure alone.
In conclusion, capturing moonlight and starlight in your night photographs can add an interesting dimension to your images. With the right exposure techniques, you can capture the beauty of the night sky and create stunning images that showcase the beauty of the night.
Light Painting
Light painting is a technique used in night photography to add light to a subject or scene to create a desired effect. This technique involves using a long exposure and moving a light source around the scene to create a trail of light that highlights specific areas or subjects.
Here are some tips for using light painting in night photography:
- Choose a slow shutter speed to capture the movement of the light source. A shutter speed of 15 seconds or slower is usually sufficient.
- Use a tripod to keep the camera steady during the long exposure.
- Use a torch or flashlight to create the light trail. You can also use other light sources such as smartphones or glow sticks.
- Experiment with different patterns and movements to create unique light trails.
- Consider using a remote shutter release or the camera’s self-timer to avoid camera shake when triggering the shutter.
By mastering the art of light painting, you can create stunning night photographs that capture the beauty and mystery of the night.
Long Exposure Techniques
One of the most effective ways to capture stunning night photographs is by using long exposure techniques. These techniques involve keeping the camera’s shutter open for an extended period, allowing more light to enter and create a brighter image. In this section, we will discuss the basics of long exposure techniques and how to apply them for night photography.
Understanding Aperture and Shutter Speed
When using long exposure techniques, it is essential to understand the relationship between aperture and shutter speed. Aperture refers to the size of the camera’s aperture, which controls the amount of light that enters the camera. Shutter speed, on the other hand, determines the length of time the camera’s shutter is open.
For night photography, a wider aperture (a smaller f-number) is usually preferred to allow more light into the camera. A larger aperture will also create a shallower depth of field, which can be useful for isolating subjects in the scene.
On the other hand, a slower shutter speed is required to capture enough light during nighttime exposures. A slower shutter speed allows more light to enter the camera, resulting in a brighter image. However, it is crucial to avoid camera shake, which can cause blurry images. Therefore, using a tripod is highly recommended when using long exposure techniques at night.
Choosing the Right Shutter Speed
The appropriate shutter speed for night photography depends on several factors, including the available light, the desired brightness of the image, and the movement of the subjects in the scene. In general, a shutter speed of 15 seconds or slower is typically used for night photography.
However, it is essential to experiment with different shutter speeds to find the optimal setting for the specific scene. For example, if the scene contains moving subjects, such as cars or people, a faster shutter speed may be necessary to freeze the motion and avoid blur.
It is also important to consider the noise levels when choosing the shutter speed. Using a longer shutter speed will increase the noise in the image, which can be reduced by using a lower ISO setting or using long exposure noise reduction (LENR) mode in some cameras.
Using ND Filters
Another way to achieve longer exposures during night photography is by using neutral density (ND) filters. ND filters are designed to reduce the amount of light entering the camera, allowing for longer exposures without overexposing the image.
ND filters come in different strengths, measured in stops. A 2-stop ND filter will reduce the light entering the camera by two stops, allowing for a longer exposure without overexposing the image. It is important to note that using an ND filter will also reduce the depth of field, so a wider aperture may be necessary to compensate.
Tips for Long Exposure Night Photography
- Use a tripod to avoid camera shake
- Use a remote shutter release or the camera’s self-timer to minimize camera shake
- Experiment with different shutter speeds and apertures to find the optimal settings for the scene
- Consider the movement of the subjects in the scene and choose an appropriate shutter speed to freeze motion or create a sense of motion
- Use an ND filter to achieve longer exposures without overexposing the image
- Consider using a lower ISO setting or using long exposure noise reduction (LENR) mode in some cameras to reduce noise in the image
By following these tips and experimenting with different techniques, you can master the art of long exposure night photography and capture stunning images that showcase the beauty of the night sky.
Tips for Experimenting with Night Photography Exposure
When it comes to night photography, there are several exposure techniques that can help you achieve the desired results. Here are some tips for experimenting with night photography exposure:
- Bracketing: Bracketing is a technique where you take multiple shots of the same scene at different exposure settings. This technique is useful when you’re not sure which exposure setting to use, as it allows you to review the images later and choose the best one.
- Long Exposure: Long exposure is a technique where you keep the camera’s shutter open for a longer period of time to capture more light. This technique is useful for capturing the movement of stars or other celestial objects in the night sky.
- Use a Tripod: Using a tripod is essential for night photography, as it helps to keep the camera steady and avoid blurry images. A tripod also allows you to use longer exposure times without worrying about camera shake.
- Adjust ISO: Adjusting the ISO setting on your camera can also help you achieve the desired exposure in low light conditions. Increasing the ISO setting will make the camera more sensitive to light, allowing you to use a faster shutter speed and avoid blurry images.
- Use a Remote Shutter Release: Using a remote shutter release can help to avoid camera shake when taking long exposure shots at night. This is especially useful when using a tripod, as it allows you to trigger the shutter without touching the camera.
By experimenting with these exposure techniques, you can achieve the desired results in your night photography shots. Remember to always check the histogram and review your images to ensure that you’re getting the exposure right.
Practical Examples of Night Photography Exposure Techniques
Capturing the beauty of night photography requires careful consideration of exposure settings. Here are some practical examples of night photography exposure techniques that can help you achieve the desired results:
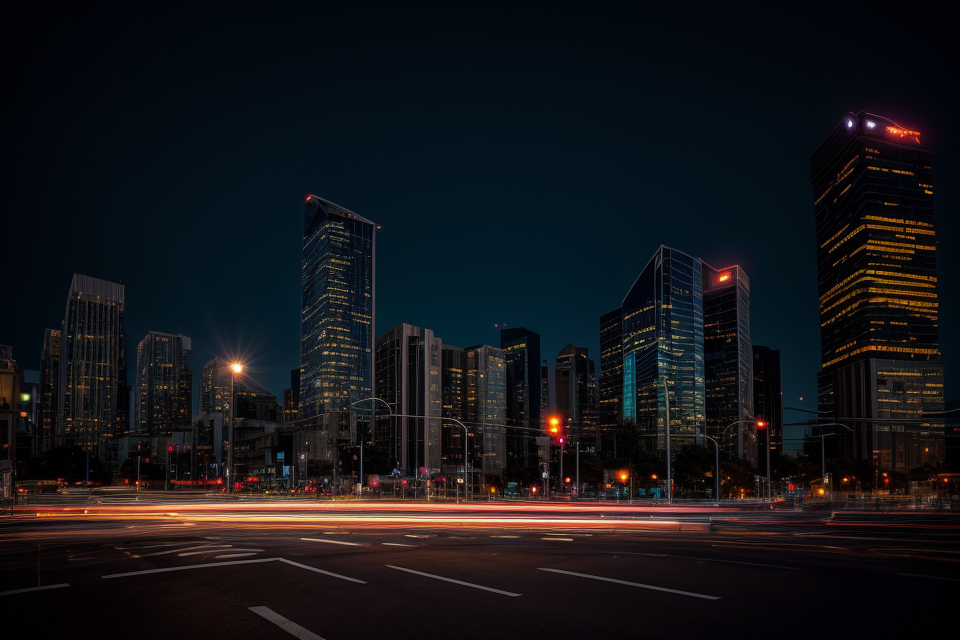
- Long Exposure: A long exposure is a technique that involves leaving the camera’s shutter open for an extended period, capturing more light and allowing you to capture the movement of stars or other celestial objects. This technique is best used when shooting the night sky or when shooting moving objects such as cars or people in low light conditions.
- ISO Boosting: Increasing the ISO setting on your camera can help capture more light in low light conditions. However, this technique should be used with caution as it can also increase noise in your images.
- Use of Tripod: Using a tripod is essential when shooting night photography as it helps keep the camera steady and reduces camera shake. A tripod also allows you to use longer exposures without causing camera shake, which can result in blurry images.
- Aperture Priority Mode: Aperture priority mode allows you to control the aperture of your camera while the camera automatically adjusts the shutter speed and ISO. This technique is useful when shooting in low light conditions as it allows you to control the depth of field and the amount of light entering the camera.
- Use of Light Painting: Light painting is a technique that involves adding light to your scene using a flashlight or other light source. This technique is useful when shooting in pitch black conditions and can help add interesting light patterns to your images.
By mastering these exposure techniques, you can capture stunning night photographs that showcase the beauty of the night sky and the world around you.
Recap of Key Takeaways
- Proper exposure is crucial for capturing stunning night photographs.
- Understanding the exposure triangle (ISO, shutter speed, and aperture) is essential for achieving the desired exposure.
- Utilizing a tripod can help in stabilizing the camera and ensuring sharp images.
- Bracketing and shooting in RAW format can be helpful in getting the correct exposure.
- Proper composition, including the use of leading lines, the rule of thirds, and negative space, can enhance the visual impact of night photographs.
- Experimenting with different exposure techniques, such as long exposures and light painting, can result in unique and creative images.
Further Reading and Resources for Night Photography Exposure
Further Reading and Resources for Night Photography Exposure
- “Night Photography: From Snapshots to Great Shots” by Darwin W. Palmer: This book covers the basics of night photography, including exposure techniques, composition, and equipment. It also includes tips for capturing cityscapes, landscapes, and other nighttime scenes.
- “Night Photography: The Complete Guide” by David Kingham: This comprehensive guide covers all aspects of night photography, from camera settings to post-processing techniques. It also includes a chapter on shooting the night sky, as well as advice on how to photograph star trails and meteor showers.
- “The Photographer’s Guide to Night Photography” by Brian R. Powell: This book is designed to help photographers of all skill levels master the art of night photography. It covers the basics of exposure and composition, as well as more advanced techniques such as long exposures and light painting.
- “Night Photography: Exposure Techniques and Equipment” by Bryan Hansel: This book focuses on the technical aspects of night photography, including exposure settings, camera controls, and lens choices. It also includes advice on how to shoot in low light conditions and how to capture nighttime cityscapes and landscapes.
- “Night Photography: Tips and Techniques” by Nicole S. Young: This e-book provides a comprehensive overview of night photography, including exposure techniques, composition, and equipment. It also includes tips for shooting the night sky, as well as advice on how to photograph light trails and other nighttime scenes.
- “Night Photography: The Complete Guide” by Gavin Hardcastle: This guide covers all aspects of night photography, from camera settings to post-processing techniques. It also includes tips for shooting cityscapes, landscapes, and other nighttime scenes, as well as advice on how to photograph the night sky.
- “Night Photography: A Beginner’s Guide” by Chris Rice: This e-book is designed for photographers who are new to night photography. It covers the basics of exposure and composition, as well as advice on how to shoot in low light conditions and how to capture nighttime cityscapes and landscapes.
- “Night Photography: Tips and Techniques” by Trevor Cole: This guide covers the basics of night photography, including exposure settings, camera controls, and lens choices. It also includes tips for shooting the night sky, as well as advice on how to photograph light trails and other nighttime scenes.
- “Night Photography: The Complete Guide” by Mark Bauer: This comprehensive guide covers all aspects of night photography, from camera settings to post-processing techniques. It also includes tips for shooting cityscapes, landscapes, and other nighttime scenes, as well as advice on how to photograph the night sky.
- “Night Photography: The Complete Guide” by Steve Perry: This guide covers all aspects of night photography, from camera settings to post-processing techniques. It also includes tips for shooting cityscapes, landscapes, and other nighttime scenes, as well as advice on how to photograph the night sky.
- “Night Photography: The Complete Guide” by Tony Northrup: This comprehensive guide covers all aspects of night photography, from camera settings to post-processing techniques. It also includes tips for shooting cityscapes, landscapes, and other nighttime scenes, as well as advice on how to photograph the night sky.
- “Night Photography: The Complete Guide” by Lance Nicoll: This guide covers all aspects of night photography, from camera settings to post-processing techniques. It also includes tips for shooting cityscapes, landscapes, and other nighttime scenes, as well as advice on how to photograph the night sky.
- “Night Photography: The Complete Guide” by Michael
FAQs
1. What is the best exposure for night photography?
The best exposure for night photography depends on the specific scene you are trying to capture. In general, you will want to use a longer exposure time to capture more light and increase the sensitivity of the camera’s sensor. This will help to capture more detail in the darker areas of the scene. However, it’s important to keep in mind that using a longer exposure time can also increase the risk of camera shake, so it’s important to use a tripod or other stabilizing device if possible.
2. How do I determine the right exposure time for night photography?
To determine the right exposure time for night photography, you will need to consider the available light in the scene and the sensitivity of your camera’s sensor. A good starting point is to use an aperture of f/2.8 or wider, and an ISO setting of 800 or higher. From there, you can adjust the exposure time based on the specific lighting conditions and the desired level of detail in the image. It’s a good idea to use a light meter or exposure meter to help you determine the correct exposure time.
3. Is it necessary to use a tripod for night photography?
It’s highly recommended to use a tripod for night photography, as it can help to stabilize the camera and reduce the risk of camera shake. Camera shake can cause blurry images, which can be especially problematic when shooting at slower shutter speeds. A tripod can also help to ensure that the camera is level, which can improve the overall composition of the image.
4. How can I adjust the exposure for night photography?
To adjust the exposure for night photography, you can use the camera’s exposure compensation feature. This allows you to increase or decrease the exposure time based on the specific lighting conditions in the scene. You can also adjust the ISO setting and aperture to control the amount of light that is entering the camera. It’s important to keep in mind that adjusting the exposure can have a significant impact on the final image, so it’s important to make small adjustments and review the results carefully.
5. How can I achieve a longer exposure time for night photography?
To achieve a longer exposure time for night photography, you can use a slower shutter speed and a wider aperture. This will allow more light to enter the camera, which can help to create a longer exposure time. You can also use a neutral density filter to reduce the amount of light entering the camera, which can help to achieve a longer exposure time. Keep in mind that using a longer exposure time can also increase the risk of camera shake, so it’s important to use a tripod or other stabilizing device if possible.


