Are you fascinated by the intricate details of the world around you? Do you dream of capturing stunning close-up shots of nature’s tiny wonders? Look no further than macro photography! This captivating genre of photography allows you to bring the tiniest details to life, revealing the hidden beauty of the world that’s often overlooked. But what kind of camera equipment do you need to get started in macro photography? Is a special camera necessary? In this guide, we’ll explore the essential equipment needed for macro photography and how to make the most of it. Get ready to embark on a journey into the miniature world, where even the smallest details become a work of art.
Understanding Macro Photography
What is macro photography?
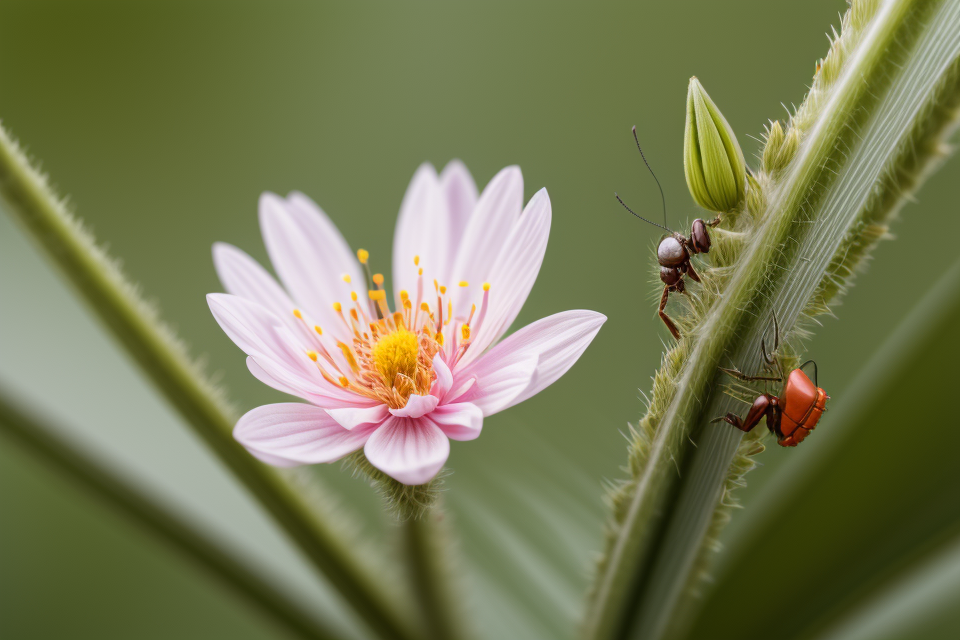
Macro photography is a type of photography that involves capturing close-up images of small subjects, often at a magnification ratio of 1:1 or greater. This means that the subject is reproduced on the camera sensor or film at life-size or larger. Macro photography allows photographers to capture intricate details and textures that are often overlooked in regular photography.
To achieve this level of magnification, photographers need to use specialized equipment, such as macro lenses, extension tubes, and bellows, which are designed to allow for close focusing and high magnification. Macro photography can be used to capture a wide range of subjects, including insects, flowers, jewelry, and small objects, and it can be used in a variety of settings, from the studio to the great outdoors.
Understanding the basics of macro photography is essential for anyone who wants to get started in this exciting and rewarding field. With the right equipment and a little bit of practice, even beginner photographers can capture stunning close-up images that showcase the beauty and complexity of the world around us.
Why is it important to use the right equipment for macro photography?
Macro photography is all about capturing small details that are often overlooked by the naked eye. In order to achieve high-quality results, it is essential to use the right equipment. Here are some reasons why:
- Sharpness and Resolution: Macro photography requires a camera that can capture sharp and detailed images. This means that you need a camera with a high resolution and a good autofocus system. A full-frame camera is generally preferred over a crop sensor camera because it provides better image quality and allows you to capture more details.
- Low-Light Performance: Many macro subjects require low-light conditions to thrive, and a camera with good low-light performance is essential. Look for a camera with good high-ISO performance and low noise, so you can capture sharp images even in low light situations.
- Stability: Macro photography often requires a long exposure time, which can cause camera shake and blurry images. A tripod or other stabilizing equipment is necessary to ensure that your camera remains steady during the shot.
- Focus and Control: A camera with manual focus control is preferred for macro photography because it allows you to fine-tune the focus on your subject. Additionally, a camera with a good depth of field control is essential for capturing images with a shallow depth of field, which can add a creative element to your shots.
- Optics: A good macro lens is crucial for achieving high-quality results in macro photography. Look for a lens with a good focal length range, good aperture, and good image stabilization. A lens with a focal length of 60mm or greater is recommended for close-up photography.
Overall, using the right equipment for macro photography can make a significant difference in the quality of your images. It allows you to capture sharp, detailed, and high-quality images that showcase the beauty of small details that are often overlooked.
Common mistakes to avoid when choosing camera equipment for macro photography
Macro photography is a unique type of photography that involves capturing small subjects at life-size or larger. To achieve this, photographers need to use specific camera equipment that is designed to enable them to focus on their subjects at a very close range. However, choosing the right camera equipment for macro photography can be a daunting task, especially for beginners. In this section, we will discuss some common mistakes to avoid when choosing camera equipment for macro photography.
- Using the wrong lens
One of the most common mistakes that beginner macro photographers make is using the wrong lens. Macro photography requires a lens that is specifically designed for close-up work, and using a regular lens can result in soft images and a lack of detail. It is essential to invest in a good quality macro lens, such as a Canon EF-S 60mm f/2.8 Macro USM or a Nikon AF-S DX Micro NIKKOR 40mm f/2.8G, to achieve sharp and detailed images. - Using the wrong settings
Another mistake to avoid when choosing camera equipment for macro photography is using the wrong settings. Macro photography requires precise control over aperture, shutter speed, and ISO, and using the wrong settings can result in a blurry image or a lack of detail. It is important to understand the relationship between aperture, shutter speed, and ISO and how they affect the final image. Beginner macro photographers should start by using the aperture priority mode and adjusting the shutter speed and ISO as needed. - Using the wrong tripod
Using the wrong tripod can also result in a blurry image in macro photography. Tripods designed for regular photography may not provide enough stability for close-up work, and a tripod with a sturdy base and adjustable height is essential. It is important to choose a tripod that is strong enough to support the camera and lens, and that can be adjusted to the appropriate height for the shooting location. - Using the wrong lighting
Lighting is critical in macro photography, and using the wrong lighting can result in a lack of detail and a poorly lit image. Beginner macro photographers should invest in a good quality external flash or LED light source, and should experiment with different lighting setups to achieve the desired effect. It is important to understand the relationship between light and shadow and how it affects the final image.
In conclusion, choosing the right camera equipment for macro photography is essential to achieving sharp and detailed images. Beginner macro photographers should avoid using the wrong lens, settings, tripod, and lighting, and should invest in good quality equipment that is designed for close-up work. By understanding the relationship between aperture, shutter speed, ISO, light, and shadow, beginner macro photographers can achieve stunning images that capture the beauty and intricacy of small subjects.
Macro lenses vs. regular lenses: which one is better for macro photography?
Macro photography is a unique type of photography that involves capturing extremely close-up images of small objects or subjects. While there are different types of cameras and lenses available in the market, choosing the right equipment is crucial to achieving stunning macro shots. One of the most important considerations when it comes to macro photography is the type of lens to use. In this section, we will compare macro lenses and regular lenses to determine which one is better for macro photography.
Macro lenses are specifically designed for capturing close-up images of small subjects. They are equipped with a range of features that make them ideal for macro photography, such as a focusing distance of just a few centimeters, high magnification ratios, and a shallow depth of field. Regular lenses, on the other hand, are not designed for macro photography and may not produce the same level of detail or clarity as a macro lens.
When it comes to macro photography, the difference between macro lenses and regular lenses is clear. Macro lenses are specifically designed to capture small details and are capable of producing high-quality images with stunning levels of detail and clarity. Regular lenses, on the other hand, may not be able to capture the same level of detail and may produce images that appear distorted or blurry.
However, it’s important to note that not all macro lenses are created equal. Some macro lenses are designed for specific types of photography, such as insect photography or flower photography, and may not be suitable for other types of macro photography. It’s important to research and choose a macro lens that is well-suited to your specific needs and the type of macro photography you plan to undertake.
In summary, when it comes to macro photography, it’s essential to use a macro lens to achieve the best results. Macro lenses are specifically designed to capture small details and produce high-quality images with stunning levels of detail and clarity. While regular lenses may be suitable for some types of photography, they are not well-suited to macro photography and may not produce the same level of detail or clarity as a macro lens. By choosing the right macro lens, you can take your macro photography to the next level and capture stunning images of small subjects.
Choosing the Right Camera for Macro Photography
Macro photography requires specific camera equipment to achieve high-quality images. Using the wrong equipment can result in soft images and a lack of detail. The right equipment includes macro lenses, tripods, and lighting setups. Camera brands to consider for macro photography include Canon, Nikon, Sony, and Fujifilm. Budget-friendly options include the Nikon D5600 and the Canon EOS Rebel T6. Essential accessories for macro photography include a tripod, remote shutter release, and macro lenses. Proper lighting techniques and understanding of shutter speed and motion blur are crucial for capturing sharp images.
DSLR vs. mirrorless cameras: which one is better for macro photography?
When it comes to macro photography, both DSLR and mirrorless cameras have their own advantages and disadvantages. Choosing the right camera for macro photography depends on several factors, including the level of control you want over your settings, the size and weight of the camera, and the specific features you need for your macro photography.
DSLR Cameras
DSLR (Digital Single-Lens Reflex) cameras are known for their optical viewfinders, which provide a more accurate representation of the image that will be captured. This can be particularly useful when composing macro shots, as it allows you to see exactly what the lens is seeing. DSLRs also tend to have larger sensors, which can result in better image quality and lower noise levels in low-light situations. Additionally, many DSLRs have built-in flash units, which can be useful for providing additional light when shooting macro shots.
Mirrorless Cameras
Mirrorless cameras, on the other hand, do not have an optical viewfinder. Instead, they use an electronic viewfinder (EVF) or the rear screen to preview the image. While some photographers may find this less intuitive, mirrorless cameras are generally lighter and more compact than DSLRs, making them easier to handle when shooting macro shots. Additionally, many mirrorless cameras have higher resolution sensors, which can result in even greater detail in your macro shots. Mirrorless cameras also tend to have better autofocus systems, which can be helpful when trying to keep a small subject in focus.
Comparing DSLR and Mirrorless Cameras for Macro Photography
Ultimately, the choice between a DSLR and a mirrorless camera for macro photography comes down to personal preference and the specific needs of your shooting style. DSLRs tend to be better for photographers who want more control over their settings and prefer an optical viewfinder, while mirrorless cameras are often favored by those who prioritize portability and higher resolution sensors. It’s worth noting that many modern cameras offer features from both categories, so it’s possible to find a camera that meets your specific needs, regardless of whether it’s a DSLR or a mirrorless camera.
Camera brands to consider for macro photography
When it comes to macro photography, choosing the right camera is crucial to achieving the desired results. There are several camera brands that are known for their exceptional performance in macro photography. Some of the top brands to consider include:
- Canon
- Nikon
- Sony
- Olympus
- Panasonic
Each of these brands offers a range of cameras that are well-suited for macro photography, with features such as high resolution, fast autofocus, and image stabilization. It’s important to research and compare the different models within each brand to find the one that best meets your needs and budget.
Budget-friendly options for macro photography cameras
If you’re just starting out with macro photography or on a tight budget, there are several camera options that can still produce stunning results. Here are some budget-friendly options to consider:
Nikon D5600
The Nikon D5600 is a beginner-friendly DSLR camera that offers excellent image quality and versatility for macro photography. It has a 24.1 MP APS-C sensor, which captures fine details and vibrant colors. Additionally, it features a built-in flash and supports external flash units, allowing you to illuminate your subjects effectively.
Canon EOS Rebel T6
The Canon EOS Rebel T6 is another popular budget-friendly DSLR camera suitable for macro photography. It has an 18 MP APS-C sensor that delivers sharp and detailed images. The camera also features a vari-angle touchscreen LCD monitor, making it easy to compose your shots from different angles. The Canon EOS Rebel T6 is compatible with a wide range of lenses, including macro lenses, providing you with plenty of creative options.
Sony Alpha a6400
The Sony Alpha a6400 is a mirrorless camera that offers excellent value for money. It features a 24.2 MP APS-C sensor that captures stunning details and colors. The camera is compact and lightweight, making it easy to carry around, and it has a tiltable touchscreen LCD monitor for composing your shots from different angles. The Sony Alpha a6400 is also compatible with a wide range of lenses, including macro lenses, providing you with ample opportunities to experiment with different creative options.
These budget-friendly options offer impressive image quality and features, making them ideal for those who want to get started with macro photography without breaking the bank. With these cameras, you can capture stunning close-up shots of insects, flowers, and other small subjects, and learn the basics of macro photography techniques.
Features to look for in a macro photography camera
When it comes to macro photography, having the right camera equipment is crucial. The camera you choose will greatly impact the quality of your images, so it’s important to select one that meets your needs. Here are some features to look for in a macro photography camera:
- Resolution: A higher resolution is always better for macro photography, as it allows you to capture more detail in your images. Look for a camera with at least 16 megapixels, but 24 or 36 megapixels is even better.
- Image Stabilization: Macro photography often involves shooting at very slow shutter speeds, which can lead to blurry images. Look for a camera with built-in image stabilization to help keep your shots sharp.
- Focus Control: Macro photography requires precise focus, so look for a camera with a fast and accurate autofocus system. Manual focus is also an option, but it requires more skill and patience.
- Macro Mode: Some cameras have a dedicated macro mode, which allows you to focus very closely on your subject. This is especially useful for shooting small objects or insects.
- Live View and Remote Control: Macro photography often requires precise adjustments to settings like aperture, shutter speed, and focus. A camera with live view and remote control options can make it easier to make these adjustments and capture the perfect shot.
- Optical Viewfinder: Optical viewfinders provide a brighter and more accurate view of your subject than electronic viewfinders or LCD screens. This can be especially useful when shooting in bright light or trying to compose an image with small details.
- Low-Light Performance: Macro photography often involves shooting in low-light conditions, such as in a dark room or outside at dusk. Look for a camera with good low-light performance, such as high ISO sensitivity and fast lenses.
- Weight and Size: Macro photography often requires you to get very close to your subject, which can be difficult with a heavy and bulky camera. Look for a camera that is lightweight and easy to handle, especially if you plan to shoot handheld.
Overall, the camera you choose will depend on your specific needs and preferences. Consider the features listed above and how they fit into your workflow and shooting style. With the right camera equipment, you’ll be well on your way to capturing stunning macro photographs.
Recommended camera models for macro photography
When it comes to macro photography, choosing the right camera is crucial. While many cameras can capture decent images, some models are specifically designed to cater to the needs of macro photographers. Here are some recommended camera models for macro photography:
- Canon EOS 5D Mark IV: This camera model is known for its exceptional image quality and advanced autofocus system, making it a popular choice among macro photographers. It features a full-frame sensor and can shoot up to 30.4 megapixels, ensuring that every detail of your subject is captured in stunning detail.
- Nikon D850: The Nikon D850 is another popular camera model for macro photography. It boasts a 45.7-megapixel full-frame sensor and a fast autofocus system, making it easy to capture sharp and detailed images of even the smallest subjects. Additionally, its tilting touchscreen display and built-in flash make it a versatile option for a range of shooting scenarios.
- Sony Alpha a7R III: The Sony Alpha a7R III is a high-end camera model that offers excellent image quality and advanced features for macro photography. It features a 42.2-megapixel full-frame sensor, real-time Eye AF, and fast autofocus, making it easy to capture stunning images of even the smallest subjects. Additionally, its 4K video capabilities and 10fps continuous shooting make it a versatile option for a range of shooting scenarios.
- Fujifilm X-T4: For photographers who prefer a mirrorless camera, the Fujifilm X-T4 is an excellent option for macro photography. It features a 26.1-megapixel APS-C sensor, fast autofocus, and 4K video capabilities, making it a versatile and powerful tool for capturing stunning macro images. Additionally, its compact size and lightweight design make it easy to transport and use in a range of shooting scenarios.
Overall, when choosing a camera for macro photography, it’s important to consider factors such as sensor size, autofocus system, image quality, and overall versatility. By choosing a camera that meets your specific needs and preferences, you’ll be well on your way to capturing stunning macro images that showcase the beauty and intricacy of your subjects.
Accessories for your macro photography camera
While choosing the right camera is crucial for macro photography, it is equally important to have the right accessories to make the most out of your camera. Here are some essential accessories that you will need for macro photography:
- Tripod: A tripod is essential for keeping your camera steady and ensuring that your shots are in focus. It also allows you to use longer exposures without the risk of camera shake.
- Remote shutter release: A remote shutter release allows you to take pictures without touching the camera, which is especially useful when using a tripod. It eliminates the risk of camera shake and ensures that your shots are sharp.
- Lenses: Macro photography requires a lens with a high magnification ratio, which means that the subject appears larger in the image. There are several lenses available in the market that are specifically designed for macro photography, such as the Canon MP-E 65mm f/2.8 1-5x Macro Photo lens and the Nikon 105mm f/2.8 Macro lens.
- Macro ring flash: A macro ring flash is a specialized flash that is designed to provide even lighting for close-up shots. It is particularly useful when shooting in low light conditions or when shooting transparent or reflective objects.
- Extension tubes: Extension tubes are a cost-effective way to achieve macro-like results without purchasing a dedicated macro lens. They work by moving the lens further away from the camera sensor, allowing you to get closer to your subject.
- Focus stacking software: Focus stacking software allows you to combine multiple images to create a single image with a greater depth of field. This is particularly useful when shooting objects with a lot of detail, such as insects or flowers.
These are just a few of the essential accessories that you will need for macro photography. Investing in good quality accessories will not only improve the quality of your shots but also make your photography experience more enjoyable.
Tips for using a camera for macro photography
- Familiarize yourself with your camera’s features and settings. This will allow you to adjust settings quickly and confidently when you’re shooting close-ups.
- Use a tripod to keep your camera steady and avoid camera shake, which can ruin your macro shots.
- Consider using a remote shutter release or the camera’s self-timer to avoid touching the camera and causing vibrations while taking a shot.
- Shoot in manual mode to have full control over your camera’s settings, such as aperture, shutter speed, and ISO.
- Use live view mode to better see your subject and the playback on the camera’s screen.
- Choose a camera with a high-resolution sensor and a shallow depth of field for better macro shots.
- Look for a camera with a fast autofocus system to quickly and accurately focus on your subject.
- Use a camera with built-in image stabilization to avoid camera shake, especially when shooting handheld.
- Consider using a macro lens or a lens with a focus stacking feature to achieve even greater magnification and sharpness.
Taking Amazing Macro Photos
Composition tips for macro photography
Macro photography is all about capturing the intricate details of your subject, and composition plays a crucial role in achieving this goal. Here are some tips to help you compose your shots like a pro:
- Focus on the subject: When shooting macro, it’s essential to have a clear focus on your subject. Use the autofocus function to lock onto your subject and ensure that it’s sharp and in focus.
- Use leading lines: Leading lines are a composition technique that involves using lines in your shot to lead the viewer’s eye to the subject. Look for interesting lines in your environment, such as branches, lines on a wall, or even cracks in the ground, and use them to draw the viewer’s eye to your subject.
- Consider the background: In macro photography, the background can make or break your shot. Look for interesting and unique backgrounds that complement your subject and add depth to your shot. Try to find a location with a plain and simple background to ensure that your subject stands out.
- Play with depth of field: Macro photography allows you to play with depth of field, which is the area of the shot that’s in focus. Experiment with different aperture settings to create images with a shallow depth of field, which can add a sense of depth and dimensionality to your shots.
- Use lighting to your advantage: Lighting is crucial in macro photography, as it can help bring out the details and textures of your subject. Look for interesting lighting conditions, such as backlighting or sidelighting, to add interest and depth to your shots. You can also use external flashes or reflectors to add light to your subject and create more contrast in your images.
By following these composition tips, you’ll be well on your way to capturing amazing macro photos that showcase the intricate details and beauty of your subject.
Lighting techniques for macro photography
Lighting is a crucial element in macro photography as it can significantly affect the overall quality of your shots. Proper lighting can help you highlight the intricate details of your subject, while also adding depth and dimension to your images. Here are some lighting techniques for macro photography that you can use to create stunning images:
- Natural Lighting: Using natural light is a popular choice among macro photographers. You can place your subject near a window or outside to capture the best light. The early morning or late afternoon light is often considered the best for macro photography as it is soft and diffused, which helps to create a natural and delicate look.
- Artificial Lighting: If you’re shooting indoors or during the middle of the day, you may need to use artificial lighting. There are several options available, including flash, ring lights, and LED panels. Ring lights are particularly popular among macro photographers as they provide even and consistent lighting, which is ideal for bringing out the details of your subject.
- Multiple Light Sources: Using multiple light sources can help to create more complex and interesting lighting effects. You can use a combination of natural and artificial light, or multiple artificial light sources, to create shadows and highlights that add depth and dimension to your images.
- Experiment with Shadows: Shadows can be used to create interesting textures and patterns in your images. Try positioning your subject in a way that creates interesting shadows, or use multiple light sources to create more complex shadows.
- Background Lighting: The lighting of your background can also affect the overall look of your macro photos. Try to position your subject in a way that creates a clean and simple background, or use a separate light source to highlight the background and create more depth and interest.
Overall, lighting is a critical aspect of macro photography, and experimenting with different techniques can help you achieve stunning results.
Focus and depth of field in macro photography
In macro photography, the ability to control focus and depth of field is crucial to achieving stunning results. Here’s what you need to know:
- Understanding depth of field: Depth of field refers to the area in a photo that appears in focus, from the nearest point to the farthest point. In macro photography, you typically want a shallow depth of field to isolate your subject and create a more dramatic effect. This can be achieved by using a small aperture (high f-stop number) and getting close to your subject.
- Manual focus mode: Because depth of field is so critical in macro photography, it’s essential to have full manual control over your camera’s focus. Most DSLRs and mirrorless cameras offer manual focus modes, which allow you to adjust the focus ring on your lens to precisely focus on your subject. Some cameras also offer a “focus peaking” feature, which highlights the edges of the image that are in focus, making it easier to fine-tune your focus.
- Focus stacking: Another technique used in macro photography is focus stacking, which involves taking multiple shots of your subject at different focus points and then combining them in post-processing to create an image with a wider depth of field. This technique can be especially useful when photographing subjects with a lot of detail, such as flowers or insects.
- Live view and focus magnification: Many cameras also offer live view mode, which allows you to preview the image on the LCD screen while you adjust your focus. This can be especially helpful when using a tripod or other stabilizing device, as it allows you to accurately focus on your subject without having to look through the viewfinder. Some cameras also offer focus magnification, which zooms in on the subject to make it easier to fine-tune your focus.
By mastering focus and depth of field in macro photography, you’ll be well on your way to capturing stunning images that showcase the beauty and intricacy of your subjects.
Shutter speed and motion blur in macro photography
Macro photography often involves capturing images of small subjects that can move quickly, such as insects or other small creatures. One of the biggest challenges in macro photography is controlling the motion of your subject, as even a small movement can result in a blurry image. Shutter speed plays a crucial role in controlling motion blur in macro photography.
Slow shutter speed
When shooting macro photography, a slower shutter speed is often required to capture the details of your subject. A slower shutter speed allows more light to enter the camera, which can help to create a sharper image. However, it also means that the camera’s shutter is open for a longer period of time, which can result in motion blur if your subject moves during the exposure.
Fast shutter speed
On the other hand, a faster shutter speed can help to freeze the motion of your subject. This is particularly important when photographing fast-moving subjects, such as insects or small animals. A faster shutter speed can help to capture the subject in sharp detail, without any motion blur.
Balancing shutter speed and motion blur
Finding the right balance between shutter speed and motion blur can be challenging in macro photography. In some cases, a slight amount of motion blur can add interest to the image and create a sense of movement. However, too much motion blur can make the image appear blurry and out of focus.
Using a tripod
One way to control motion blur in macro photography is to use a tripod. A tripod can help to keep the camera stable and ensure that the subject stays in focus. It can also help to prevent camera shake, which can result in a blurry image.
Aperture and depth of field
Aperture and depth of field can also play a role in controlling motion blur in macro photography. A wider aperture can help to create a shallower depth of field, which can help to isolate the subject from the background. However, it can also result in a shorter exposure time, which can increase the risk of motion blur.
In conclusion, shutter speed and motion blur are important considerations in macro photography. A slower shutter speed can help to capture more detail, while a faster shutter speed can help to freeze the motion of your subject. Finding the right balance between the two can be challenging, but using a tripod and considering aperture and depth of field can help to create stunning macro photographs.
Experimenting with different angles and perspectives in macro photography
Experimenting with different angles and perspectives is an essential aspect of macro photography. By doing so, photographers can capture unique and creative images that showcase the subject’s intricate details from different viewpoints. Here are some tips to help you experiment with angles and perspectives in macro photography:
- Use a tripod: Using a tripod is essential when experimenting with different angles and perspectives in macro photography. It helps to keep the camera stable and ensures that the image is sharp and in focus.
- Try different angles: Experiment with different angles when shooting your subject. You can shoot from above, below, or at eye level. Each angle can create a different perspective and add depth to your image.
- Shoot at different times of day: The time of day can also affect the lighting and mood of your image. Try shooting at different times of day to see how the light changes and how it affects your image.
- Experiment with shadows: Shadows can add depth and interest to your image. Experiment with different lighting setups to see how the shadows affect the image.
- Try different backgrounds: The background can also affect the overall look of your image. Experiment with different backgrounds, such as leaves, rocks, or fabric, to see how they affect the image.
- Get close up: Get as close as possible to your subject, while still maintaining focus. This will help to highlight the intricate details of the subject and create a more dramatic image.
By experimenting with different angles and perspectives, you can create unique and creative macro images that showcase the subject’s intricate details from different viewpoints. Remember to use a tripod, try different angles, shoot at different times of day, experiment with shadows, try different backgrounds, and get as close as possible to your subject.
Editing Your Macro Photography Shots
Choosing the right editing software for macro photography
Selecting the right editing software is crucial to achieve the desired results in macro photography. With numerous options available, it can be overwhelming to decide which one to use. Here are some factors to consider when choosing the right editing software for macro photography:
- Compatibility with your camera’s raw format: Ensure that the software you choose is compatible with the raw format of your camera. This will allow you to work with the unprocessed data from your camera, providing more flexibility in editing.
- Ease of use: The software should be user-friendly and easy to navigate, even for beginners. Look for features such as a simple interface, intuitive controls, and comprehensive tutorials to help you get started.
- Feature set: Consider the features offered by the software, such as color correction, noise reduction, sharpening, and retouching tools. Macro photography often requires precise adjustments, so a robust set of tools is essential.
- Compatibility with other software: If you already use other software for your photography workflow, ensure that the editing software you choose can import and export files in compatible formats.
- Price: Determine your budget and look for software that fits within it. Some options may offer free trials or student discounts to help you get started.
Some popular editing software options for macro photography include Adobe Lightroom, Capture One, and Luminar AI. Each has its own strengths and weaknesses, so it’s essential to research and compare them based on your specific needs and preferences.
Basic editing techniques for macro photography
When it comes to editing your macro photography shots, there are a few basic techniques that you can use to enhance the look of your images. Here are some tips to keep in mind:
- Adjust the exposure: One of the first things you should do when editing your macro photography shots is to adjust the exposure. This will help ensure that your images look bright and vibrant, without being overexposed or underexposed.
- Boost the contrast: Another simple technique you can use is to boost the contrast of your images. This will help to bring out the details and make your images look more dynamic.
- Adjust the color balance: Macro photography often involves shooting close-up shots of plants, insects, and other small objects. To make these shots look their best, you may need to adjust the color balance of your images. This can help to bring out the natural colors of your subjects and make them look more vibrant.
- Sharpen the image: Macro photography often results in very sharp images, but you can still use editing software to enhance the sharpness of your images even further. This can help to make your images look crisp and clear, and draw attention to the details of your subjects.
- Add a vignette: Finally, you can use a vignette effect to add a bit of drama to your macro photography shots. This can help to draw attention to the center of the image and create a sense of depth and dimension.
By using these basic editing techniques, you can take your macro photography shots to the next level and create stunning images that really stand out.
Advanced editing techniques for macro photography
In addition to capturing the perfect shot with the right camera equipment, editing your macro photography shots can take them to the next level. Here are some advanced editing techniques to consider:
- Adjusting Colors and White Balance
One of the most important aspects of editing macro photography shots is adjusting the colors and white balance. This is because the colors and tones in a macro shot can often appear unnatural or washed out. By adjusting the colors and white balance, you can bring out the richness and depth of your subject. - Cropping and Composition
Another key aspect of editing macro photography shots is cropping and composition. Even if you capture the perfect shot, there may be elements in the frame that distract from the main subject. By cropping and adjusting the composition, you can draw attention to the subject and create a more visually appealing image. - Sharpening and Noise Reduction
Sharpening and noise reduction are also important editing techniques for macro photography shots. When shooting at high magnification, the image can often appear soft or blurry. By sharpening the image, you can bring out the fine details and textures. Noise reduction is also important, as shooting at high magnification can often result in noise or grain in the image. - Contrast and Exposure Adjustments
Finally, contrast and exposure adjustments can help to bring out the best in your macro photography shots. By adjusting the contrast, you can create a more dynamic image with richer colors and more depth. Exposure adjustments can also help to ensure that your subject is correctly exposed, without being too bright or too dark.
By incorporating these advanced editing techniques into your workflow, you can take your macro photography shots to the next level and create truly stunning images.
Tips for enhancing colors and details in macro photography
Enhancing the colors and details in macro photography can make a significant difference in the final output. Here are some tips to help you achieve better results in post-processing:
Adjusting White Balance
One of the first things to do when editing macro photographs is to adjust the white balance. This setting determines the color temperature of your image, and getting it right can help make your colors look more natural. Use the eyedropper tool to select a neutral tone in your image and set the white balance accordingly.
Boosting Saturation
Macro photography often captures vibrant colors, but sometimes they can appear dull in the final image. Boosting the saturation can help bring back the lost colors. However, be careful not to overdo it, as it can result in an unnatural look. Use a saturation slider or a selective color adjustment tool to target specific areas of your image.
Contrast Adjustments
Contrast adjustments can help bring out the details in your macro photographs. Increasing the contrast can help make the image look sharper and more vibrant. Use a contrast slider or a levels adjustment tool to achieve the desired results.
Sharpening Techniques
Sharpening is a crucial step in editing macro photographs, as it can help bring out the fine details in your image. Use a sharpening tool to enhance the edges and details without oversharpening, which can lead to an unnatural look. It’s essential to sharpen carefully, starting with a low radius and an increased amount before moving to higher values.
Noise Reduction
Noise can be a significant issue in macro photography, especially when shooting at high ISO settings. Use a noise reduction tool to help reduce the noise in your image while preserving the details. Apply noise reduction selectively to specific areas of your image that exhibit noise.
Fine-Tuning Exposure
Lastly, fine-tune the exposure of your macro photographs to achieve the desired look. Use exposure adjustment tools to brighten or darken specific areas of your image, or use a graduated filter to adjust the exposure across a broader area.
By following these tips, you can enhance the colors and details in your macro photographs, resulting in stunning images that showcase the beauty of the subject.
Sharing your macro photography shots with the world
Once you have captured your macro photography shots, the next step is to edit them. Editing your shots can help you to bring out the best in your images and make them look their very best. Here are some tips for editing your macro photography shots:
Adjusting the Exposure
One of the first things you should do when editing your macro photography shots is to adjust the exposure. This can help to ensure that your images look well-lit and are not too dark or too bright. There are several ways to adjust the exposure of your shots, including using the exposure slider in your photo editing software or using a tool such as the histogram to help you to see where the shadows and highlights are in your image.
Removing Unwanted Objects
Another important step in editing your macro photography shots is to remove any unwanted objects that may be in the image. This can help to make your shots look cleaner and more professional. There are several tools that you can use to remove unwanted objects from your shots, including the clone stamp tool and the healing brush tool.
Enhancing Colors
Finally, you may want to enhance the colors in your macro photography shots. This can help to make your images look more vibrant and eye-catching. There are several ways to enhance the colors in your shots, including using color adjustment sliders and applying filters such as black and white or sepia tones.
Once you have edited your macro photography shots, you may want to share them with the world. There are many different ways to do this, including posting them on social media, sharing them with friends and family, or entering them into photography competitions. Whatever you choose to do, be sure to take pride in your work and enjoy sharing your beautiful macro photography shots with others.
Recap of key points for choosing camera equipment for macro photography
When it comes to macro photography, choosing the right camera equipment is crucial to achieving the desired results. Here’s a recap of the key points to consider when selecting your camera equipment for macro photography:
- Sensor size and resolution: A larger sensor and higher resolution are preferred for macro photography as they allow for greater detail and sharpness in the final image.
- Lens selection: A dedicated macro lens with a focal length of 60mm or higher is recommended for true macro photography, with a minimum magnification ratio of 1:1. However, other lenses with close focusing capabilities can also be used for macro photography.
- Focus and focus control: Manual focus and a focus ring with distinct marks are essential for precise focusing in macro photography. A focus limiter switch or a focus stacking feature can also be helpful in certain situations.
- Image stabilization: Image stabilization is not always necessary for macro photography, but it can be helpful in certain situations, such as when shooting handheld or in low light conditions.
- Shutter speed and ISO: A fast shutter speed and low ISO are important for reducing camera shake and minimizing noise in macro photography.
- Tripod: A tripod is recommended for stable shooting and to allow for longer exposures when necessary.
- Remote shutter release: A remote shutter release can help minimize camera shake and ensure sharp images when shooting macro photography.
- Other accessories: Additional accessories, such as extension tubes, bellows, and focus rails, can be useful for achieving specific magnification ratios and working distances in macro photography.
By considering these key points, you can choose the right camera equipment for your macro photography needs and achieve stunning results.
Final thoughts on the importance of using the right equipment for macro photography
While the right camera equipment is essential for capturing stunning macro shots, it’s equally important to have the right editing tools to bring out the best in your images. Here are some final thoughts on the importance of using the right equipment for macro photography:
- Adobe Photoshop: This powerful image editing software is widely used by professional photographers to edit their macro photos. It offers a range of tools for adjusting colors, brightness, contrast, and sharpness, as well as removing unwanted elements and enhancing details.
- Capture One: This software is specifically designed for editing RAW images and offers a range of features for optimizing macro photos, including tethered shooting, color management, and advanced sharpening tools.
- Luminar AI: This software uses artificial intelligence to automate many of the editing tasks, making it an excellent choice for those who want to speed up their workflow. It offers a range of presets and tools for adjusting colors, brightness, contrast, and more.
Overall, the right camera equipment and editing tools can make a significant difference in the quality of your macro photos. By investing in the right gear and software, you can unlock your creativity and capture stunning images that showcase the beauty of the natural world.
Additional resources for improving your macro photography skills
While having the right camera equipment is crucial for macro photography, there are also other resources that can help you improve your skills. Here are some additional resources to consider:
Online tutorials and courses
There are numerous online tutorials and courses available that can help you improve your macro photography skills. Websites like Udemy, Skillshare, and Coursera offer a wide range of courses on macro photography, covering topics such as composition, lighting, and post-processing. These courses can provide you with a structured learning experience and teach you new techniques to enhance your macro photography.
Photography forums and communities
Joining photography forums and communities can be a great way to connect with other macro photographers and learn from their experiences. Websites like Reddit, Flickr, and Facebook have numerous photography groups where you can share your work, get feedback, and learn from others. These communities can also provide you with valuable tips and tricks for improving your macro photography skills.
Macro photography workshops and meetups
Attending macro photography workshops and meetups can be a great way to learn from experienced photographers and network with other macro enthusiasts. Many photography schools, camera clubs, and organizations offer workshops and meetups focused on macro photography. These events can provide you with hands-on learning experiences, as well as the opportunity to learn from others and get feedback on your work.
Books and e-books
There are numerous books and e-books available on macro photography that can provide you with valuable information and techniques. Some popular books on macro photography include “The Macro Photography Handbook” by Chris Gomez, “Macro Photography: How to Shoot Great Images” by Bryan Peterson, and “The Complete Guide to Macro Photography” by Jeff Cremer. These books can provide you with a comprehensive understanding of macro photography and help you improve your skills.
In conclusion, there are numerous additional resources available to help you improve your macro photography skills. Online tutorials and courses, photography forums and communities, macro photography workshops and meetups, and books and e-books can all provide you with valuable information and techniques to enhance your macro photography.
FAQs
1. What is macro photography?
Macro photography is a type of photography that captures very small details of subjects that are often overlooked by the naked eye. In macro photography, the subject is photographed at a magnification ratio of 1:1 or greater, which means that the subject appears larger on the camera sensor or film than in real life.
2. Do I need a special camera for macro photography?
Yes, you will need a camera that is capable of focusing at very close distances and has a shallow depth of field. Many modern DSLR and mirrorless cameras have these capabilities, but some are better suited for macro photography than others. For example, cameras with electronic viewfinders and live view mode, such as the Canon EOS M50 and Nikon D5600, are great for macro photography because they allow you to focus on small details with ease.
3. Can I use a smartphone for macro photography?
It is possible to take macro photos with a smartphone, but it can be challenging to achieve the same level of detail and clarity as with a dedicated camera. Smartphones typically have fixed focus lenses that cannot be adjusted for close-up shots, which means that you will need to get very close to your subject to fill the frame. Additionally, the shallow depth of field and low light capabilities of smartphone cameras are limited, which can make it difficult to capture small details in low light conditions.
4. What lens do I need for macro photography?
Macro lenses are designed specifically for close-up photography and can capture details that are not visible to the naked eye. A good macro lens should have a magnification ratio of 1:1 or greater, which means that the subject appears larger on the camera sensor or film than in real life. Some popular macro lenses include the Canon EF-S 60mm f/2.8 Macro USM and the Nikon AF-S Micro Nikkor 60mm f/2.8G ED.
5. Can I use a regular lens for macro photography?
It is possible to use a regular lens for macro photography, but the results may not be as good as with a dedicated macro lens. Regular lenses are not designed for close-up photography and may not have the same level of detail and clarity as a macro lens. Additionally, regular lenses may not have the shallow depth of field and low light capabilities needed for macro photography. If you want to try macro photography with a regular lens, look for a lens with a minimum focusing distance of around 10cm (4 inches) and a maximum aperture of f/2.8 or wider.


