Night photography is a captivating and challenging field that allows photographers to capture the beauty of the night in all its glory. With the right equipment and techniques, it’s possible to capture stunning images that showcase the magic of the night. In this article, we’ll explore the essential shots to capture in night photography, from the majesty of the city skyline to the wonder of the night sky. Whether you’re a seasoned pro or a beginner just starting out, this guide will provide you with the inspiration and guidance you need to take your night photography to the next level. So, let’s dive in and discover the art of night photography!
The Beauty of Night Photography
Capturing the Magic of Twilight
Twilight, that fleeting moment between day and night, offers a unique opportunity for night photographers to capture a dreamy, ethereal atmosphere. This transitional period, when the sun dips below the horizon but the sky is still illuminated, can create a magical ambiance that’s simply captivating. To capture the magic of twilight, consider these essential shots:
- Sunset Silhouettes: As the sun sets, silhouette people, buildings, or trees against the vibrant sky. This technique adds depth and contrast to your photographs, highlighting the beauty of the fading light.
- Long Exposures: Use a tripod and a low ISO to capture the changing colors of the sky during twilight. Experiment with longer exposures (30 seconds to several minutes) to create an otherworldly effect, capturing the ephemeral nature of this transitional period.
- Stars and Constellations: Once the sky has darkened, point your camera skyward to capture the stars and constellations. A wide-angle lens and a low ISO will help you capture the vastness of the night sky. Consider using a remote shutter release or a timer to avoid camera shake.
- Cityscapes: As twilight gives way to night, turn your attention to the cityscape. Capture the glow of streetlights, neon signs, and the warmth of home windows. Experiment with different angles and compositions to showcase the city’s unique character.
Remember, the magic of twilight is fleeting. Plan your shots in advance, scout your location during the day, and be prepared to work quickly as the light changes. With patience, persistence, and a willingness to experiment, you’ll be able to capture the enchanting beauty of twilight in your night photography.
The Allure of Starry Skies
- The night sky is a mesmerizing subject for photographers, as it offers a vast and seemingly endless canvas of stars and constellations.
- Capturing the beauty of the starry skies can be both challenging and rewarding, as it requires careful planning, composition, and technique.
- The appeal of starry skies lies in their ability to evoke a sense of wonder, mystery, and connection to the universe.
- Whether it’s the subtle glow of the Milky Way or the vibrant colors of the aurora borealis, the night sky offers a wealth of breathtaking scenes to capture.
- Night photographers often seek out locations with minimal light pollution, such as remote wilderness areas or high mountain peaks, to capture the most vivid and detailed images of the stars.
- In addition to capturing the stars themselves, night photographers may also aim to include other elements in their shots, such as landscapes, cityscapes, or even the moon, to create a sense of scale and context.
- The challenge of photographing the night sky lies in balancing the exposure of the stars with the surrounding environment, as well as managing the effects of atmospheric conditions such as humidity, temperature, and wind.
- With careful planning, patience, and attention to detail, photographers can capture stunning images of the starry skies that evoke the beauty and mystery of the night.
Planning Your Night Photography Shoot
Choosing the Right Location
Selecting the ideal location is crucial for a successful night photography session. The following factors should be considered when choosing a location:
- Light Pollution: Look for areas with minimal light pollution to capture clear and vivid night skies. Dark-sky areas such as national parks or remote locations are ideal.
- Terrain: The terrain can significantly impact your photography experience. Choose a location with a mix of flat and hilly areas to create variety in your shots.
- Scenery: Consider the scenery around the location. Look for interesting landmarks, buildings, or natural formations that can serve as a focal point in your photographs.
- Weather: The weather can significantly impact your photography experience. Choose a location with clear skies and minimal wind to ensure a smooth shooting experience.
- Accessibility: Choose a location that is easily accessible and safe to visit during nighttime hours.
By considering these factors, you can choose a location that will provide the best opportunity for capturing stunning night photographs.
Understanding Light Pollution
Light pollution is a major challenge that photographers face when shooting at night. It refers to the excessive and misdirected light that is emitted by man-made structures, such as buildings, streetlights, and billboards. This type of pollution can significantly impact the quality of your night photographs by washing out the sky, creating glare, and causing lens flares.
Here are some key points to consider when understanding light pollution:
- Light pollution can affect the clarity and quality of your night photographs.
- The level of light pollution can vary depending on the location you are shooting in.
- It is important to understand the effects of light pollution in order to plan your night photography shoot effectively.
- Taking steps to minimize the impact of light pollution, such as using a polarizing filter or shooting during the blue hour, can help to improve the quality of your night photographs.
Understanding light pollution is a crucial step in planning your night photography shoot. By taking the time to assess the level of light pollution in your location, you can make informed decisions about the best time to shoot, the best angles to use, and the best equipment to bring. By minimizing the impact of light pollution, you can capture stunning night photographs that truly showcase the beauty of the night sky.
The Importance of Time and Seasons
Night photography offers a unique set of challenges and opportunities. To make the most of your nighttime shoots, it’s important to consider the time of year and the time of night when you plan your photography outings. Here are some tips to help you get the most out of your night photography sessions:
- Seasonal Considerations: Depending on the time of year, the length of the night and the angle of the sun will vary. For example, during the summer solstice, the sun may be visible for up to 20 hours a day in some locations, while during the winter solstice, the sun may only be visible for a few hours. As a result, the lighting conditions and the available shooting opportunities will also vary.
- Weather Conditions: The weather can also have a significant impact on your night photography sessions. Clear skies and a full moon can provide ideal conditions for shooting, while rain, fog, or snow can create dramatic and moody scenes.
- Location and Time of Night: The time of night can also play a role in your shooting decisions. For example, shooting during the golden hour just after sunset can provide soft, warm light, while shooting during the blue hour just before sunrise can create a moody, dramatic effect. The location can also affect the lighting conditions, as well as the availability of subjects to photograph.
- Equipment: Lastly, it’s important to consider the equipment you’ll need for your night photography session. This may include a tripod, a remote shutter release, and a camera with manual controls to allow for long exposures and low-light shooting. Additionally, you may want to consider a wide-angle lens to capture expansive landscapes or a telephoto lens to capture details of distant subjects.
Essential Shots for Night Photography
Long Exposure Shots
Capturing the night sky is one of the most popular and challenging aspects of night photography. One of the most effective techniques for capturing the beauty of the night sky is through long exposure shots.
What is a Long Exposure Shot?
A long exposure shot is a photography technique where the camera’s shutter is left open for an extended period, allowing more light to enter the camera and capture more details in the image. This technique is particularly useful in low-light conditions, such as during the night, when the available light is limited.
Tips for Taking Long Exposure Shots at Night
- Use a tripod: Using a tripod is essential for long exposure shots, as it helps to keep the camera steady and avoid blurry images.
- Use a remote shutter release or the camera’s self-timer: This will help to minimize camera shake when pressing the shutter button.
- Set the camera’s ISO sensitivity: A higher ISO sensitivity will allow the camera to capture more light, but it may also introduce noise into the image. It’s essential to find the right balance between capturing enough light and keeping the image noise-free.
- Choose the right aperture: A wider aperture will allow more light into the camera, but it may also result in a shallower depth of field. Choose the right aperture based on the desired depth of field and the available light.
- Focus the camera manually: Focusing manually will help to ensure that the image is sharp and in focus, particularly when shooting at night when the light is limited.
- Experiment with different shutter speeds: Long exposure shots can be taken at various shutter speeds, from a few seconds to several minutes. Experiment with different shutter speeds to see what works best for the desired effect.
Examples of Long Exposure Shots at Night
- Star trails: A series of images taken over several minutes, showing the movement of the stars in the night sky.
- Light trails: A series of images taken over several minutes, showing the movement of car headlights or streetlights.
- Cityscapes: Capturing the nighttime cityscape with long exposure shots can create unique and interesting effects, such as blurred traffic and people.
By following these tips and experimenting with different techniques, photographers can capture stunning long exposure shots of the night sky and cityscapes.
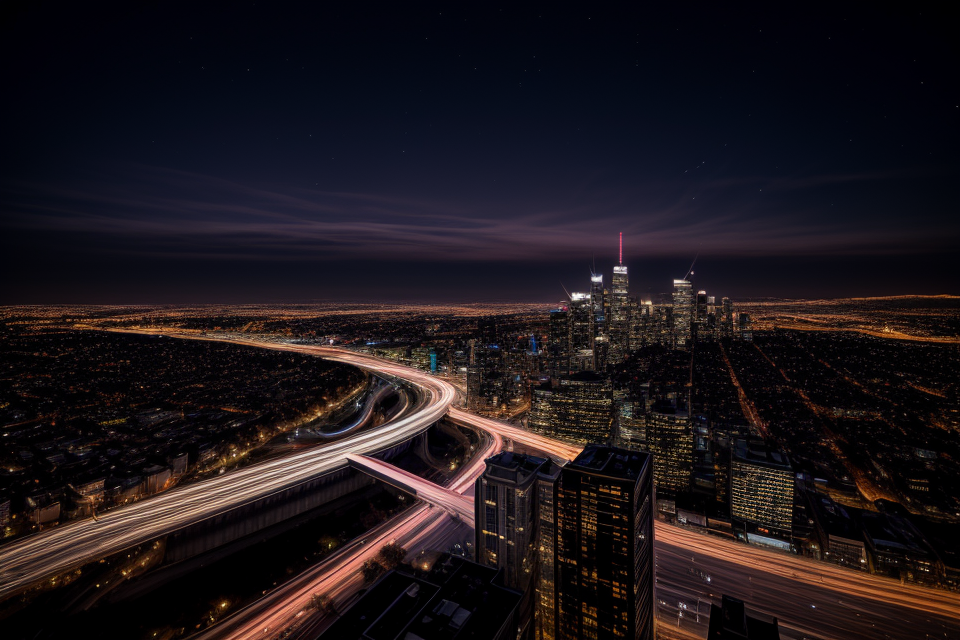
Night Cityscapes
Night cityscapes are one of the most popular types of night photography. This type of photography captures the urban landscape at night, highlighting the unique lighting and architecture of the city. Here are some essential shots to capture when photographing night cityscapes:
- Architectural Details: When photographing night cityscapes, it’s important to capture the architectural details of the buildings. This can include details such as windows, balconies, and rooftop features. These details can add interest and depth to your photographs.
- Streetlights and Neon Signs: Streetlights and neon signs are often a prominent feature of night cityscapes. They can add color and energy to your photographs, so it’s important to capture them in your shots. Consider experimenting with long exposures to create abstract, dreamy effects.
- Reflections: Reflections on wet pavement or bodies of water can add an interesting element to your night cityscape photographs. Look for reflections of buildings, streetlights, or other elements in the cityscape.
- Panning: Panning is a technique where you move the camera during a long exposure to create a blurred effect. This can be a great way to capture the movement of traffic or people in the city. Experiment with different shutter speeds and movement techniques to create unique panning effects.
- Wide Angle Perspectives: Night cityscapes are often best captured with a wide angle lens. This allows you to capture a broad view of the city and its lighting. Consider using a wide angle lens such as a 14mm or 24mm to capture sweeping views of the city.
- Composition: Composition is key when photographing night cityscapes. Consider the placement of the elements in your photograph, such as the buildings, streetlights, and other features. Experiment with different angles and perspectives to create unique and compelling compositions.
By capturing these essential shots, you can create stunning night cityscape photographs that showcase the unique beauty of the urban landscape at night.
Astrophotography
Astrophotography is a unique and fascinating area of night photography that involves capturing images of celestial objects, such as stars, planets, and nebulas. This type of photography requires specialized equipment and techniques to capture the vastness and beauty of the night sky.
One of the most important considerations when shooting astrophotography is choosing the right location. Ideally, you want to find a location with minimal light pollution, which can be difficult in urban areas. You can use online resources like Stellarium or Sky-Skan to find dark sky locations near you.
Another essential consideration is the camera equipment. For astrophotography, you’ll need a camera with manual controls and a low ISO setting to capture the most detail in the sky. A tripod is also crucial to keep the camera steady during long exposures.
When shooting astrophotography, it’s important to use a remote shutter release or a camera with a built-in intervalometer to avoid any camera shake from pressing the shutter button. Long exposures are also necessary to capture the faint light of celestial objects. A typical exposure time for shooting stars can range from 15 seconds to several minutes, depending on the brightness of the stars and the camera settings.
Finally, post-processing is an essential step in astrophotography. You’ll need to adjust the brightness, contrast, and color balance of the image to bring out the details of the night sky. You can also use specialized software like Adobe Lightroom or Photoshop to remove light pollution and enhance the details of the stars.
In summary, astrophotography is a challenging but rewarding area of night photography that requires careful planning, specialized equipment, and post-processing skills. With patience and practice, you can capture stunning images of the night sky that showcase the beauty and wonder of our universe.
Tips for Long Exposure Shots
When it comes to night photography, long exposure shots are a must-try. Here are some tips to keep in mind when capturing these types of shots:
- Use a tripod: To ensure that your camera remains still during the long exposure, it’s important to use a tripod. This will help prevent any blur or shake in your shots.
- Use a remote shutter release or the camera’s self-timer: To avoid any camera shake when pressing the shutter button, it’s best to use a remote shutter release or the camera’s self-timer. This will help reduce the risk of any blur or shake in your shots.
- Experiment with different shutter speeds: To achieve different effects, experiment with different shutter speeds. A slower shutter speed will capture more light and result in a brighter image, while a faster shutter speed will capture less light and result in a darker image.
- Consider the moon: If there is a full moon, take advantage of it by using it as a light source in your shots. This can help illuminate the scene and create some interesting effects.
- Experiment with different ISO settings: Depending on the amount of light available, you may need to adjust your ISO setting to ensure that you’re capturing enough light. However, be careful not to increase the ISO too much, as this can result in noise in your images.
- Consider the location: When choosing a location for your long exposure shots, consider the surroundings and any potential distractions. Look for a location with minimal light pollution and no distracting movements.
By following these tips, you’ll be well on your way to capturing stunning long exposure shots at night.
Tips for Night Cityscapes
When it comes to night photography, capturing the essence of a city at night can be both challenging and rewarding. To help you capture the best night cityscapes, here are some essential tips to keep in mind:
- Choose the Right Location: Look for a location that offers a good view of the city skyline or a specific landmark that can serve as the focal point of your shot. Consider the lighting conditions, too, as some areas may be brighter than others.
- Experiment with Different Angles: Don’t be afraid to experiment with different angles and perspectives. You can shoot from ground level, use an elevated position, or even capture the city from a distance. The key is to find an angle that showcases the city’s architecture and lights in the most interesting way possible.
- Utilize Light Trails: Cars, bicycles, and even pedestrians can create interesting light trails that can add visual interest to your night cityscape shots. Experiment with different shutter speeds to capture different types of light trails.
- Bracket Your Shots: To ensure that you capture the best exposure, bracket your shots by taking multiple shots at different exposure settings. This will give you more options to choose from during post-processing.
- Incorporate People and Movement: Adding people or moving vehicles to your night cityscape shots can create a sense of scale and activity. Experiment with using a long exposure to capture the movement of people and vehicles as blurred lines or streaks of light.
- Post-Processing: Lastly, don’t forget to enhance your night cityscape shots during post-processing. Adjust the exposure, contrast, and colors to bring out the best in your images.
By following these essential tips, you’ll be well on your way to capturing stunning night cityscapes that showcase the beauty and energy of urban life after dark.
Tips for Astrophotography
Capturing the beauty of the night sky is an essential part of night photography. Here are some tips for astrophotography to help you capture stunning shots of the stars and other celestial bodies.
Finding the Right Location
To capture stunning astrophotography shots, you need to find the right location. Look for places with minimal light pollution, such as remote wilderness areas or high mountains. Use tools like the Sky-Skan Light Pollution Map to find the best locations.
Shooting during the Right Time
The best time for astrophotography is during the winter months when the sky is clear and the air is crisp. The best time to shoot is during the hours between dusk and dawn, when the stars are most visible.
Choosing the Right Equipment
Astrophotography requires specialized equipment to capture the beauty of the night sky. You’ll need a camera with a full-frame sensor, a wide-angle lens, and a tripod to keep the camera steady during long exposures. Consider investing in a specialized astrophotography lens like the Canon EF 16-35mm f/2.8L III USM or the Nikon AF-S Nikkor 14-24mm f/2.8G ED.
Setting the Camera Settings
To capture stunning astrophotography shots, you’ll need to set your camera settings correctly. Use a low ISO, a long exposure time, and a wide aperture to capture the most detail in the night sky. Consider using a star tracker app to help you set the correct exposure time.
Editing Your Photos
Finally, you’ll need to edit your photos to bring out the beauty of the night sky. Use tools like Adobe Lightroom or Nik Collection to adjust the brightness, contrast, and color of your photos. Add a star trails effect or add a milky way overlay to create stunning astrophotography shots.
Editing Your Night Photography Shots
Basic Editing Techniques
When it comes to editing your night photography shots, there are several basic techniques that you can use to enhance the quality of your images. Here are some of the most essential editing techniques to consider:
- Adjusting Exposure: One of the most important aspects of editing night photography shots is adjusting the exposure. This can help to bring out the details in the shadows and highlights, creating a more balanced and well-lit image.
- Adjusting Contrast: Another key technique for editing night photography shots is adjusting the contrast. This can help to make the image look more vibrant and dynamic, while also improving the overall clarity and sharpness.
- Enhancing Colors: Depending on the scene you are photographing, you may want to enhance the colors in your night photography shots. This can be done by adjusting the saturation and hue of the image, helping to bring out the rich colors and textures in the scene.
- Removing Noise: One of the challenges of night photography is dealing with noise in the image. You can use noise reduction tools to help remove this noise, creating a smoother and more professional-looking image.
- Adding Filters: Finally, you can use filters to add extra depth and interest to your night photography shots. This can include adding a vintage or black and white filter, or experimenting with different color filters to enhance the colors in the image.
By using these basic editing techniques, you can help to enhance the quality of your night photography shots, creating images that are both stunning and professional-looking.
Enhancing Night Scenes
Capturing night scenes can be a challenging task, especially when shooting in low light conditions. However, with the right editing techniques, you can bring out the hidden details and enhance the overall appearance of your night photography shots. Here are some tips to help you enhance your night scenes during the editing process:
- Adjust the exposure: One of the most important aspects of editing night photography shots is adjusting the exposure. You can use tools like the histogram and curves to ensure that the shadows and highlights are correctly exposed.
- Boost the contrast: Contrast is another crucial element of night photography. By boosting the contrast, you can create a more dynamic and vibrant image. You can use tools like the contrast slider or curves to enhance the contrast.
- Increase the clarity: Clarity is essential when editing night photography shots. It helps to bring out the details and make the image appear sharper. You can use the clarity slider to adjust the amount of clarity in your image.
- Adjust the color temperature: The color temperature of your night photography shots can vary depending on the ambient light sources. You can use the white balance tool to adjust the color temperature and create a more natural-looking image.
- Add noise reduction: Noise can be a common issue when shooting at high ISO settings. You can use noise reduction tools to reduce the noise and create a smoother image.
- Apply a film or preset: Film or presets can be a great way to enhance your night photography shots. You can experiment with different film or presets to achieve a unique look and feel.
By following these tips, you can enhance your night scenes and create stunning images that showcase the beauty of night photography.
Bringing Out the Colors of the Night Sky
Capturing the colors of the night sky is a crucial aspect of night photography. The night sky is not just black, but it has various shades of blue, purple, and orange that make it visually stunning. Here are some tips for bringing out the colors of the night sky in your night photography shots:
- Use a wide-angle lens: A wide-angle lens can capture more of the night sky, which will help you to include more colors in your shot. A wide-angle lens will also help you to capture more of the foreground, which can add depth and interest to your image.
- Use a long exposure: A long exposure can help you to capture the colors of the night sky more accurately. A long exposure will allow more light to enter the camera sensor, which will help to capture the colors of the night sky more accurately. You can use a tripod to keep your camera steady during a long exposure.
- Use a low ISO: A low ISO will help you to capture more detail in the image, which will help to bring out the colors of the night sky. A low ISO will also help to reduce noise in the image, which can spoil the quality of the photograph.
- Use a polarizing filter: A polarizing filter can help to reduce glare and reflections in the image, which can help to bring out the colors of the night sky. A polarizing filter can also help to increase the saturation of the colors in the image.
- Use post-processing software: Post-processing software can help you to adjust the colors of the night sky in your image. You can use software like Adobe Lightroom or Photoshop to adjust the colors of the night sky, making it more vibrant and colorful.
By following these tips, you can bring out the colors of the night sky in your night photography shots, creating stunning images that capture the beauty of the night sky.
Equipment for Night Photography
Choosing the Right Camera
Selecting the right camera is crucial for night photography, as it greatly impacts the quality of your shots. Consider the following factors when choosing a camera for night photography:
- Sensor size: Full-frame cameras are generally better for night photography due to their larger sensors, which allow for better low-light performance. However, APS-C and micro four-thirds sensors can still produce great results, especially when paired with a fast lens.
- Low-light performance: Look for a camera with high ISO performance, as this will allow you to capture more light in low-light situations. Additionally, a camera with good dynamic range will help retain details in both bright and dark areas of your shots.
- Autofocus performance: Fast and accurate autofocus is essential for night photography, as it allows you to quickly and easily focus on your subject in low-light conditions. Look for a camera with a good AF system, such as phase-detection autofocus, for the best results.
- Image stabilization: If you’re shooting handheld, image stabilization can help reduce camera shake and produce sharper images. Look for a camera with in-body or lens-based image stabilization for the best results.
Overall, a full-frame camera with good low-light performance, fast autofocus, and image stabilization is ideal for night photography. However, other types of cameras can still produce great results with the right lenses and techniques. Ultimately, the best camera for night photography is the one that fits your budget and meets your specific needs and preferences.
Lenses for Night Photography
Choosing the right lens is crucial for capturing stunning night photographs. Different lenses offer various capabilities, so it’s important to select one that best suits your needs. Here are some popular lenses for night photography:
Wide-Angle Lenses
Wide-angle lenses, typically ranging from 14mm to 35mm, are ideal for capturing expansive cityscapes or landscapes at night. These lenses allow you to fit a large portion of your scene into a single shot, making them perfect for shooting night scenes with a lot of visual information. They also have a relatively fast aperture, which enables you to capture more light and keep your shutter speed up, reducing the risk of camera shake or motion blur.
Telephoto Lenses
Telephoto lenses, generally ranging from 70mm to 200mm, are excellent for capturing detailed, close-up shots of specific subjects in the distance, such as buildings or monuments. They compress the distance between the subject and the background, creating a shallow depth of field that draws attention to the main subject while softly blurring the surrounding environment. This effect can create a striking, atmospheric feel in your night photographs.
Prime Lenses
Prime lenses, typically featuring a fixed focal length, offer superior image quality and aperture performance compared to their zoom counterparts. This makes them well-suited for low-light situations, as they allow more light to enter the camera and enable you to achieve a shallower depth of field when shooting at wider apertures. Prime lenses also tend to be lighter and more compact, making them an excellent choice for night photography when you want to travel light.
Zoom Lenses
Zoom lenses offer versatility, as they allow you to adjust the focal length to fit the scene you’re trying to capture. This can be particularly useful when shooting night landscapes or cityscapes, as you can adjust the focal length to frame your scene exactly as you desire. Many zoom lenses also have a relatively fast aperture, allowing you to capture more light and maintain a faster shutter speed, which is crucial for reducing camera shake and motion blur in low-light situations.
In summary, the choice of lens for night photography depends on your specific shooting requirements. Wide-angle lenses are ideal for capturing expansive scenes, while telephoto lenses are perfect for isolating specific subjects in the distance. Prime lenses offer superior image quality and aperture performance, while zoom lenses provide versatility and flexibility. By selecting the right lens for your needs, you can capture stunning night photographs that showcase your unique artistic vision.
Other Essential Gear
Apart from the camera and lenses, there are other essential gear that one should consider for night photography. These accessories are crucial in ensuring that you get the best results possible. Some of the essential gear includes:
- Tripod: A tripod is essential for night photography because it helps to stabilize the camera and keep it steady during long exposures. This is especially important when shooting in low light conditions, as any movement can cause blur. A tripod also allows you to use slower shutter speeds, which can help to capture more light and create a brighter image.
- Remote shutter release: A remote shutter release is useful for avoiding camera shake when taking long exposures. It allows you to trigger the camera’s shutter without touching it, which can help to minimize any movement and produce sharper images.
- Wide-angle lens: A wide-angle lens is useful for capturing expansive nightscapes or cityscapes. It allows you to capture a wide field of view, which can be especially useful when shooting in low light conditions. A wide-angle lens can also help to create dramatic and striking images, with a lot of detail in the foreground and background.
- Neutral density filters: Neutral density filters are useful for shooting long exposures at night. They allow you to use a slower shutter speed while still maintaining a normal aperture and ISO setting. This can help to capture more light and create a brighter image, which can be especially useful when shooting in low light conditions.
- Headlamp or flashlight: A headlamp or flashlight is useful for navigating around at night and finding your way to the perfect shooting location. It can also be useful for setting up your tripod or camera in a dark location.
Overall, these accessories are essential for anyone looking to capture stunning night photography shots. They help to ensure that you have the right equipment to handle low light conditions and produce high-quality images.
Inspiration and Further Exploration
Finding Inspiration in Night Photography
Night photography can be a challenging yet rewarding art form, providing endless opportunities for creativity and experimentation. Whether you’re a seasoned photographer or just starting out, seeking inspiration is a crucial step in expanding your skills and developing your unique style.
One of the best ways to find inspiration in night photography is to explore the work of other photographers. Social media platforms like Instagram and 500px offer a wealth of resources, allowing you to browse through an extensive collection of night photography shots. By studying the work of other photographers, you can gain insight into various techniques, styles, and composition methods, helping you to refine your own approach to night photography.
Another way to find inspiration is to attend photography workshops, meetups, and events. These gatherings provide a platform for photographers to share their knowledge, techniques, and experiences, allowing you to learn from others and network with like-minded individuals. Attending these events can also expose you to new locations and ideas, helping you to expand your creative horizons.
Additionally, reading books and online articles on night photography can be a valuable source of inspiration. Books such as “Night Photography: Finding Your Way in the Dark” by Robin Clark and “Night Photography: From Snapshots to Great Shots” by Jim Miotke offer practical advice and technical information on how to capture stunning night photography shots. Online articles and blogs can also provide you with a wealth of information, including tips, techniques, and inspiration for capturing the perfect night shot.
Overall, finding inspiration in night photography is a crucial step in developing your skills and style. By exploring the work of other photographers, attending events, and reading books and articles, you can gain valuable insights and ideas that will help you to take your night photography to the next level.
Resources for Improving Your Night Photography Skills
If you’re looking to improve your night photography skills, there are a wealth of resources available to help you. Here are some of the best places to start:
- Online Communities: Joining online communities dedicated to night photography can be a great way to learn from other photographers and get feedback on your own work. Some popular communities include Reddit’s r/NightPhotography and Flickr’s Night Photography group.
- Photo Workshops: Attending a photo workshop can be a great way to learn new techniques and get hands-on experience with night photography. Many workshops are offered in major cities around the world, and can range from beginner-friendly to advanced.
- Online Tutorials: There are a wealth of online tutorials available that cover everything from the basics of night photography to advanced techniques. Websites like Udemy, Skillshare, and CreativeLive offer a wide range of courses on night photography.
- Books: There are many great books on night photography that can provide in-depth information on techniques, equipment, and the history of the art form. Some popular books include “Night Photography: Finding Your Way in the Dark” by Steve Biver and “Night Photography: From Snapshots to Great Shots” by Paul S. Manfield.
- Videos: Videos can be a great way to learn night photography techniques, as they often include demonstrations and step-by-step instructions. YouTube channels like COOPH and The Art of Photography offer a wealth of videos on night photography.
No matter what resource you choose, the key to improving your night photography skills is to practice, practice, practice. Experiment with different techniques, equipment, and locations, and don’t be afraid to try new things. With time and dedication, you’ll soon be capturing stunning night photos that you’ll be proud to share with the world.
FAQs
1. What is night photography?
Night photography is a type of photography that involves capturing images in low light conditions, usually after sunset or during the night. It requires special techniques and equipment to capture the available light and create stunning images.
2. What equipment do I need for night photography?
You will need a camera with manual settings, a tripod, and a sturdy surface to rest your camera on. A wide-angle lens is also recommended, as it allows you to capture more of the scene. Additionally, a remote shutter release or the camera’s self-timer can help reduce camera shake.
3. What are some essential shots to capture during night photography?
There are several essential shots to capture during night photography, including cityscapes, night skies, street scenes, and nighttime landscapes. Each of these shots requires different techniques and equipment, but all are worth exploring to create stunning images.
4. How do I choose the right settings for night photography?
The right settings for night photography will depend on the scene you are trying to capture and the available light. In general, you will want to use a slower shutter speed, a higher ISO, and a lower aperture to capture as much light as possible. You may also need to experiment with different white balance settings to get the best results.
5. How do I avoid camera shake during night photography?
To avoid camera shake during night photography, you can use a tripod and a remote shutter release or the camera’s self-timer. You can also brace your camera against a wall or other solid object to help steady it. Additionally, you can try using a higher ISO and a faster shutter speed to reduce the effects of camera shake.
6. How do I edit my night photography shots?
Editing your night photography shots can help enhance the details and colors in your images. You can adjust the exposure, contrast, and saturation to create a more vibrant and dynamic image. You can also use filters and presets to give your images a unique look. However, it’s important to be careful not to over-edit your images and to maintain a natural look.


