Are you ready to take your photography game to the next level? Look no further than the three-light technique! This essential photography lighting technique involves the strategic use of three lights to create stunning and professional-looking images. Whether you’re a beginner or an experienced photographer, mastering the three-light technique is a must-have skill in your toolkit. In this comprehensive guide, we’ll dive into the details of this powerful technique, exploring its history, benefits, and practical applications. Get ready to elevate your photography game and learn the secrets to creating stunning, professional-grade images with the three-light technique.
Understanding the Three-Light Technique
What is the Three-Light Technique?
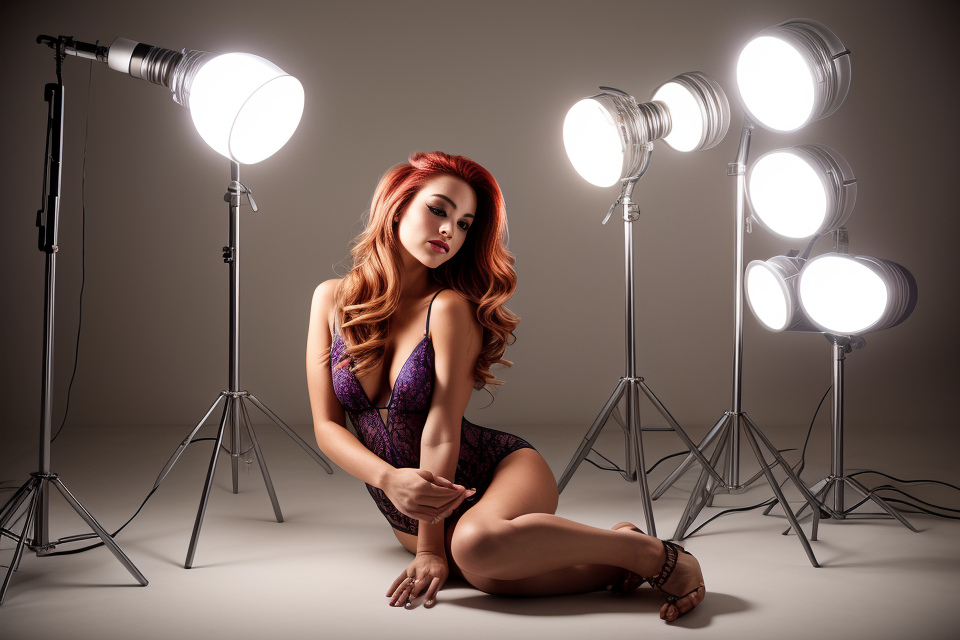
The Three-Light Technique is a fundamental concept in professional photography lighting that involves the strategic placement of three lights to create a balanced and flattering lighting setup. This technique has been used by photographers for decades and continues to be a staple in the industry due to its versatility and ability to produce high-quality results.
Definition and Explanation
The Three-Light Technique involves the use of three lights: a key light, a fill light, and a backlight. The key light is the main light source and is placed at a 45-degree angle from the subject, while the fill light is placed opposite the key light to soften shadows and add overall illumination. The backlight is placed behind the subject to create separation from the background and add depth and dimension to the image.
Historical Context and Development
The Three-Light Technique has its roots in traditional studio lighting and has been refined over time by photographers and lighting professionals. Early Hollywood film studios utilized this technique to create classic film noir lighting and it has since been adapted for use in fashion, portrait, and commercial photography. The Three-Light Technique is considered a foundational skill for photographers and is essential for achieving professional-looking results.
Why it’s Important
Mastering the Three-Light Technique is crucial for photographers looking to take their work to the next level. This technique provides a versatile and adaptable framework for lighting any subject, allowing photographers to achieve consistent and high-quality results regardless of the environment or equipment used. Understanding the principles of the Three-Light Technique also lays the groundwork for exploring more advanced lighting techniques and experimenting with different lighting styles.
Key Terms and Concepts
Primary Light Source
The primary light source is the main light that illuminates the subject and creates the overall look and mood of the photograph. It is typically the brightest light and is used to shape and define the subject’s features. The position and intensity of the primary light source can greatly affect the final image, so it is important to understand how to control and manipulate it.
Secondary Light Source
The secondary light source is used to add depth and dimension to the image by creating shadows and highlights. It is typically set up to the side or behind the subject and is used to fill in any shadows created by the primary light source. The secondary light source can also be used to create separation between the subject and the background.
Background Light Source
The background light source is used to separate the subject from the background and create a sense of depth. It is typically set up behind the subject and is used to create a subtle rim light or highlight around the edges of the subject. The intensity and placement of the background light source can greatly affect the final image, so it is important to understand how to control and manipulate it.
Ratios and Relationships
The ratios and relationships between the primary, secondary, and background light sources are important to understand when using the three-light technique. The ratios of the lights can greatly affect the final image, so it is important to understand how to balance and control them. The relationships between the lights can also greatly affect the final image, so it is important to understand how to position and manipulate them to create the desired effect.
Modifiers and Accessories
Modifiers and accessories are used to shape and control the light. They can be used to soften the light, create specific effects, or direct the light where it is needed. Some common modifiers and accessories include softboxes, umbrellas, snoots, and gels. Understanding how to use these tools can greatly enhance your ability to control and manipulate the light to create the desired effect.
Setting Up the Three-Light Technique
Equipment and Gear
When setting up the three-light technique, it is important to have the right equipment and gear to achieve the desired lighting effects. Here are some essential lighting tools and accessories that you will need:
Essential Lighting Tools and Accessories
- Studio flash lights: These are the primary light sources that will provide the base light for your subject. They are typically powerful and can be adjusted for intensity and direction.
- Softboxes: These are light-shaping tools that help to soften the light and create a more flattering effect on the subject. They come in different sizes and shapes, and can be used to create different lighting patterns.
- Reflectors: These are used to bounce light back onto the subject and fill in any shadows. They come in different colors, and can be used to add warmth or coolness to the light.
- Barndoors: These are used to control the direction of the light and create specific lighting effects. They are typically used with studio flash lights and can be adjusted to shape the light in different ways.
Recommended Brands and Models
There are many brands and models of lighting equipment and gear available on the market. Some of the most popular and highly rated include:
- Flash lights: Profoto B10, Elinchrom ELC Pro, and AlienBees B800
- Softboxes: Westcott 7ft Octagonal Softbox, Lastolite Ezybox Speed-Lite 2, and Impact 5×7 Softbox
- Reflectors: Lastolite Tripod Reflector, 65″ 5-in-1 Reflector Disc, and White Lightning 82″ Octagonal Reflector
- Barndoors: Westcott Flex Ring, Gridded Mini Softbox II, and AlienBees TTL Ring
Budget Options and Trade-offs
If you are on a budget, there are still many affordable options available for the three-light technique. However, it is important to keep in mind that cheaper equipment may not provide the same level of quality and control as more expensive options. Here are some budget-friendly options to consider:
- Flash lights: Yongnuo YN900 II, Godox X1R-C, and Neewer NW-700
- Softboxes: ULANZI 63″ Octagonal Softbox, JRL DIY 60x60cm Softbox, and Hakuba 4x6ft Softbox
- Reflectors: Lastolite Eco Reflector, Rannveig 72″ Disc Reflector, and Photography Master Reflector
- Barndoors: ST-SOFT Softbox, GAMDIFF Softbox, and E-TTL Ring
In summary, having the right equipment and gear is essential for mastering the three-light technique in professional photography. By investing in high-quality lighting tools and accessories, you can achieve the desired lighting effects and create stunning images.
Lighting Setup and Configuration
When setting up the three-light technique, there are several key elements to consider when configuring the lights. These include:
Positioning and Direction of Lights
The positioning and direction of the lights is crucial in achieving the desired lighting effect. The key light should be positioned at a 45-degree angle from the subject, while the fill light should be placed at a lower angle and to the side of the key light. The backlight should be positioned behind the subject, pointing towards the camera.
Lighting Ratios and Balance
Lighting ratios and balance are important in creating a balanced and harmonious lighting setup. The key light should be about two stops brighter than the fill light, while the backlight should be one stop brighter than the fill light. By adjusting the intensity of each light, you can achieve the desired balance and create a natural-looking image.
Background and Ambient Light Control
The background and ambient light can greatly affect the overall look of the image. To ensure a clean and professional look, it’s important to control the ambient light by using blackout curtains or other methods to eliminate distracting background elements. Additionally, you can use gels or other color-correcting tools to adjust the color of the background and create a more pleasing background.
Adjusting for Different Shooting Scenarios
Finally, it’s important to be able to adjust the lighting setup for different shooting scenarios. Whether you’re working in a studio or on location, you may encounter different lighting conditions that require adjustments to the three-light technique. By understanding the basics of lighting ratios and balance, as well as being familiar with the different tools and techniques available, you can quickly and easily adjust your lighting setup to achieve the desired effect.
Tips and Best Practices
Proper placement and angle of lights
One of the most critical aspects of the three-light technique is the proper placement and angle of the lights. Here are some tips to help you achieve the best results:
- Position your key light at a 45-degree angle from your subject, slightly above eye level, and pointing towards the subject’s nose. This will create a natural and flattering light that eliminates shadows and reduces the appearance of wrinkles.
- Place your fill light opposite the key light, at a lower angle, and pointing towards the subject’s shadow side. This will fill in any remaining shadows and create a more even light across the subject’s face.
- Position your backlight behind the subject, pointing towards the camera. This will create a rim of light around the subject’s silhouette, which can be used to create depth and contrast in the image.
Using gels and color correction
Another essential aspect of the three-light technique is using gels and color correction to balance the light and create the desired mood. Here are some tips to help you achieve the best results:
- Use gels to adjust the color temperature of your lights to match the ambient light in the room or to create a specific mood. For example, if you’re shooting in a room with warm lighting, you can use a blue gel on your key light to counteract the warmth and create a more natural look.
- Use color correction gels to balance the color of your light sources. For example, if your key light is too warm, you can use a gel with a higher blue/green content to cool it down.
Utilizing reflectors and scrims
Reflectors and scrims are essential tools for controlling the light and reducing the appearance of shadows. Here are some tips to help you achieve the best results:
- Use reflectors to bounce light back onto the subject’s face and reduce the appearance of shadows. You can use a white or silver reflector on the opposite side of the key light to fill in any remaining shadows and create a more even light across the subject’s face.
- Use scrims to diffuse the light and reduce its intensity. You can use a scrim on the fill light to reduce the amount of light hitting the shadow side of the subject’s face and create a more subtle fill light.
Lighting diagrams and visual aids
Visual aids such as lighting diagrams can be a helpful tool for planning and executing your lighting setup. Here are some tips to help you achieve the best results:
- Use lighting diagrams to plan your lighting setup before you start shooting. This will help you ensure that you have the right balance of key, fill, and backlight, and that the lights are positioned correctly.
- Use visual aids such as light meters and colorimeters to measure the light and ensure that the color balance is correct. This will help you make accurate adjustments to your lighting setup and achieve the desired look.
Common Mistakes and Pitfalls
Overpowering or Underexposing the Subject
One common mistake when setting up the three-light technique is either overpowering or underexposing the subject. Overpowering the subject occurs when the lights are too bright and wash out the subject, resulting in a loss of detail and contrast. On the other hand, underexposing the subject occurs when the lights are not bright enough, causing the subject to appear dark and underexposed.
Inconsistent Lighting Ratios
Another common pitfall is inconsistent lighting ratios. The three-light technique relies on balancing the key light, fill light, and backlight to create a well-lit scene. If the ratios between these lights are inconsistent, it can lead to uneven lighting and a lack of depth and dimension in the final image.
Improper Use of Modifiers and Accessories
Improper use of modifiers and accessories can also lead to common mistakes when setting up the three-light technique. For example, using the wrong modifier for the wrong type of light can cause the light to spread too much or too little, leading to an unevenly lit scene. Additionally, failing to use accessories such as gels or reflectors can result in a lack of control over the light and an inability to achieve the desired look.
Forgetting to Account for Ambient Light
Finally, forgetting to account for ambient light can also lead to common mistakes when setting up the three-light technique. Ambient light refers to the natural light present in the environment, and it can have a significant impact on the final image. If the ambient light is not taken into consideration, it can lead to overexposed or underexposed areas in the image, resulting in a loss of detail and contrast.
Applying the Three-Light Technique
Portrait Photography
Portrait photography is a genre that relies heavily on lighting to create the desired mood and effect. The three-light technique can be used to achieve a range of looks, from dramatic and moody to bright and airy. By manipulating the position and intensity of the lights, photographers can enhance facial features, create contours, and work with different backgrounds and environments.
Lighting for different moods and styles
The three-light technique can be used to create a variety of moods and styles in portrait photography. For example, by using a high key lighting setup, photographers can create a bright and airy look that emphasizes the subject’s features and creates a sense of openness. On the other hand, a low key lighting setup can create a dramatic and moody look, with deep shadows and a focus on the subject’s face.
Enhancing facial features and contours
The position and intensity of the lights can be used to enhance facial features and create contours. For example, by placing a key light at a 45-degree angle to the subject’s face, photographers can create shadows that add depth and dimension to the face. A fill light can be used to fill in the shadows and reduce contrast, while a backlight can be used to create separation from the background and add a halo effect to the hair.
Working with different backgrounds and environments
The three-light technique can also be used to work with different backgrounds and environments in portrait photography. By using a fill light, photographers can reduce the contrast between the subject and the background, making it easier to blend the two together. A backlight can be used to create separation between the subject and the background, while a hair light can be used to separate the hair from the background.
Overall, mastering the three-light technique is essential for any photographer looking to take their portrait photography to the next level. By understanding how to manipulate the position and intensity of the lights, photographers can create a range of looks and effects, from dramatic and moody to bright and airy.
Still Life and Product Photography
Creating depth and dimension
When it comes to still life and product photography, creating depth and dimension is crucial for making the product stand out and look appealing to the viewer. One way to achieve this is by using a key light, which is placed at a 45-degree angle to the subject and is the main light source. This light is used to create highlights and shadows that add depth and dimension to the product.
Highlighting textures and details
Another important aspect of still life and product photography is highlighting the textures and details of the product. This can be achieved by using a fill light, which is placed opposite the key light and is used to fill in the shadows and create a more even lighting effect. The fill light can also be used to highlight specific textures and details of the product.
Showcasing the product in the best light
Finally, when it comes to still life and product photography, it’s important to showcase the product in the best light possible. This can be achieved by using a backlight, which is placed behind the subject and is used to create a halo effect around the product. The backlight can also be used to highlight specific features of the product and create a more dramatic effect.
By using these three lighting techniques in combination, photographers can create stunning still life and product photographs that are sure to grab the attention of viewers and help sell their products.
Environmental and Landscape Photography
- Lighting for different times of day and weather conditions
- Choosing the right lighting for the scene, taking into account the time of day and weather conditions
- Understanding how different lighting setups can enhance or detract from the mood and atmosphere of the scene
- Enhancing the environment and atmosphere
- Using lighting to draw attention to specific elements of the scene, such as texture, color, or form
- Experimenting with different lighting angles and intensities to create mood and atmosphere
- Balancing the exposure and dynamic range
- Ensuring that the image is correctly exposed and that the highlights and shadows are not overexposed or underexposed
- Utilizing the dynamic range of the camera and/or post-processing techniques to capture the full range of tones and detail in the scene.
Tips and Techniques for Different Genres
Photography is an art form that requires creativity, skill, and technical knowledge. Lighting is one of the most important elements in photography, and mastering the three-light technique can help photographers achieve stunning results. In this section, we will discuss some tips and techniques for applying the three-light technique to different genres of photography.
Experimenting with different lighting setups
Experimenting with different lighting setups is essential to mastering the three-light technique. Photographers should try different lighting configurations and angles to achieve the desired effect. This includes adjusting the intensity, direction, and distance of the lights to create the desired mood and atmosphere.
Adjusting for camera angle and position
The camera angle and position also play a crucial role in achieving the desired effect. Photographers should experiment with different angles and positions to find the best composition. This includes adjusting the height and angle of the camera to capture the subject from the most flattering angle.
Balancing the lighting with the subject’s position
Balancing the lighting with the subject’s position is also essential to achieving the desired effect. Photographers should adjust the lighting to highlight the subject’s features and minimize shadows. This includes adjusting the intensity and direction of the lights to create a natural and flattering light.
Overall, mastering the three-light technique requires experimentation, creativity, and technical knowledge. By following these tips and techniques, photographers can achieve stunning results and create images that are both technically sound and aesthetically pleasing.
Refining Your Skills: Advanced Three-Light Techniques
Mastering Lighting Ratios and Relationships
Adjusting the ratio for different effects
- Understanding the relationship between the key light, fill light, and backlight
- How to manipulate the ratio for creative effects
- Examples of different lighting ratios and their effects on the final image
Using off-camera flash and strobes
- The benefits of using off-camera flash and strobes
- How to set up and control off-camera flash and strobes
- Tips for achieving a balanced and natural-looking lighting setup with off-camera flash and strobes
Balancing ambient and artificial light
- How to balance ambient and artificial light for different shooting scenarios
- Tips for adjusting the ratio of ambient and artificial light
- How to use the environment to your advantage when balancing ambient and artificial light
Overall, mastering lighting ratios and relationships is key to achieving professional-level lighting in your photography. By understanding the relationship between the different lights in your setup and how to manipulate that relationship, you can create a wide range of moods and effects in your images.
Experimenting with Light Shaping Tools
As you continue to refine your skills in professional photography lighting, it’s important to experiment with light shaping tools. These tools are designed to help you control and shape the light to achieve your desired effect. In this section, we’ll explore some of the most popular light shaping tools and how to use them to create stunning images.
Using Gobos, Flags, and Barndoors
Gobos, flags, and barndoors are essential light shaping tools that can help you control the direction and intensity of the light.
Gobos
Gobos, short for “go-between,” are materials that are placed between the light source and the subject to control the shape and direction of the light. Common gobos include leaves, flags, and shapes, which can be used to create interesting textures and patterns on the subject.
Flags
Flags are another type of gobo that are designed to help you control the direction of the light. They are typically made of thin material, such as fabric or foam, and can be used to block or redirect light.
Barndoors
Barndoors are a type of flag that are specifically designed for use with softboxes or octagonal softlights. They are made up of a series of leaves that can be adjusted to control the direction and shape of the light.
Creating Custom Lighting Setups
Creating custom lighting setups is another way to experiment with light shaping tools. This involves arranging multiple lights in a specific configuration to achieve a particular effect. For example, you might use a combination of hard and soft light to create a dramatic effect, or use multiple lights to create a halo effect around the subject.
Achieving Dramatic and Moody Effects
Experimenting with light shaping tools can also help you achieve dramatic and moody effects in your images. By using gobos, flags, and barndoors to control the direction and intensity of the light, you can create a range of different moods and atmospheres in your images.
In conclusion, light shaping tools are an essential part of professional photography lighting. By experimenting with these tools, you can create stunning images that stand out from the crowd.
Lighting for Video and Motion
- Continuous lighting and camera movement
- Utilizing a continuous light source, such as fluorescent or LED lights, allows for smooth and seamless camera movement during video production. This is achieved by eliminating the need to pause and change lighting setups between shots.
- Additionally, using a continuous light source enables the camera to maintain a consistent frame rate, resulting in a more professional and polished final product.
- Using multiple light sources
- When shooting video, it is often necessary to use multiple light sources to create a more dynamic and visually interesting scene. This can be achieved by strategically placing lights at different angles and distances from the subject.
- For example, a key light can be placed at a 45-degree angle to create a dramatic, high-contrast look, while a fill light can be used to soften shadows and fill in any dark areas.
- Achieving smooth and fluid transitions
- In order to create smooth and fluid transitions between shots, it is important to pay close attention to the placement and movement of lights. This can be done by gradually adjusting the position and intensity of lights to match the changing mood and tone of the scene.
- Additionally, using a combination of hard and soft lighting can help to create a sense of depth and dimension, making the final product more visually appealing and engaging.
Advanced Techniques and Special Effects
When you have mastered the basics of the three-light technique, you can start to experiment with advanced techniques and special effects to take your photography to the next level. Here are some ideas to consider:
Exploring high-speed sync and panning
High-speed sync (HSS) is a feature found in some cameras and flash units that allows you to use flash at shutter speeds faster than the X-sync speed. This is useful when you want to shoot in bright daylight or in a high-contrast scene, as it allows you to balance the exposure between the foreground and background. To use HSS, you’ll need a camera and flash that support this feature, and you’ll need to set the flash to HSS mode.
Panning is a technique where you move the camera while keeping the subject in focus. This creates a sense of motion and can add drama to your photos. To do this, set a slow shutter speed and follow your subject as they move. Make sure to use a tripod or monopod to keep the camera steady.
Light painting and long exposures
Light painting is a technique where you add light to a dark scene to create a visual effect. This can be done with a flashlight, glow sticks, or other light sources. To do this, set a long exposure and move the light source around the scene to create the desired effect.
Long exposures are also useful for capturing motion in low-light situations. Set a slower shutter speed and use a tripod to keep the camera steady. You can also use a remote shutter release to minimize camera shake.
Incorporating fire and sparks
Fire and sparks can add a dramatic element to your photos. To do this, use a flash unit with a diffuser and place it close to the fire or sparks. Use a slow shutter speed and a tripod to keep the camera steady. You can also experiment with different angles and positions to create different effects.
Overall, advanced techniques and special effects can help you create unique and striking photos. Experiment with different techniques and techniques to find what works best for you and your style.
FAQs
1. What is the three lighting technique?
The three lighting technique is a fundamental lighting technique used in professional photography. It involves using three lights to create a balanced and flattering light on a subject. The three lights are typically placed at 45-degree angles to the subject, with one light above and two lights below. This technique is commonly used in portrait photography but can also be used in other genres of photography.
2. What are the benefits of using the three lighting technique?
The three lighting technique offers several benefits for photographers. Firstly, it creates a balanced and flattering light on the subject, which can help to enhance their features and reduce the appearance of shadows. Secondly, it provides a lot of control over the lighting, allowing photographers to shape and sculpt the light to create the desired effect. Finally, it is a versatile technique that can be used in a variety of lighting situations and environments.
3. What kind of equipment do I need to use the three lighting technique?
To use the three lighting technique, you will need three light sources, such as studio lights or speedlights. You will also need a light modifier for each light, such as an umbrella or softbox, to shape and control the light. Additionally, you will need a camera and a tripod to hold the camera steady during long exposures.
4. How do I set up the three lighting technique?
Setting up the three lighting technique involves placing the three lights at 45-degree angles to the subject, with one light above and two lights below. The height and distance of the lights will depend on the size of the subject and the desired effect. Once the lights are in place, you can adjust the intensity and direction of each light to create the desired lighting effect.
5. Can I use natural light for the three lighting technique?
While the three lighting technique typically involves using artificial light sources, it is possible to use natural light for this technique. To do this, you will need to find a location with a large window or skylight and position the subject in relation to the light source. You can then use reflectors or scrims to shape and control the light.
6. How do I adjust the lighting for different skin tones?
Different skin tones require different lighting conditions to look their best. For lighter skin tones, you may want to use a slightly brighter and more direct light to avoid washing out the subject. For darker skin tones, you may want to use a slightly softer and more diffused light to bring out the depth and dimension of the subject. Experimenting with different lighting setups and positions can help you find the ideal lighting for different skin tones.
7. How can I use the three lighting technique for different types of photography?
The three lighting technique can be used in a variety of photography genres, including portrait, fashion, and product photography. In portrait photography, the technique is often used to create a flattering and professional look for the subject. In fashion photography, the technique can be used to create dramatic and creative lighting effects. In product photography, the technique can be used to highlight the details and features of the product. The key to using the three lighting technique in any genre is to experiment with different lighting setups and positions to achieve the desired effect.


